How to mount the hard drive and partition using the Linux command line
If you want to use the Linux terminal more, find out how to mount and remove your hard drive mount manually. This is a simple task to get started..
If you want to use the Linux terminal more, find out how to mount and remove your hard drive mount manually. This is a simple task to get started. Besides, if you want to get out of the traditional desktop, learning how to do this can save a lot of time searching on Google.
Fortunately, modern Linux distributions make this process easier and more intuitive than ever before.
What is the mount?
In most cases, mount refers to a process that allows the computer to access files on many different devices, such as USB or hard drives. This is because they originate from separate file systems. Mount also occurs in most Linux distributions because of the way they use multiple file systems in the form of 'partitions'.
Typically, modern Linux desktops handle this automatically. However, you should know how to do it manually if automatic execution fails or if you are stuck with a terminal and need to back up some data.
Check the available partitions
To view existing devices and their separate file systems, simply use the following command:
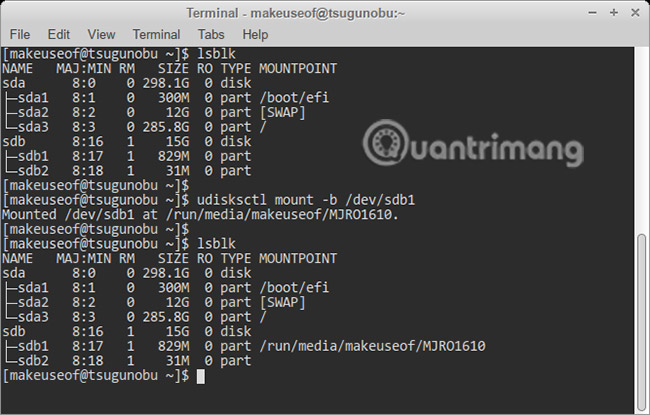
lsblk

As seen above, separate devices are divided into letters with different names, namely sda, sdb and sdc. Other hard drives follow this convention, will continue to be sdd, sde, etc. All modern hard drives and USB devices are named starting with sd (x), short for 'serial device'. On older computers, you can see that they are labeled as hda instead.
These devices are divided into different partitions. Simply put, they represent the way to divide your hard drive. Those are the specific partitions that you will mount, instead of the whole device. That's where the data is actually stored.
As a rule of thumb, Linux box is a device with multiple partitions. This is usually done to separate important and unimportant system files together, among many different files. In other words, look at the "Mountpoint" section. The entries are the Linux box that will be mounted.
Mount with Udisks
Udisks is an important part of the software used in many Linux distributions. It is responsible for managing storage devices such as USB flash memory and hard drives. With it comes a command line tool called udisksctl. In this tool, all of your partition commands will follow this pattern:
udisksctl [lệnh]
Very simple, right? To mount the desired partition, use this command, replace the last bit with the right partition:
udisksctl mount -b /dev/sd[b1, b2, etc.]
The -b parameter simply indicates that what you are mounting is from a device.
You can also mount the drive images with the Udisks, but take one more step:
udisksctl loop-setup -r -f Example.iso
udisksctl mount -b /dev/loop[0, 1, 2, etc.]

The first command allows the user to identify the image of the drive as a virtual device (or loop / loop). The -r parameter is optional, but make sure that the files you are mounting will not be accidentally overwritten by placing read-only files. After that, you can proceed as usual, and mount the existing drive image. Because the example in the article does not mount the hard drive, it is labeled as a loop, not sd (x).
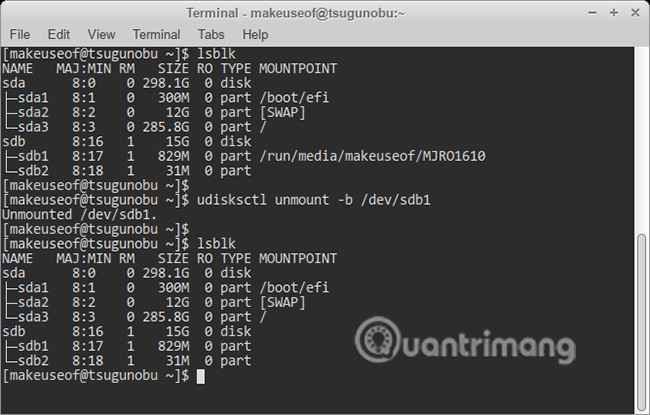
If you check your mounted partitions with the lsblk command again, you'll see a few changes.
Note how other devices with the current Linux box also have specific mount points. This means that you can now access the files on these devices by going to their designated locations.
Unmount by Udisks
When you are done with USB or any other device, you need to securely remove the device from your Linux box to avoid losing data. This is done by removing the external file system mount, separating it from your own file system.
Doing this is as simple as following (replacing mount with unmount):
udisksctl unmount -b /dev/sd[b1, b2, etc.]
Remember that virtual devices like drive images are named differently from hard drives and USB!
If you check your device using lsblk, you'll notice that your hard drive / USB drive is still present, even after you've removed it. To completely and safely delete the device, you need to enter another command:
udisksctl power-off -b /dev/sd[b, c, etc.]

Note that this does not apply to your own partitions as they are part of the system. The same thing happens with the drive's image because they are not supported in the first place - instead, you will need another command to delete them from your device list:
udisksctl loop-delete -b /dev/loop[0, 1, 2, etc.]
Traditional Mount
For most cases, Udisks will meet most users' needs. However, you should know how to do it in some other way. The main difference here is that you need to specify where you want to mount your partitions and you will not be able to turn off your device with these commands after you are done.
You will also need admin privileges to do this (that's why 'sudo' will be at the beginning of the following commands). In general, using Udisks is recommended in most cases to prevent your system from being accidentally destroyed!
To mount a partition:
sudo mount /dev/sd[b1, b2, etc.] /mnt
The last section shows where you want to put the strange file system into your Linux box. Traditionally, this is the / mnt directory . For many devices, you can mount them in the / mnt subdirectories. Just make sure to create these directories first with the mkdir command !

Like Udisks, the mount tool also supports drive images. However, keep in mind that the way it works can be a bit more cumbersome. On the positive side, compared to the Udisks method, you only need to enter a single command:
sudo mount Example.iso /mnt -t (iso9660|udf) -o loop
If the contents of the drive image are not displayed correctly, you may have to replace between 'iso9660' and 'udf' (without quotes!) - this indicates the format of the drive image.
Unmount the traditional style
Strangely, the command to mount a partition is not an unmount but umount. Keep this in mind. Unlike when performing mount operation, you do not need to specify the location of the mount point but only the device:
sudo umount /dev/sd[b1, b2, etc.]
Now you can delete your device without losing data.
For disk images, the command is a bit different:
sudo umount /dev/loop[0, 1, 2, etc.]
Future reference
If at any time you need to recall specific steps to mount or mount your device with the command line, all you need to do is enter:
udisksctl help

As seen in the image above, you can also ask for help regarding different udisksctl commands.
With these commands, you're getting a little closer to using Linux without the help of the desktop. If you want, please navigate through your newly mounted files via the terminal.
Do you know of other useful commands that Linux users should know? Let everyone know the comments in the comment section below!
See more:
- Learn the file system and folders on Linux operating systems
- Basic file system in Unix / Linux
- Basic Shell commands in Linux