How to install OnTrack software on Linux
Ontrack is a simple yet powerful self-hosted budgeting software for Linux. It works by creating a beautiful interface where you can list your budget, review your finances, and even track your spending history.
Table of Contents
Ontrack is a simple yet powerful self-hosted budgeting software for Linux. It works by creating a beautiful interface where you can list your budget, review your finances, and even track your spending history. This article shows you how to install Ontrack on Ubuntu Linux 22.04 using Docker Compose and Caddy.
Get the dependencies for Ontrack
The first step in installing Ontrack budgeting software on Linux is to download Docker and Caddy. Docker will run the entire web application in an isolated container, while Caddy will let you broadcast it to the Internet.
To get started, find the signing key for the Docker repository from the developer's website:
curl -fsSL https://download.docker.com/linux/ubuntu/gpg | sudo gpg --dearmor -o /etc/apt/keyrings/docker.gpg
sudo chmod a+r /etc/apt/keyrings/docker.gpg
Create new apt repository file for Docker:
sudo nano /etc/apt/sources.list.d/docker.listWrite the following line of code in your repository file:
deb [arch=amd64 signed-by=/etc/apt/keyrings/docker.gpg] https://download.docker.com/linux/ubuntu jammy stableDownload the signing key for the Caddy project repository:
curl -fsSL 'https://dl.cloudsmith.io/public/caddy/stable/gpg.key' | sudo gpg --dearmor -o /usr/share/keyrings/caddy-stable-archive-keyring.gpgFetch the Caddy project's repository file by running the following command:
curl -fsSL 'https://dl.cloudsmith.io/public/caddy/stable/debian.deb.txt' | sudo tee /etc/apt/sources.list.d/caddy.listApply your new repository and make sure your system is completely updated:
sudo apt update && sudo apt upgradeInstall Docker, Docker Compose and Caddy using apt:
sudo apt install docker-ce docker-ce-cli containerd.io docker-compose-plugin docker-buildx-plugin caddy gitDownload Docker containers Ontrack
Fetch the current Ontrack repository for Linux from the developer's Github page:
git clone https://github.com/inoda/ontrack.git && cd ./ontrackRun the following command 2 times to generate two random long text strings:
cat /dev/urandom | tr -dc 'A-Za-z0-9' | fold -w 32 | head -n 1 >> ~/random-pass.txt

Open Ontrack's 'docker-compose.yml' file with your favorite text editor:
nano ./docker-compose.ymlScroll to the variable 'SECRET_KEY_BASE' and change the value from 'super-secret' to your first random string.
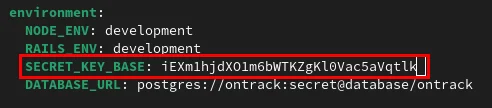
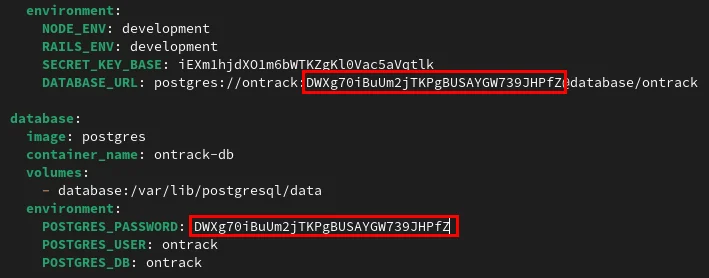
Replace the string 'secret' on the variable 'DATABASE_URL' with your second random string.

Scroll down to the 'POSTGRES_PASSWORD' variable and replace the 'secret' value with your second random string.
Updating and building Ontrack containers
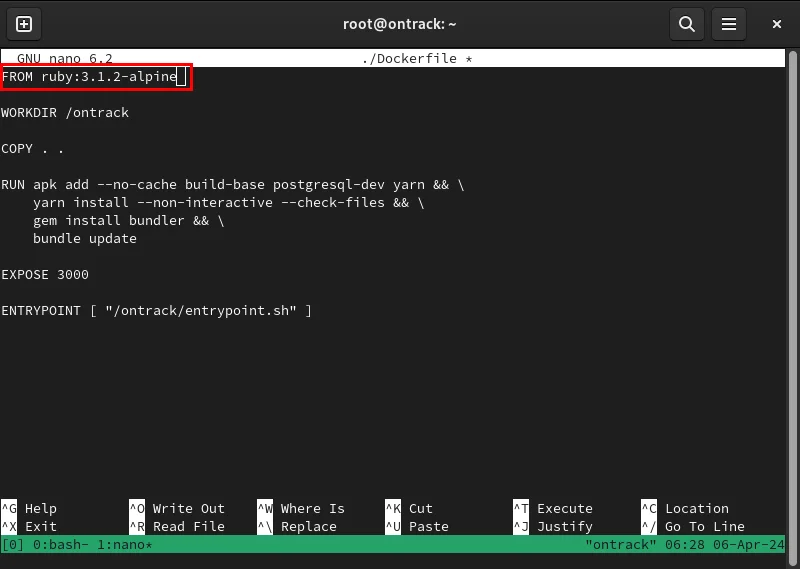
Open the Dockerfile for Ontrack using your favorite text editor:
nano ./DockerfileReplace the value of the FROM variable with the following value:
FROM ruby:3.1.2-alpine
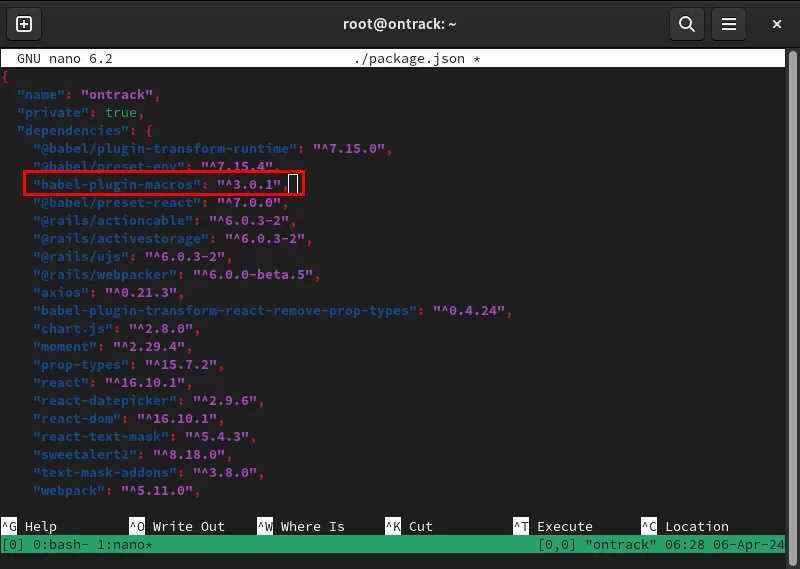
Save your modified Dockerfile, then open the 'package.json' file:
nano ./package.jsonFind the line that starts with @babel/preset-env , then insert the following code below that line:
"babel-plugin-macros": "^3.0.1",
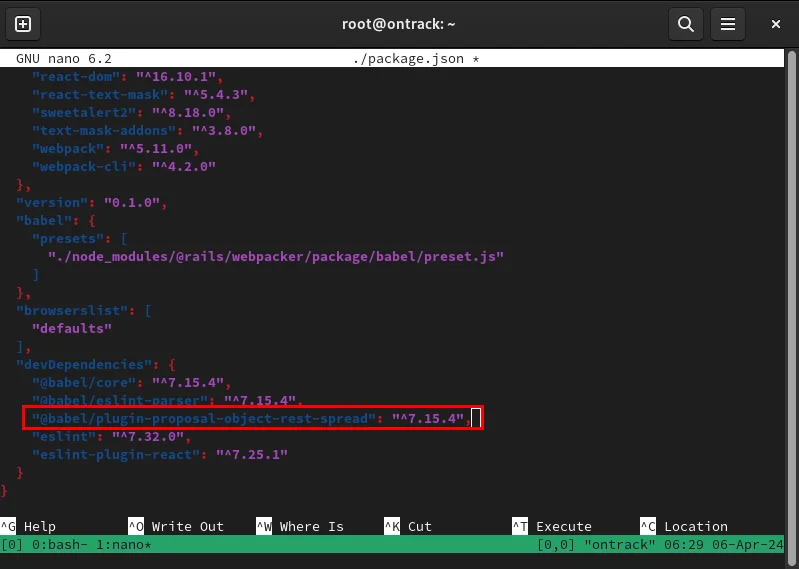
Scroll down to the 'devDependency' category , then add the following to the @babel/eslint-parser line :
"@babel/plugin-proposal-object-rest-spread": "^7.15.4",
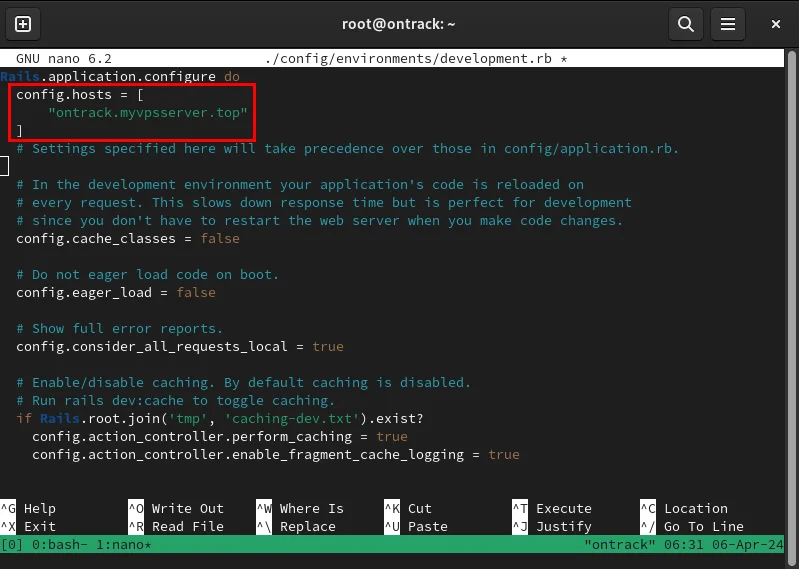
Open your instance configuration file with your favorite text editor:
nano ~/ontrack/config/environments/development.rbAdd the following line of code right below Rails.application.configure:
config.hosts = [ "SUBDOMAIN.YOUR-ROOT.DOMAIN" ]
Save your instance configuration file, then run the following command to build both its Ontrack and Postgres databases:
sudo docker compose up --detachNote : Ontrack Docker container building can take 5 to 10 minutes depending on your server resources. If your machine has less than 2GB RAM and no swap file, Docker will crash without reporting any errors on Terminal.
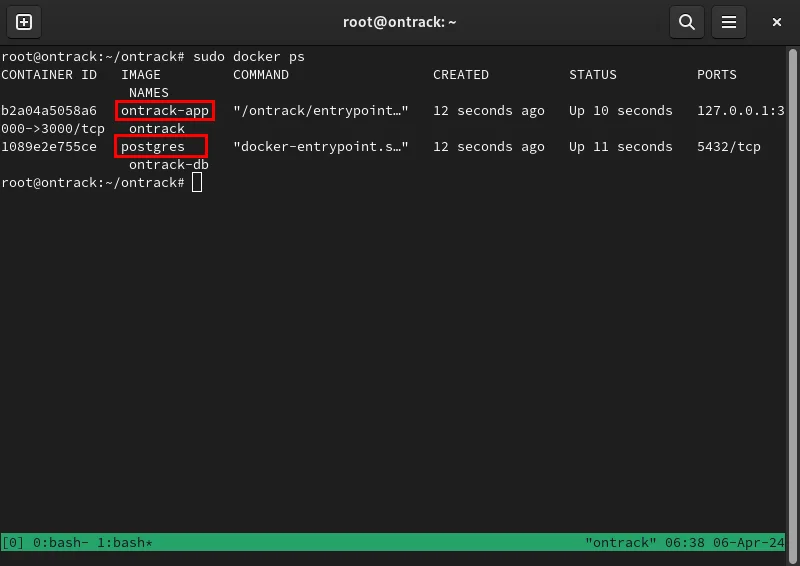
Confirm that Ontrack containers are running properly by listing all active Docker processes:
sudo docker ps
Create SSL Reverse Proxy with Caddy
At this point, you have Ontrack budgeting software running on port 3000 of your machine. To access this software securely, you need to create an SSL Reverse Proxy that encrypts the connection between you and your server.
Go to your domain's DNS manager, then add a new 'A' record for your Ontrack instance.

Backup the original Caddyfile, then create a new Caddyfile in '/etc/caddy/':
sudo mv /etc/caddy/Caddyfile ~/Caddyfile.backup sudo nano /etc/caddy/CaddyfilePaste the following block of code into your new Caddyfile:
SUBDOMAIN.YOUR-ROOT.DOMAIN { reverse_proxy :3000 }Save your new Caddyfile, then start the Caddy daemon to run your new reverse proxy:
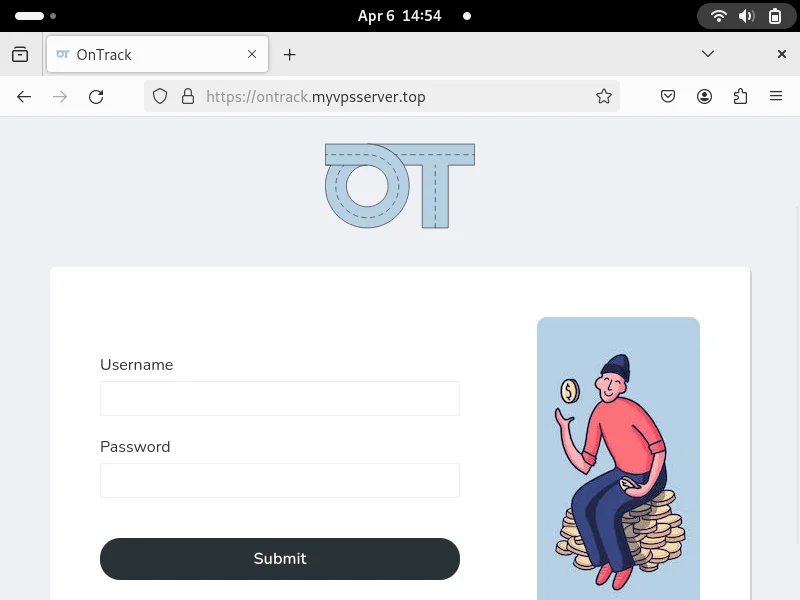
sudo systemctl enable --now caddy.serviceTest if your SSL Reverse Proxy is working by navigating to your URL.
Use Ontrack and create a user account
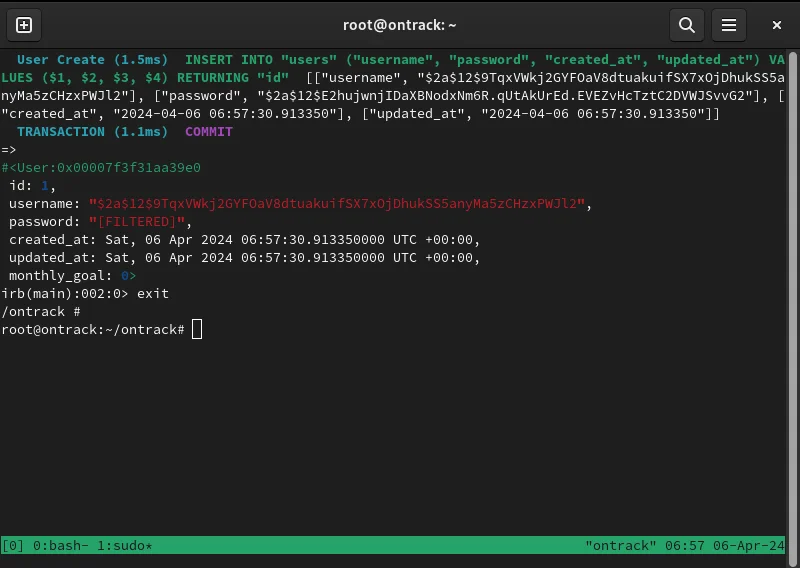
Once Ontrack is up and running, you can now create your user account. To do this, return to the server's terminal window, then open the shell for the Ontrack container:
sudo docker exec -it ontrack shOpen the database handler inside your Ontrack container:
bundle exec rails cCreate your new user account by running the following command:
User.create!(username: "YOUR-USERNAME", password: "YOUR-SECURE-PASSWORD")

Type 'exit' , then press Enter to exit the database handler.
Press Ctrl + D to leave the Docker container's root shell.
Test your new account by opening Ontrack in your web browser and logging in to your account.
Create your first trade on Ontrack
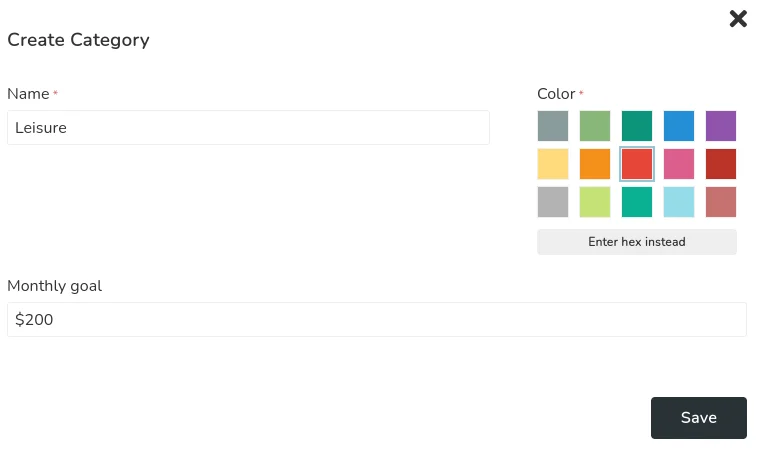
To use Ontrack to record transactions, you need to create an expense category. This allows the web app to collate your expenses by group, making it easy to deduce insights into your spending habits.
Scroll down to the Ontrack dashboard, then click Add a category .

Provide the category name, tag color, and whether the category has spending limits.
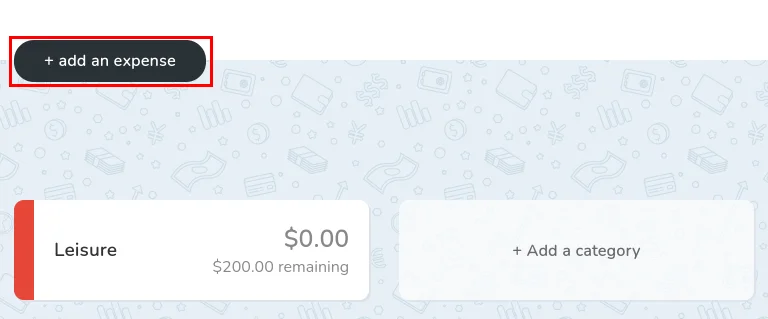
Click Add an expense on the Ontrack Dashboard.
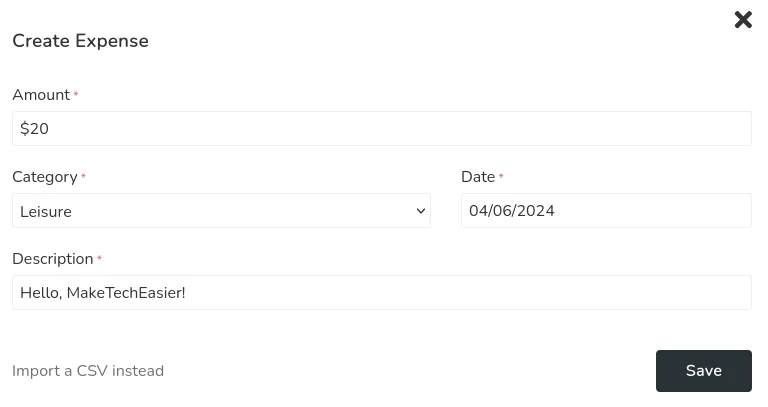
Fill in your expense details, then click Save to transfer it to your Ontrack instance.
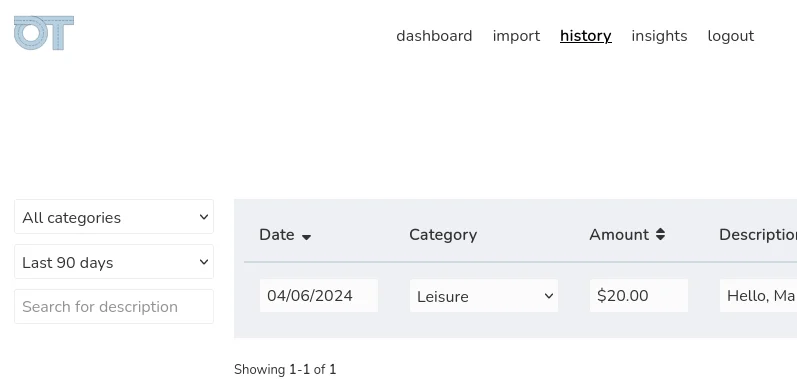
Finally, confirm that Ontrack successfully saved the transaction by checking your expense history. To do that, scroll up the page, then click the History link in the upper right corner of the page.
Installing and implementing your own expense tracking software is just the first step to taking back control of your online and digital life. Learn how you can ensure your privacy when sending emails by installing an alias server like SimpleLogin.
Was this article helpful?
Your feedback helps us improve.
Related Articles
 5 reasons to use Flatpak to install software on Linux5 minutes read
 Instructions for installing software and applications on Linux11 minutes read
 7 ways to run Linux software on Windows8 minutes read
 How to Install Software on Linux7 minutes read
 5 New Linux Apps Users Should Install Right From the Start5 minutes read
 How to Install and Uninstall RPM3 minutes read
Reader Comments 0
Sign in with email or Google to join the discussion.