How to install Composr CMS on Ubuntu 18.04 LTS
Composr is a free and open source CMS with advanced interactive functions. It is written in PHP language and uses MariaDB to store data.
Composr is a free, open source CMS with advanced interactive functions. Composr is written in PHP language and uses MariaDB to store data. It is a combination of web content management system and online community software with many features available.
Composr's main features include:
- Support for images, video, audio, and more.
- Support multiple display modes of category content with tables and boxes.
- Event reminders, support for RSS and Atom.
- Allow users to create their own galleries.
This tutorial will show you how to install Composr CMS on Ubuntu 18.04 LTS server.
Requires installation of Composr
- A server running Ubuntu 18.04.
- Static IP address 192.168.0.104 is set for the server.
- A user account is not rooted with sudo privileges.
Start installation
Before starting, users will need to update their system to the latest version. You can do this by running the following command:
  sudo apt-get update -y
  sudo apt-get upgrade -y
When the system is updated, reboot to apply the changes.
Install LAMP server
Next, we will need to install the Apache library, MariaDB, PHP and other PHP libraries on the server. Users can install all of them by running the following command:
sudo apt-get install apache2 mariadb-server unzip wget php7.2 libapache2-mod-php7.2 php7.2-common php7.2-sql php7.2-mbstring php7.2-intl php7.2-mbstring php7.2- xmlrpc php7.2-mysql php7.2-gd php7.2-xml php7.2-cli php7.2-zip -y
When all packages are installed, users will need to modify the PHP default configuration file:
sudo nano /etc/php/7.2/apache2/php.ini
Make the following changes:
memory_limit = 300M upload_max_filesize = 200M max_execution_time = 400 date.timezone = Asia/Kolkata
Save and close the file. Then restart Apache and MariaDB service, then allow them to start as soon as it starts by running the following command:
sudo systemctl restart apache2 sudo systemctl restart mariadb sudo systemctl enable apache2 sudo systemctl enable mariadb
Configure MariaDB database
By default, MariaDB is not secure. Therefore, users will need to secure it first. You can secure MariaDB settings by running the following script:
sudo mysql_secure_installation
Answer all questions as shown below:
Enter current password for root (enter for none): Set root password? [Y/n]: N Remove anonymous users? [Y/n]: Y Disallow root login remotely? [Y/n]: Y Remove test database and access to it? [Y/n]: Y Reload privilege tables now? [Y/n]: Y
When MariaDB is secured, log into MariaDB shell:
mysql -u root -p
Enter the root password and press Enter, then create the database and user account with the following command:
MariaDB [(none)]> CREATE DATABASE composrdb; MariaDB [(none)]> CREATE USER composr;
Next, grant privileges to Composr database with the following command:
MariaDB [(none)]> GRANT ALL PRIVILEGES ON composrdb.* TO 'composr'@'localhost' IDENTIFIED BY 'mypassword';
Note to replace the word 'mypasdsword' in the above command with the selected secure password. Next, give privileges using the following command:
MariaDB [(none)]> FLUSH PRIVILEGES;
Next, exit the MariaDB control panel with the following command:
MariaDB [(none)]> exit
Install Composr
First, users will need to download the latest version of Composr from the official website. Can be downloaded using the following command:
cd /tmp wget https://compo.sr/site/dload.php?id=519 -O composr.zip
When the download is complete, unzip the downloaded file into the root directory of the Apache web with the command:
unzip composr.zip -d /var/www/html/composr
Next, provide the appropriate permissions with the command:
sudo chown -R www-data:www-data /var/www/html/composr/ sudo chmod -R 755 /var/www/html/composr/
Next, create the Apache virtual host file for Composr with the command:
sudo nano /etc/apache2/sites-available/composr.conf
Add the following lines:
ServerAdmin admin@example.com DocumentRoot /var/www/html/composr ServerName 192.168.0.104 Options FollowSymlinks AllowOverride All Require all granted ErrorLog ${APACHE_LOG_DIR}/composr_error.log CustomLog ${APACHE_LOG_DIR}/composr_access.log combined
Replace example.com with your own domain name in the above file. Then save and close the Apache vhost configuration file. Then, disable Apache's default virtual host file and activate the virtual host Composr file with the following command:
sudo a2dissite 000-default sudo a2ensite composr
Next, activate the module to record Apache and restart the Apache service to apply the changes using the following command:
sudo a2enmod rewrite sudo systemctl restart apache2
Access Composr
Composr is now installed and 'listened' on port 80. It's time to access Composr's web interface.
Open the web browser and enter the URL http://192.168.0.104/install.php. Replace the IP address in the URL with the server IP or use the chosen domain name for this site instead. The user will be redirected to the following page:
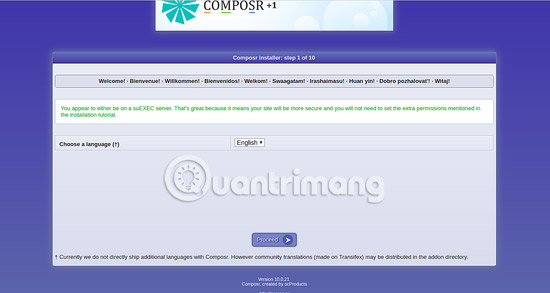
- Select the language and click the Proceed button . Users will see the following page:
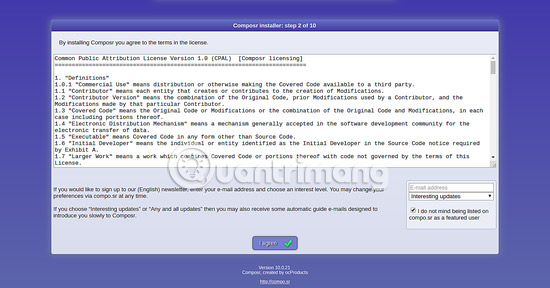
- Accept the Composr license agreement and click the I agree button. The following page will appear:
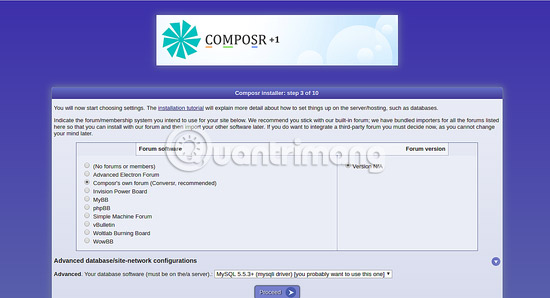
- Select the database server and click the Proceed button . The following page will show:


Here, provide the base url, master password, admin username, password, database, database username and password, and then click the Install Composr button . You will see the following page:

Now, click the first Configure my Composr button. You will be redirected to Composr login page:
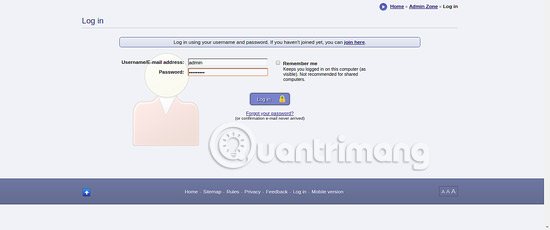
Provide admin username and password. Then, click the Log In button . You will see Composr's default control panel on the following page:

Congratulations! You have successfully installed and configured Composr CMS on Ubuntu 18.04 server. Now, you can easily store your own website with Composr.
Hope you are succesful.
See more:
- Instructions for uninstalling software on Ubuntu
- How to run and install Pantheon Desktop on Ubuntu
- How to install Steam in Ubuntu
- How to install Putty SSH Client on Ubuntu 20.04 LTS
- Instructions on how to install Ubuntu on VirtualBox virtual machine
- Instructions to install Ubuntu directly from the hard drive
- How to install Hyper Terminal in Ubuntu 20.04
- How to install Pip in Ubuntu
- How to install GIMP on Ubuntu 18.04
- How to Install CyberPanel on Ubuntu 20.04
- Instructions for installing Ubuntu on VMware Workstation - Part 2
- How to create a media server with VLC to stream music and videos
- How to install Safari on Linux
- 6 best DIY security camera software for Linux
- 8 best open source NAS operating systems for Linux
- How to fix Ubuntu freezing in VirtualBox
- 7 lightweight Linux distros, ideal for PCs with Intel Atom processors
- How to enable / disable automatic login in Debian 10
- Disabling unnecessary services for faster boot Linux
- Fix USB not working in Linux
- Use Guestfish to reset the forgotten root password for the virtual machine in qcow2 format on KVM


