How to insert 3D models into Word and PowerPoint in Office 2016
One of the special and unique features from Office 2016 onwards is that we can insert clips, 3D models into Word, Powerpoint and make our presentations more lively and interesting.
Table of Contents
One of the special and unique features from Office 2016 onwards is that we can insert clips, 3D models into Word, Powerpoint and make our presentations more lively and interesting.

Today's article, TipsMake.com will guide you how to insert 3D models into Word and PowerPoint 2016. Invite you to follow.
1. Insert 3D models into Word 2016
Step 1: Put the cursor (1) in the position where you need to insert the model, then you go to the Insert menu (2) => 3D Models (3) . Select From a File . to insert 3D files from your computer, From Online Sources . to select 3D models from online.

Step 2: If you choose From a File . then we select the 3D file to open (1) and click Insert (2) . (The 3D file formats supported in Word are fbx, obj, 3mf, ply, stl, glb).

Step 3: After inserting the 3D model, we can click on the anchor icon (1) to move. To zoom in and out, we click on the 6 corners (2) of the image and drag along the dimensions. To rotate the 3D model, we click on the rotate icon in the middle of the 3D model and rotate it at arbitrary angles.

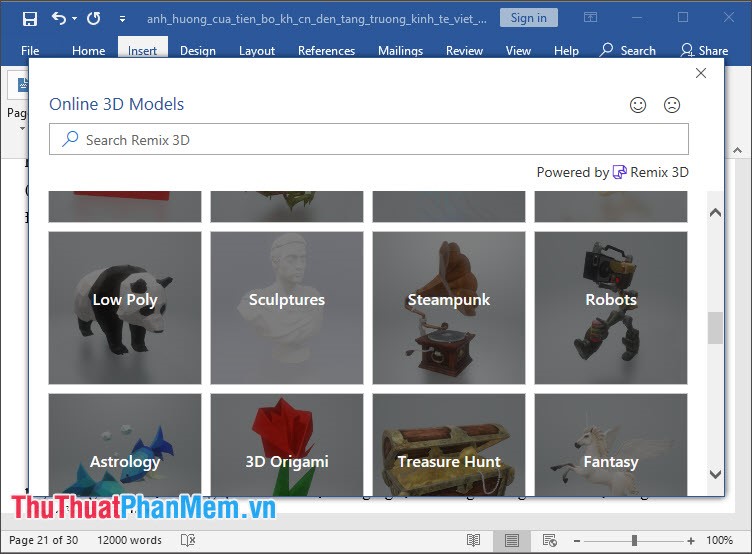
If you do not have 3D models available in your computer, we can use 3D models online in much From Online Sources… There are hundreds of 3D models with different topics.
2. How to insert 3D models into PowerPoint 2016
Step 1: Open Powerpoint and place the cursor to the position where you need to insert the model. Then we click Insert => 3D Models => Select From a File . to get the model file from the computer, select From Online Sources . to get the 3D model file online.

Step 2: If we choose From a File . then this step we open 3D model file and click Insert to open.

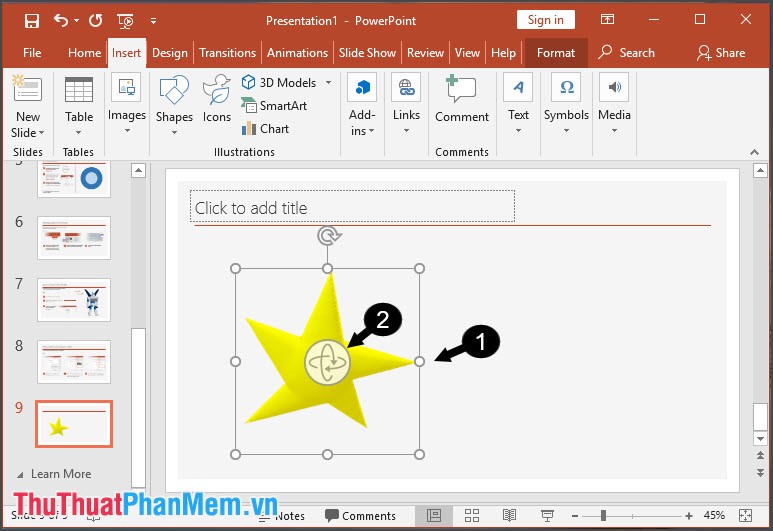
Step 3: After inserting the 3D model, we can enlarge and shrink the image by left clicking and dragging 6 corners of the image in the direction of inward or outward.
With instructions for inserting 3D models into Word and PowerPoint. Use these models to make Word and PowerPoint lessons more vivid and unique. Good luck!
Was this article helpful?
Your feedback helps us improve.
Related Articles
 How to insert 3D models into Word4 minutes read
 How to insert PDF into Word and PowerPoint5 minutes read
 How to insert images below the word on PowerPoint3 minutes read
 Steps to Insert and Animate 3D Models in PowerPoint5 minutes read
 Add Word Art in PowerPoint1 minutes read
 How to transfer tables from Word to PowerPoint3 minutes read
Reader Comments 0
Sign in with email or Google to join the discussion.