How to Get Rid of a Horizontal Line in Microsoft Word
This wikiHow teaches you how to remove a border line in Microsoft Word that you may have inadvertently created by typing three hyphens (-), underscores (_), equal signs (=), or asterisks (*), and pressing 'return.' Click in the row...
Table of Contents
Method 1 of 3:
Highlighting and Deleting
-
 Click in the row immediately above the unwanted line. If there is any text immediately above the line, select the entire row above the line.
 -
 Drag the cursor to the row immediately below the unwanted line. The left end of the line will be highlighted.
 -
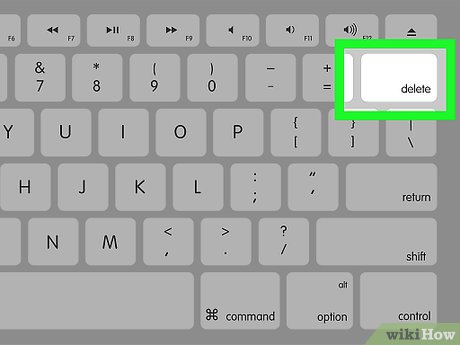 Press delete. In many versions of Word, doing so will remove the line.
Method 2 of 3:
Using the Home Tab Shortcut
-
 Click in the row immediately above the unwanted line. If there is any text immediately above the line, select the entire row above the line.
 -
 Drag the cursor to the row immediately below the unwanted line. The left end of the line will be highlighted.
 -
 Click the Home tab at the top of the screen.
 -
 Click the "Borders and Shading" icon. It's a square divided into four panes in the "Paragraph" section of the ribbon.
 -
 Click No Borders. The border line will disappear.
Method 3 of 3:
Using the Page Borders Dialog
-
 Click in the row immediately above the unwanted line. If there is any text immediately above the line, select the entire row above the line.
 -
 Drag the cursor to the row immediately below the unwanted line. The left end of the line will be highlighted.
 -
 Click the Design tab at the top of the window.
 -
 Click Page Borders in the upper-right corner of the window.
 -
 Click the Borders tab at the top of the dialog box.
 -
 Click None in the left pane.
 -
 Click OK. The border line will disappear.
Was this article helpful?
Your feedback helps us improve.
Related Articles
 Delete horizontal lines in text on Microsoft Word2 minutes read
 How to delete horizontal lines in Word4 minutes read
 Create a quick dot (……………) line in Microsoft Word3 minutes read
 How to create dotted line in Excel3 minutes read
 106 tips with Microsoft Office - Part 36 minutes read
 How to create horizontal lines in Word5 minutes read
Reader Comments 0
Sign in with email or Google to join the discussion.