How to fix PXE-E61 error: Media Test Failure, Check Cable
PXE-E61 errors are related to the Preboot eXecution Environment (PXE) - supported by some motherboards. PXE is a special boot mode that allows the computer to search and download a bootable operating system over the network instead of from a local hard drive.
Table of Contents
PXE-E61 errors are related to the Preboot eXecution Environment (PXE) - supported by some motherboards. PXE is a special boot mode that allows the computer to search and download a bootable operating system over the network instead of from a local hard drive.
When does the PXE-E61 error message appear on the computer?
Typically, PXE-E61 error messages appear on the computer when the user accidentally starts a network device that doesn't really exist. This is usually caused by a misconfigured installation in the BIOS but may also be caused by a hard drive failure.

These are the most common PXE related errors:
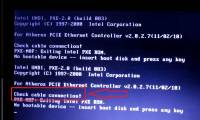
- PXE-E61: Media test failure, check cable
- PXE-M0F: Intel PXE ROM Exiting.
- PXE-M0F: Exiting Intel Boot Agent.
- Không tìm thấy thiết bị Boot. Hãy đóng phím nào để khởi động máy phục vụ.
PXE-E61 errors appear before the computer starts, usually in white text on a black background, and come with additional text displayed above the error.
How to fix PXE-E61 error
1. Please change the boot order in the BIOS to boot from the hard drive instead of the network. This will force the BIOS to find an operating system installed on a local hard drive, which is how most computers are set up.
Important note: Please try your best to complete this step. Change the Boot menu search and make sure the Boot Drive Order screen (or similar name) displays the hard drive, not 'No Boot Drive.'
2. If the BIOS does not detect the hard drive, turn off the computer, open the computer case (if you are using a desktop computer) and make sure the HDD cable is properly attached.
Note: If the cable is securely connected and the hard drive is still not detected, you may need to replace the hard drive. Before you do, make sure that it is actually corrupted by using a hard drive test program (if it does not work, then those programs will not find the hard drive).
3. If you are trying to boot from a USB device such as an external hard drive, make sure the device can actually boot. Otherwise, the BIOS will find another device to boot and may try to use the network, thus generating a PXE-E61 error.
You can use a program like Rufus to create a bootable USB device.
Also, make sure that the boot order is configured to boot from USB, the device is fully connected and the USB port is not corrupted - try moving the device to another USB port If you are not sure about this.

4. Enter the BIOS and disable PXE if you don't really want to use it. It will be called Boot to Network or Ethernet, and is often found in the Boot menu.
5. If you want to use PXE to boot into a network device, check that the network cable is plugged in properly. Without a reliable connection, PXE will not be able to connect via the network and will generate a PXE-E61 error.
Replace the new cable if you suspect that the old cable has been damaged.
6. Update network card driver to fix PXE-E61 error. An outdated or corrupted driver may prevent the computer from accessing the network, which will prevent PXE from working properly.
Note: Since you are almost unable to start your computer to update the network driver, try to boot in Safe Mode or change the boot order to use the local hard drive first. After updating the network card driver, try restarting the network again.
7. Reset BIOS. If the PXE-E61 error is caused by a misconfigured BIOS installation, resetting the BIOS to its default options may erase the error.
See more:
- How to fix 401 Unauthorized error
- How to fix 408 Request Timeout error
- Quick fix "This site can't be reached" error on Chrome browser
- Enable Safe Mode in Windows 7
- How to access Safe Mode Windows 10 on startup
Was this article helpful?
Your feedback helps us improve.
Related Articles
 Share how to fix the computer error check cable connection5 minutes read
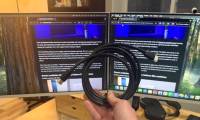 Unexpected results from testing cheap HDMI cables.6 minutes read
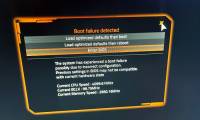 Boot Failure Detected Error – Pocket the Fix Now5 minutes read
 Why should you bring a USB-A cable on long flights?3 minutes read
 Quick fix Cyclic Redundancy Check error6 minutes read
 The Bluestack error connecting to the server failed, this is how to fix it2 minutes read
Reader Comments 0
Sign in with email or Google to join the discussion.