How to fix email out of sync on Android
You are very busy, but you cannot hear an email notification. If this doesn't happen often, you may have the problem that your Android phone no longer syncs your email, so you don't receive any new emails on the device. Fortunately, there are many ways we can fix this problem.
1. Make sure automatic email sync is turned on
Most email applications have automatic email sync mode so you can receive messages from any device. However, if you change some settings, you may accidentally affect this automatic mode.
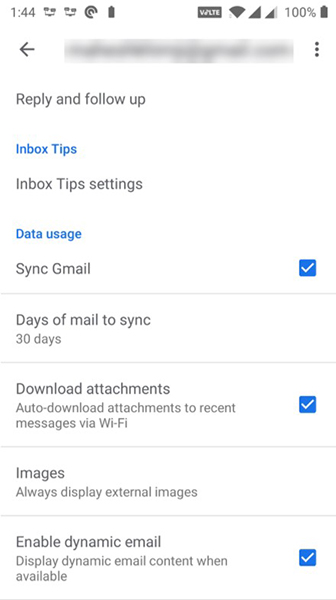
You can activate this mode from the settings menu of your email client. The steps here will take on Gmail, and it's similar to any other email client:
- Open the email app (Here is Gmail).
- Tap the 3-dash icon in the upper-left corner of the screen and select Settings (Settíngs).
- Select an email account, if you have multiple email accounts with phone names.
- Scroll down and turn on Sync Gmail or a similar option on other apps.

2. Manually sync email
If the automatic email sync doesn't work, you can do this manually. The email client will be forced to sync, search, and download new emails to your device.
This method is the same as normal sync processes, except that you have to go to settings and click on an option:
- Open Settings on your phone and select Accounts .
- Select email account with synchronization problems.
- Select Account sync to view all features that can be synchronized.
- Tap the three dots in the top-right corner of the screen and select Sync now .

Your phone will start syncing data including email.
3. Free up space on Android device
Email when downloading will take up some space on your device. If your Android phone runs low, emails won't be able to download and this may be the reason why they no longer sync with the device.
You can solve this problem by deleting unnecessary files on your phone following the instructions below:
- Open Settings on your phone and tap Storage .
- You will see the total and amount of used and remaining space on your device.
- Click Free up Space to find files taking up a lot of 'space' on your hard drive.

4. Enter the correct password to enter the email application
When you change the password for the email client, you must update it on your phone as well. If you don't, your device won't be able to sync new emails, because it simply doesn't have that permission anymore.
You can fix this problem by opening your email client and entering a new password. The application will connect to the email server and set up new notifications for you.
Remember to update your passwords in other devices so you can use your email accounts anywhere.
5. Clear the email client's cache and data
Like other apps on your phone, the email app also stores data and cache files on your device. While these files are infrequently problematic, deleting them to fix them is also a recommended practice.
Clear data and cache files will not lose your email, emails are stored in the server. To clear the cache:
- Go to the Settings app and select Apps & notifications .
- Find and select an email client (eg Gmail).
- Select Storage .

You will see how much space the email client is taking up. Click Clear Cache to clear the cache data. You can select Clear Storage if you want, but this will delete all app data on your device, you will have to reinstall the app, log in and sync all the messages again.
Open the email app and reconfigure if needed.
6. Update email application
For best performance, you should update the app regularly. If it's been a while since you updated your email app, go to Play Store and update if the update is available.
New updates will fix existing bugs in the application. If email out of sync is also a vulnerability, updating your app should fix the problem:
- Open the Play Store on your device.
- Search for the email application you are using to see if there are new updates available (or go to My Apps to find them).
- If there is a new update available, click on Update to download and install.
7. Re-add the email account into the app
If you still haven't figured out the solution, you may be having problems with the configuration of your email account. In this case, the chemical deletes and re-adds that account to the app.
To do this, first you need to remove the email account from the app. In Settings (Settings)> Account (Account) , select an account then click Delete Account (Remove account) to remove it from the phone. Then re-add its email account according to the instructions of the email app.
8. Turn on notifications for the email app
Finally, if the email is still in sync, the problem might be with your phone not sending notifications. You can fix this by allowing the email app to send you notifications:
- In Settings (Settings)> Applications & notification (Apps & notifications) and choose the email application you use.
- Select Notifications .
- Turn on Show notifications . You can customize the notification according to the purpose of use.

You should read it
- ★ How to access iCloud on Android
- ★ How to Email Photos on Android Phone
- ★ The self-canceling email feature (Confidential Mode) has been officially updated for Gmail on Android
- ★ How to schedule sending messages, email, posting Facebook, Twitter for Android phones
- ★ Instructions for setting up iCloud email account for Android and Windows Phone