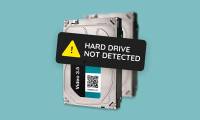
How to Fix an 'External Hard Drive Not Detected' Error on PC or Mac
This wikiHow teaches you how to fix an 'External Hard Drive Not Detected' error on your computer. There are a number of issues that can cause an external hard drive to not be detected. It could be a simple issue with the cord, USB port, or...
Table of Contents
Method 1 of 6:
Basic Troubleshooting on Windows and Mac
-
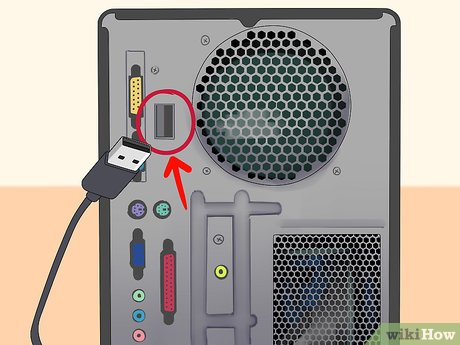 Check the USB port. There are a numbers of ways to check to see if a USB port is working. Look inside the port to see if there is any debris or obstructions. Make sure that USB connections are snug and do not wiggle. Try plugging the external hard drive into a different USB port to see if it works on a different port. Plug a different device into the USB port to see if it works with other devices.
 -
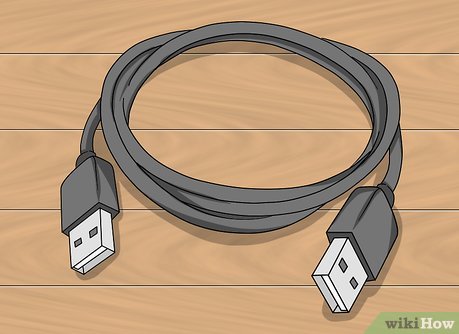 Check the USB cord. If you determine that the USB port is working properly, check to see if the cord is working properly. See if the USB cord is able to power a different device. Try swapping the cord with a different one.
 -
 Check that the drive is receiving power (if possible). Most external hard drives and some USB flash drives have external LED lights on them. Check to see if the lights are lighting up to see if the lights are lighting up.
Method 2 of 6:
Troubleshooting with the Device Manager on Windows
-
 Right-click on the Windows Startbutton. It's in the lower-left corner of the task bar. Right-clicking the start menu displays a list of different managers you can use to troubleshoot problems on your computer.
-
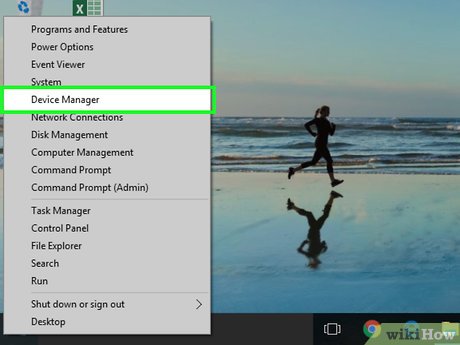 Click Device Manager. This opens the Device Manager program on your computer.
 -
 Click Other Devices. This displays a list of assorted devices on your computer, including unrecognized devices.
 -
 Right-click Unknown device. If there are devices on your PC that don't have the proper drivers installed, they appear as "Unknown devices" in the Device Manager.[1]
 -
 Click Disable. This displays a prompt asking if you want to disable the device. Click Yes to disable the device.
 -
 Right-click Unknown device again. This displays the pop-up menu.
 -
 Click Scan for hardware changes. It's near the bottom of the pop-up menu. This scans for new devices on your PC.
 -
 Right-click Unknown device again. This displays the pop-up menu.
 -
 Click Enable. It's the second option at the bottom of the pop-up menu. This re-enables the device.
 -
 Right-click Unknown device again. This displays the pop-up menu.
 -
 Click Update Software Driver. It's first option in the pop-up menu.
 -
 Click Search automatically for updated driver software. This searches for the latest driver for the device online.
 -
 Click Universal Serial Bus controller. This displays the all the USB ports on your PC.
 -
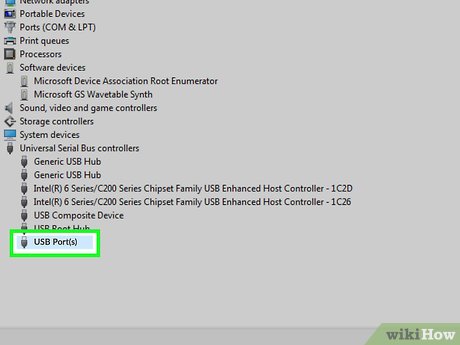 Right-click the USB port(s). This displays a pop-up menu for the USB port.
 -
 Click Properties. It's at the bottom of the pop-up menu for the USB port.
 -
 Click the Power Management tab. It's the last tab at the top of the Properties menu.
 -
 Uncheck"Allow this computer to turn off this device to save power". Repeat for all USB ports on your computer.
Method 3 of 6:
Troubleshooting with Disk Management on Windows
-
 Right-click the Windows Start button. It's the button in the lower-left corner of the task bar. Right-clicking the Start button displays a list of managers you can use to troubleshoot issues on your computer.
 -
 Click Disk Management. This opens the Disk Management program on your computer.
 -
 Right-click the external hard drive (if displayed). If the external hard drive is displayed in Disk Management, right-click it to display a pop-up window.
 -
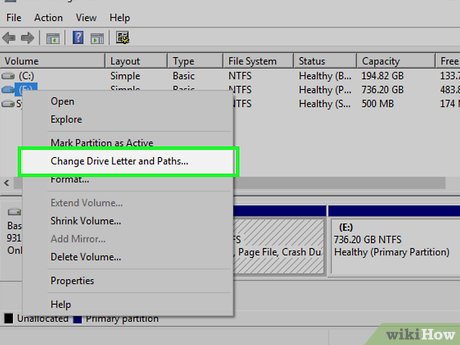 Click Change Drive Letter and Paths. This displays a box that allows you to change the drive letter for the device.
 -
 Click Change. This allows you to change the drive letter.
 -
 Select a new drive letter and click Ok. Use the drop-down menu next to "Assign the following drive letter" to select a new drive letter for the external hard drive. Click Ok when you are finished. Changing the drive letter may force Windows to recognize the hard drive.
 -
 Right-click any unallocated space. If there is any unallocated space on the hard drive, it needs to be initialized in order to be recognized by Windows.
 -
 Click Initialize Disk. This opens a window that allows you to initialize the Disk.
 -
 Click Ok. This initializes the disk so that it is recognized by Windows.
- By default, the disk will be initialized as a "MBR (Master Boot Record)". If the external hard drive is larger than 2 terabytes, select "GPT (GUIT Partition Table}.[2]
-
 Format the drive. If the external hard drive was formatted on another computer platform, such as Mac or Linux, it may not be recognized by Windows. If all else fails, you can reformat the drive for Windows. If you plan on using the external hard drive only on Windows, select NTFS as the file system. If you plan on using it with other devices, select FAT32 as the file system. Warning: Formatting the external hard drive will permanently erase all the data on the external hard drive. Use this step as a last resort. If possible, try to backup any files you want to keep to another computer. Use the following steps to format the hard drive.
- Right-click the external hard drive in Disk Management.
- Click Format.
- Type a name for the drive.
- Select NTFS or FAT32 next to "File System".
- Click Ok.
Method 4 of 6:
Showing External Drives In the Finder on Mac
-
 Open the Finder. The Finder is the blue and white icon with a smiley face. It's in the dock at the bottom of the screen. If an external hard drive is not showing up in the Finder, it could be that External disks are not checked in the preferences menu.
-
 Click Finder. It's in the menu bar at the top of the screen on the left next to the Apple icon. This displays a drop-down menu.
 -
 Click Preferences…. It's the second option in the "Finder" menu. This displays the preferences menu.
 -
 Click the General tab. It's the first icon at the top of the preferences menu. It has an icon that resembles a light switch.
 -
 Click the checkboxnext to "External disks". If the box next to "External disks" is not checked, external hard drives will not be displayed in the Finder. Check this box to make sure you have access to external hard drives in the finder.
- You may also want to check "Hard disks", "CDs", "DVDs", and "iPods", and "Connected servers" to make sure you have access to all devices in the Finder.
Method 5 of 6:
Resetting the SMC and VRAM on Mac
-
 Reset the SMC. SMC stands for System Management Controller. Sometimes resetting the SMC can resolve USB and other issues on Mac. The way you reset the SMC is different depending on what type of Mac you have. Read "How to Reset the System Management Controller (SMC) on a Mac" to learn how to reset the SMC. [3]
 -
 Reset the NVRAM. If resetting the SMC doesn't fix the issue, you could try resetting the NVRAM. To reset the NVRAM, simply reboot your Mac, and press ⌘ Command+⌥ Option+R+P until you hear a chime. Read "How To Reset NVRAM on a Mac" to learn more.
Method 6 of 6:
Troubleshooting Using Disk Utility on Mac
-
 Open the Finder. The Finder has a blue and white icon with a smiley face. It's located in the dock at the bottom of the screen.
-
 Click Applications. It's in the side bar to the left. This displays all the applications installed on your Mac.
 -
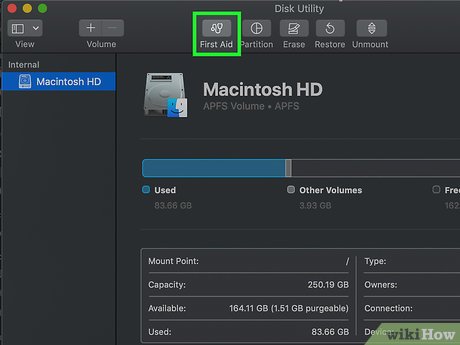
 Click Utilities. It's the blue folder in the Applications. This displays all the utility programs for your Mac.
 -
 Click the external hard drive volume. It's listed below the drive name in the sidebar to the left. This displays how much of the external hard drive has been used.
 -
 Click Mount (if available). This button is at the top of the Disk Utility app. This forces Mac OS to read the external hard drive. If the button says "Unmount", the external hard drive is already mounted. If the "Mount" button is grey out, Mac cannot read the disk.
 -
 Click First Aid. If there is no volume for the external hard drive, or the mount button is greyed out, Mac cannot access the external hard drive. Click "First Aid" at the top to scan the external hard drive for errors.
 -
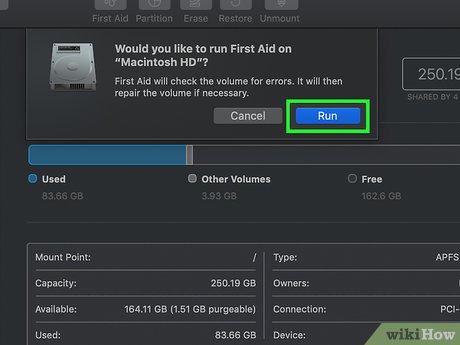 Click Run. It's in the prompt that appears when you click "First Aid". This runs a scan of the external hard drive and attempts to fix any errors.
 -
 Click Repair Disk. If First Aid finds errors on the external hard drive, it display a list of the errors and ask if you want to repair the external hard drive. Click Repair Disk to fix the errors on the external hard drive. If First Aid is unable to repair the external hard drive, it may be formatted in a file system that MacOS can't read, or it may be a faulty external hard drive.[4]
 -
 Click Partition or Erase. If the external drive has be formatted using a file system that can't be read by MacOS, you could either partition the unused portion of the external hard drive, or erase the entire drive and reformat it in a file system that can be read by MacOS. If you plan on only using the the external hard drive, select Mac OS Extended as the file system. If you plan on using the external hard drive on other devices, select FAT32, or exFAT as the file system. Warning: Erasing and reformatting your external hard drive will erase all the contents on your external hard drive. Use that as a last resort. If possible, try to back up the contents of the external hard drive to another computer before reformatting it. Use the following steps to partition or erase your external hard drive:
- Partition:
- Click Partition in Disk Utility.
- Type a name for the partition next to "Name:.
- Select a format for the partition next to "Format:".
- Type how much space you want to allocate to the partition next to "Size:".
- Click Apply.
- Erase:
- Click Erase in Disk Utility
- Type a name for the external hard drive next to "Name:"
- Select a file system next to "Format:"
- Click Erase
- Partition:
Was this article helpful?
Your feedback helps us improve.
Related Articles
 How to fix an external hard drive error is not displayed on the Mac10 minutes read
 Pros and cons of using an external hard drive for PS48 minutes read
 How to fix 'Hard Drive Not Detected' error on Windows7 minutes read
 7 best external hard drives9 minutes read
 5 best external hard drives of 20265 minutes read
 6 Tips for Using External Hard Drives on Mac9 minutes read
Reader Comments 0
Sign in with email or Google to join the discussion.