How to encrypt files using Gocryptfs
If you're really worried about the security of the data stored in the cloud, it's best for users to encrypt that data before uploading it to the cloud. TipsMake.com will show you how to use Gocryptfs to encrypt files.
Table of Contents
Encryption is almost an extremely urgent thing at the moment, when security and privacy standards are no longer strictly followed by companies. If you're really worried about the security of the data stored in the cloud, it's best for users to encrypt that data before uploading it to the cloud.
Gocryptfs is an Overlay Filesystem (abbreviated as OverlayFS - file system deployment that allows virtual consolidation of multiple directories, while keeping their actual content separate) encrypted, written in Go and built on the go-fuse library FUSE. Unlike systems that encrypt the entire drive, Gocryptfs encrypts individual files using AES-GCM (Galois Counter Mode) and encrypts file names using AES-EME (ECB-Mix-ECB). Gocryptfs is also cross-platform compatible, meaning you can access your files on any platform.
In this tutorial, TipsMake.com will show you how to use Gocryptfs to encrypt files.
Install Gocryptfs
Linux
Gocryptfs comes with a deb package and is available in the Debian and Ubuntu repositories, meaning you can easily install it using the command:
sudo apt install gocryptfs
Similar to Arch Linux, you can install Gocryptfs via Pacman:
sudo pacman -S gocryptfs
For other Linux distributions, you can download the binary file from the Github page. (Link to reference: https://github.com/rfjakob/gocryptfs/releases)
Mac
To use Gocryptfs in macOS, Homebrew must first be installed:
/usr/bin/ruby -e "$(curl -fsSL https://raw.githubusercontent.com/Homebrew/install/master/install)"
Then use the following command to install Gocryptfs:
brew install gocryptfs
Windows
Basically, Gocryptfs is not supported in Windows because this operating system lacks support for FUSE. However, cppcryptfs executes Gocryptfs in C ++ for Windows, so users can still make it work in Windows. Follow the following build instructions:
- You will need the following software (all available for free) to build cppcryptfs: Microsoft Visual Studio 2017 (Community Version), Perl, Nasm and Git (Git is not required).
- You will also need to install Dokany, download the source code for OpenSSL and RapidJSON from Github. Only OpenSSL needs to be built separately. Cppcryptfs uses only header files from RapidJSON, so there is no need to build RapidJSON.
Microsoft Visual Studio 2017
First, Microsoft Visual Studio 2017 is required. The Community version of Microsoft Visual Studio 2017 will work and is free. If not, replace it with the Professional or Enterprise version.
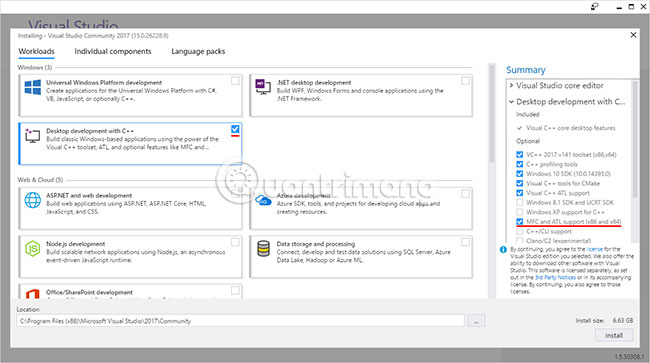
Installing Visual Studio so that it can compile C ++ applications with the support of Microsoft Foundation Classes (MFC).
When installing Visual Studio 2017, select "Desktop Development with C ++" and "MFC and ATL support (x86 and x64)" .
Perl and Nasm
To build OpenSSL, you will also need Perl and Nasm.
- For Perl, OpenSSL documents recommend using ActiveState ActivePerl for free.
- Nasm (Netwide Assembler) is available here. You should use the Nasm installer if you want to follow this guide.
Note : You should run the Nasm installer as a regular user. When prompted to rerun the installer with admin rights, just click OK. This will cause nasm to be installed in the local Appdata directory of the current user.
Git
Git is available here. Git that comes with cygwin will also work. But Git will not be needed if you download source zip files from Github and extract them.
This tutorial assumes that you are using Git. No need to have a Github account to use Git.
Dokany
Unless you want to develop or debug Dokany, you should only install one of Dokany's released binaries here.
Using DokanSetup_redist.exe is probably the safest option. Be sure to select "Install development files" in the installer options.
OpenSSL
Cppcryptfs uses OpenSSL to perform data encryption and decryption.
You will need to build OpenSSL from its source code.
Please refer to the "INSTALL" file from the OpenSSL distribution if these instructions do not work.
After installing Visual Studio, Nasm, Git and ActiveState perl, open a new Command Prompt on Windows (cmd.exe).
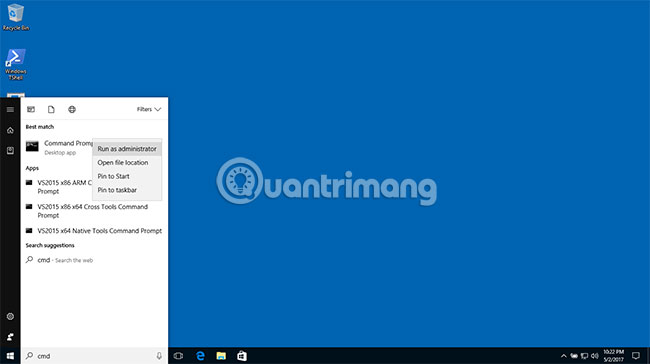
You will need to open the Command Prompt with admin rights to run the OpenSSL installation command. However, it can also be built in a normal Command Prompt.
To start an admin cmd in Windows 10, click the search icon (magnifying glass) on the bottom left of the screen and enter "cmd". Then right-click on "Command Prompt" and select "Run as administrator" .
Whether to use Git or not, it is easier to put everything into C: git.
First, create the C: git directory , go to this directory and copy the OpenSSL source code from Github, then go to the Openssl folder created by Git.
c: mkdir git cd git git clone https://github.com/openssl/openssl.git cd openssl
Run this command to put Nasm in the path (assuming you have used the Nasm installer).
set PATH=%LOCALAPPDATA%binNASM;%PATH%
Then run the batch file that comes with Visual Studio, set up environment variables to compile from the command line.
"C:Program Files (x86)Microsoft Visual Studio2017CommunityVCAuxiliaryBuildvcvarsall.bat" amd64
Use "x86" instead of "amd64" if you are building a 32 bit build.
Vcvarsall.bat from Visual Studio 2017 must be run in Windows cmd.exe command shell, not third party.
Then run perl (ActiveState) to configure OpenSSL for static build Visual Studio AMD64 / X86_64.
Use "VC-WIN32" instead of "VC-WIN64A" if you are making a 32-bit build.
perl Configure VC-WIN64A no-shared
Then run "nmake" to build OpenSSL.
nmake
Then run "nmake install" to install it.
nmake install
The "nmake install" command must be run from cmd admin. If you've built OpenSSL from a regular Command prompt, start an admin cmd, go to C: gitopenssl and make sure to call vcvarsall.bat as shown above in cmd admin before running the nmake installation in it.
RapidJson
RapidJSON is used to analyze the configuration file gocryptfs.conf. Cppcryptfs uses only header files from RapidJSON, so there is no need to build RapidJSON separately.
c: cd git git clone https://github.com/Tencent/rapidjson.git
Cppcryptfs
First, cloning cppcryptfs.
c: cd git git clone https://github.com/bailey27/cppcryptfs.git
Access C: gitcppcryptfs in Windows Explorer and double-click cppcryptfs.sln. Then change the build configuration to "Release" and the target platform to "x64".

Go to Build> Build Solution or just press F7.
There are no installers for cppcryptfs. You will need to copy cppcryptfs.exe (eg C: gitcppcryptfsx64Releasecppcryptfs.exe ) to some directories in the path or on the desktop.
32 bit build will work. However, it has not been tested for a while.
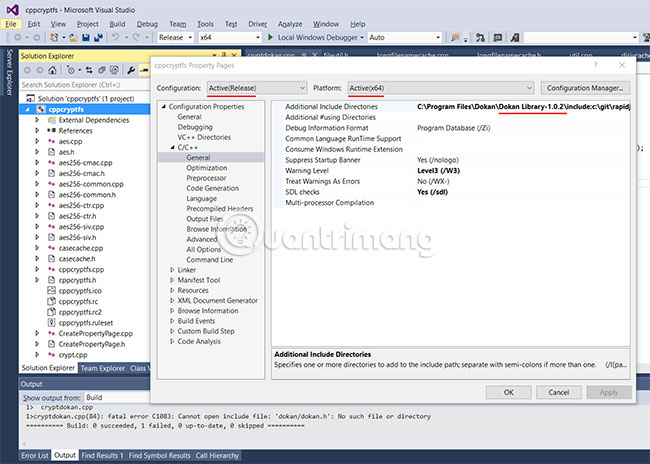
Whenever a new version is released, Dokany will install header files (included) and libraries in a path, with the Dokany version number in the name. Therefore, if cppcryptfs supports the current Dokany version, you will need to change the header file and library path in cppcryptfs' Visual Studio project.
To change the header file path in Visual Studio, right-click "cppcryptfs" in the Solution Explorer control panel. Then select "Properties" and move to "C / C ++", then "General". Then edit "Additional Include Directories" so that the current Dokany version is included in the path for the Dokany header files.
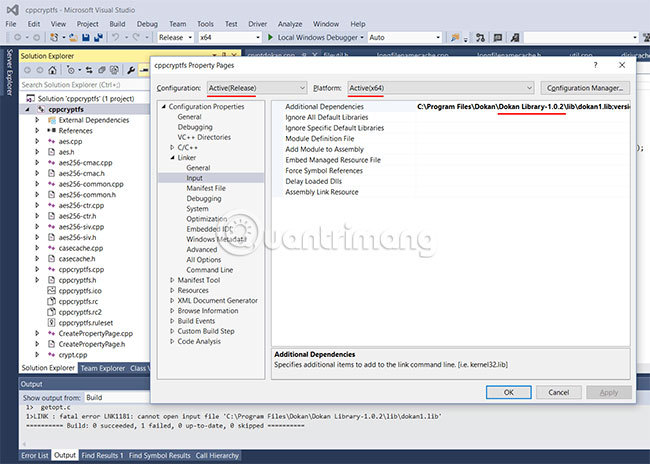
To change the library path, go to "Linker", then select "Input" and edit "Additional Dependencies".
Use Gocryptfs to encrypt files
To start using Gocryptfs, first create two empty folders:
mkdir encrypted plain
Next, initialize Gocryptfs:
gocryptfs -init encrypted
Finally, mount the 'encrypted' folder in the 'plain' directory .
gocryptfs encrypted plain
Now, any files placed in the 'plain' folder will be encrypted and stored in the 'encrypted' folder .
For example, if you want to store the encrypted file in Dropbox and mount it to the 'Private' folder in the Home folder, you can run the following commands:
cd mkdir ~/Dropbox/encrypted ~/Private gocryptfs -init ~/Dropbox/encrypted gorcypted ~/Dropbox/encrypted ~/Private
Each file in the 'Private' folder will be encrypted in the 'Encrypted' folder and uploaded to the Dropbox server.
SiriKali - GUI tool to use Gocryptfs
SiriKali is a GUI tool that can be used for coding with Gocryptfs and other standards. SiriKali is available for Linux, macOS and Windows, although the Windows version does not have support for Gocryptfs.
1. Access SiriKali website and download the package that fits the system. The Linux package provides the source that you can extract and build. This package is also available with separate repositories for many distributions and can be found here.
2. On Ubuntu, run the following command in Terminal:
sudo sh -c "echo 'deb http://download.opensuse.org/repositories/home:/obs_mhogomchungu/xUbuntu_18.04/ /' > /etc/apt/sources.list.d/home:obs_mhogomchungu.list"
When the commands are finished, you should run this code to let the system know you 'trust' the key and allow updates.
wget -nv https://download.opensuse.org/repositories/home:obs_mhogomchungu/xUbuntu_18.10/Release.key -O Release.key sudo apt-key add - < Release.key sudo apt-get update sudo apt-get install sirikali
3. You will now see that SiriKali is installed and available in the menu. Click to open.
4. SiriKali opens a window (reminiscent of VeraCrypt) with options at the bottom of the screen, including Create Volume, Mount Volume, Refresh, Manage Favorites and finally Menu.
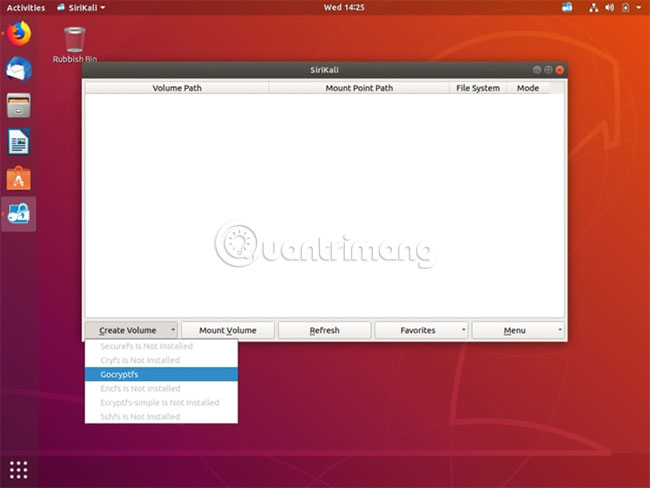
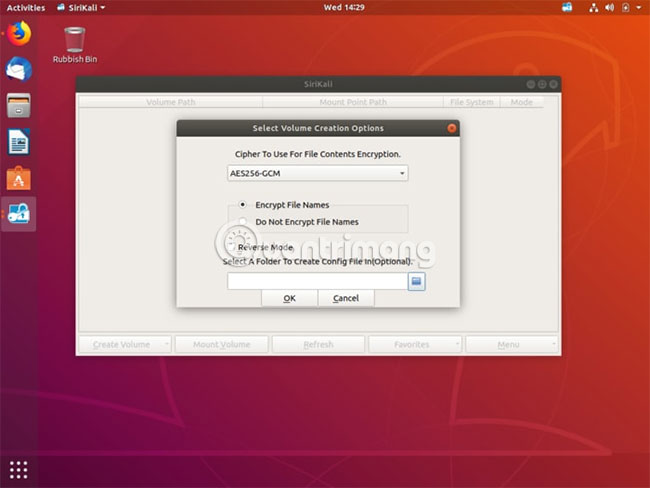
5. Now you can click Gocryptfs and create a drive.

6. Set an arbitrary name for the drive you just created and the Key section representing the password. In addition, there are other options such as Password, Password and Key file and GNOME Wallet. Choose the option that suits your needs - just remember to use a password that is not easy to guess.
7. Once completed, the newly created folder will appear in the SiriKali application. Click here to open the folder. This is where you can copy the files you want to encrypt, just like any other file copying action.
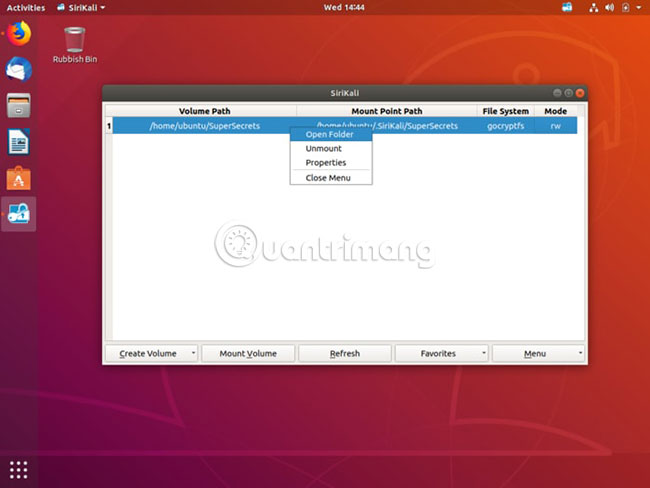
8. When done, remember to click again and select 'Unmount volume'.
Hope you are succesful.
Was this article helpful?
Your feedback helps us improve.
Related Articles
 How to easily encrypt a file without a password using Cloak Encrypt5 minutes read
 How to Encrypt Files10 minutes read
 How to encrypt files on Google Drive with Syncrypto4 minutes read
 How to encrypt files before uploading to the cloud9 minutes read
 How to encrypt local files using Cryptomator5 minutes read
 How to share encrypted files and self-destruct on Otr.to4 minutes read
Reader Comments 0
Sign in with email or Google to join the discussion.