How to encrypt FILE or FOLDERS on Windows 10, 8, 7
Each operating system has a different type of hard drive format, although they still share the same physical hard drive device. For example, Linux uses ext3, ex4 and ext2, while macOS uses Apple FIle System - APFS, and for Windows operating systems we have New Technology File System - NTFS.
To use the hard drive on any operating system, you must format your hard drive in the format specified in that operating system.
And to secure the data stored on the hard drive, the operating systems are equipped with hard drive encryption in most of the formats mentioned, and the NTFS format is no exception.
You may not know, the data on the hard drive is one of the top targets of the bad guys, especially for the operating system from Microsoft. Because it's so common!
So in this article, I will show you how to enable NTFS encryption on Windows 10 to protect personal data!
I. How to enable file encryption on Windows?
Windows 10 is one of the most targeted operating systems by bad guys, not because the system created by Microsoft is more jagged than macOS or other Linux operating systems, but it's just that Windows 10 is the most commonly used. stop.
So NTFS hard drive encryption is a safe layer of protection for the data you store on the hard drive. On Windows 10, there is a feature available to help encrypt files and folders saved on the hard drive with NTFS format, with the purpose of protecting them from unwanted access, it is called Encrypting File System or EFS.
EFS provides efficient encryption as well as decryption using advanced and standard encryption algorithms.
Once the file is encrypted, any user or application without the correct encryption key will not be able to open or edit the file.
Note that to do this you need to log into Windows 10 with an account that has Admin rights first.
Method #1: Enable file encryption on Windows 10 with Local Group Policy Editor
Local Group Policy Editor is a great tool for you to customize your Windows 10 system.
However, it can only be used on Windows 7, 8, 10 with Pro, Enterprise, Edu versions only, Windows 10 Home version is not equipped with this tool, so you need to use one of the other ways. below.
+ Step 1: First, open the Run dialog box with the Windows + R key combination, enter the gpedit.msc command => and then press Enter to quickly access the Local Group Policy Editor on Windows 10.
You can also open the above tool using Windows Search (Windows + S), but I prefer using the command because it is much more convenient.
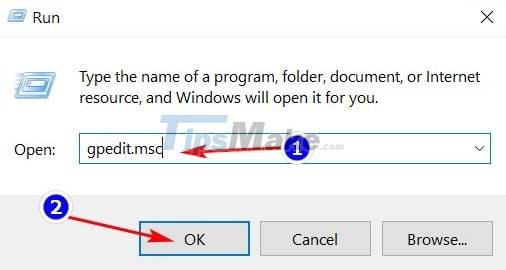
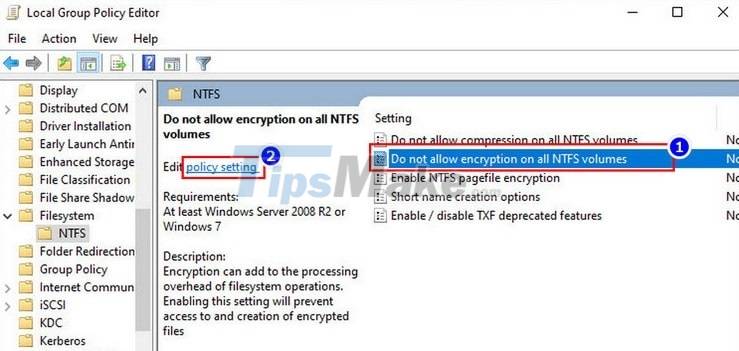
+ Step 2: The Local Group Policy Editor window appears, access the NTFS folder according to the following path:
Computer Configuration/Administrative Templates/System/Filesystem/NTFS
Because this tool does not have an address bar like Registry Editor, you must manually access it through the directory tree on the left.
=> After logging in, find in the list of policies to the right of a policy named Do not allow encryption on all NTFS volumes => Click on this policy and then click policy setting or double-click on the name to edit the settings. put it.
+ Step 3: Here, switch from the default option Not configured to Disabled to enable NTFS encryption on Windows 10 => then click OK to save this setting, and restart the computer to changes take effect.
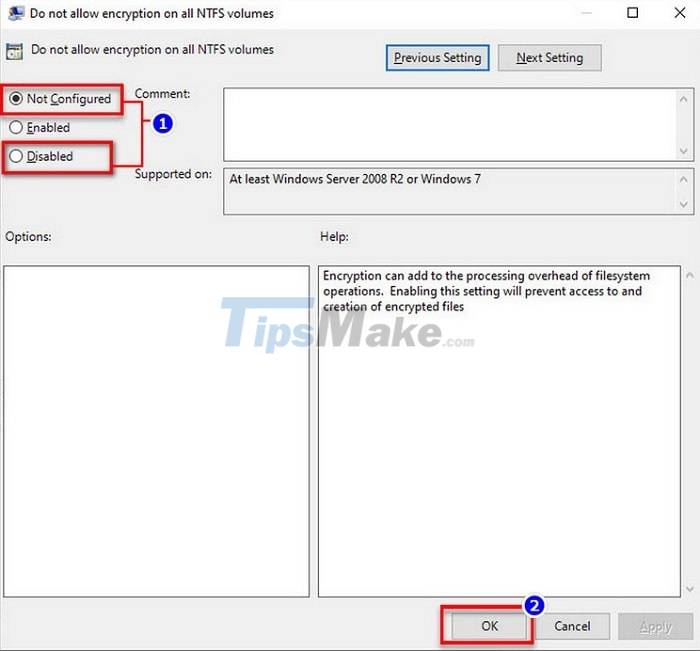
Conversely, if you want to turn off this feature, you just need to switch to Enabled and save it.
Method #2: Enable file encryption on Windows 10 with Registry Editor
Registry Editor is a tool that we are all too familiar with, through so many tutorials, you probably don't mind editing the Registry anymore.
However, to be safe, you should still back up the entire Registry of Windows 10 before following the instructions in this article!
+ Step 1: First, you also open the Run dialog box (Windows + R) => then enter the command regedit => and then press Enter to open the Registry Editor on Windows 10.
In addition, if you run this command directly in Windows Search, it will also produce the same results.

+ Step 2: You continue to access the Filesystem folder in the Registry by following this path:
HKEY_LOCAL_MACHINE/SYSTEM/CurrentControlSet/Control/FileSystem
=> The fastest way is to paste this link directly into the address bar => then press Enter to finish.
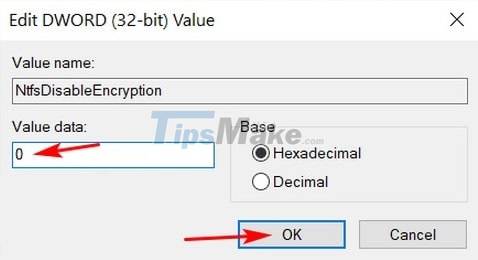
Then you find and right-click on the key named NtfsDisableEncryption => then select Modify… to edit its value.

NOTE: This key will usually be available, otherwise you can also create a new key with the same name yourself, by right-clicking on any space in the right column, selecting New => DWORD (32 -bit) Value only.
+ Step 3: In this Edit DWORD (32-bit) Value window, change the value in the Value data box from 1 to 0 to enable NTFS encryption on Windows 10, and vice versa, leave 1 to turn it off. this feature goes, the rest remain the same and then click OK to save.
=> Then you also need to restart the computer for these changes to take effect.
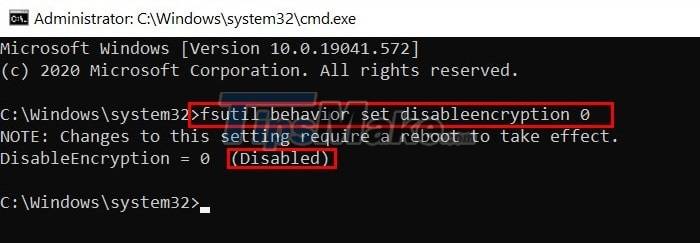
In addition, you can do this with just a single command line in the Command Prompt.
Open CMD with Administrator rights => then paste the command below and press Enter to enable NTFS encryption on Windows 10.
fsutil behavior set disableencryption 0
After running, you will see the ON or OFF status as shown below. This command will also edit the value of the NtfsDisableEncryption key like we just did above.
Similarly you can also change 0 to 1 to turn off this feature. Because this operation actually still edits the value in the Registry, you need to restart Windows 10 for this command to take effect.
II. How to encrypt files and folders on Windows 10
After doing one of the two ways above to enable NTFS encryption, now I will show you how to encrypt any file or folder on Windows 10.
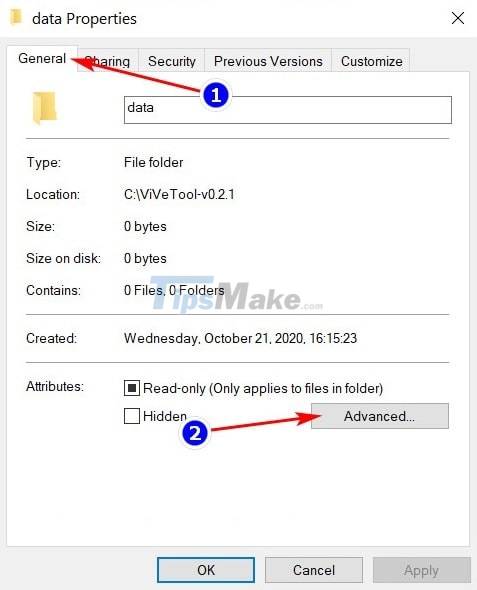
+ Step 1: Open File Explorer by pressing Windows + E => right-click on the file or folder you want to encrypt => then select Properties. I will take as an example the data folder of the ViveTool tool.

+ Step 2: The Properties window appears => in the Attributes section in the General tab, find and click the Advanced button to open the settings for advanced properties of the selected folder or file.
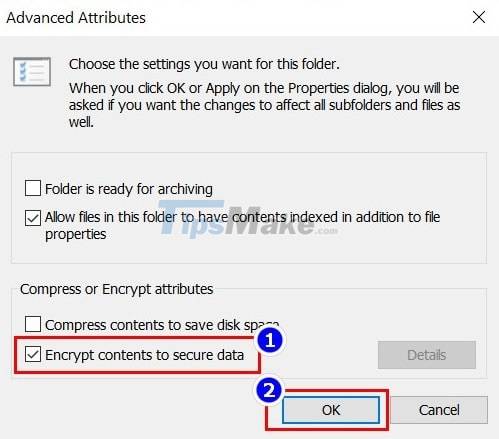
+ Step 3: At this point, in the Compress or encrypt attributes section, you will have two options:
- Compress contents to save disk space: Compress folders and files to save space.
- Encrypt contents to secure data: Encrypt files and folders to protect them.
=> Now you just need to check the line Encrypt contents to secure data => and then click OK to confirm the data encryption of the selected file or folder. You can also choose to compress files and folders to save hard drive space if you want.
Besides, if the Encrypt contents to secure data line does not light up, it means that this feature has not been enabled, please double check the steps above and do it again if possible.
III. Epilogue
So I have just finished showing you how to enable and use the NTFS encryption feature on Windows 10.
Overall, this is a pretty useful feature that those who do not use Antivirus software can consider using to protect their data. Hope this article will be of help to you. Good luck !