How to enable High-DPI support for Windows 10 applications
You may have faced problems such as fuzzy application interfaces, blurred or displayed text content related to similar problems on Windows 10 computers. Due to the increasing demand of users. , for a long time, Microsoft tried to work, looking for ways to fix this problem. And now you no longer have to worry about this problem because Microsoft has integrated High-DPI feature to support behavior for Windows 10 applications..
You may have faced problems such as fuzzy application interfaces, blurred or displayed text content related to similar problems on Windows 10 computers. Due to the increasing demand of users. , for a long time, Microsoft tried to work, looking for ways to fix this problem. And now you no longer have to worry about this problem because Microsoft has integrated High-DPI feature to support behavior for Windows 10 applications.
On Build 15002, the company also added High-DPI support for Windows 10 applications and is available on Insider. This feature works on large applications integrated on the system. As for 3rd party applications, you will have to manually activate.
In the following article, Network Administrator will guide you 4 steps to enable High-DPI to support applications on Windows 10.
Enable High-DPI support for applications on Windows 10
To enable High-DPI support for Windows 10 applications, follow the steps below:
Step 1:
Right-click on any application you want to enable High-DPI Support and select Properties .

Step 2:
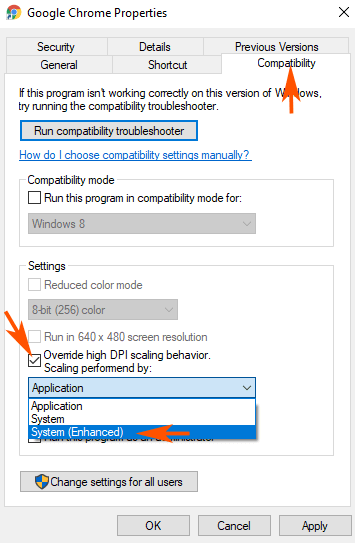
On the Properties dialog window, switch to the Compatibility tab . There you find the Settings block and select the option Override high DPI Scaling behavior .
Step 3:
After selecting the option, the drop down menu of Scaling performed by will be activated. Click on the drop down menu by Scaling performed by and select System (Enhanced) .
Step 4:
Finally click Apply and then click OK to apply the change.
Refer to some of the following articles:
- Instructions for activating TFTP and Telnet Client on Windows 10
- Fix the Webcam Error on Windows 10 Anniversary Update is suspended
- Backspace key on Windows 10 can only delete 1 character, this is how to fix it
Good luck!