How to download and install Llama 2 locally
Meta releases Llama 2 in summer 2023. The new version of Llama is refined with 40% more tokens than the original Llama model, doubles the context length, and significantly outperforms other Other open source models exist. The quickest and easiest way to access Llama 2 is through the API via the online platform. However, if you want the best experience, installing and downloading Llama 2 directly on your computer is most effective.
With that in mind, TipsMake has created a step-by-step guide on how to use Text-Generation-WebUI to download Llama 2 LLM locally on your computer.
Why install Llama 2 locally?
There are many reasons why people choose to run Llama 2 live. Some do it because of privacy concerns, some for customization, and others for offline capabilities. If you are researching, tweaking, or integrating Llama 2 for your project, accessing Llama 2 via API may not be for you. The purpose of running LLM locally on PC is to reduce dependence on third-party AI tools and use AI anytime, anywhere without worrying about leaking sensitive data to other companies and organizations .
With that said, let's get started with the step-by-step guide to installing Llama 2 locally.
How to download and install Llama 2 locally
Step 1: Install Visual Studio 2019 Build Tool
To simplify things, we will use the one-click installer for Text-Generation-WebUI (the program used to load Llama 2 using the GUI). However, for this installer to work, you need to download Visual Studio 2019 Build Tool and install the necessary resources.
Download Visual Studio 2019 (Free)
- Go ahead and download the community version of the software.
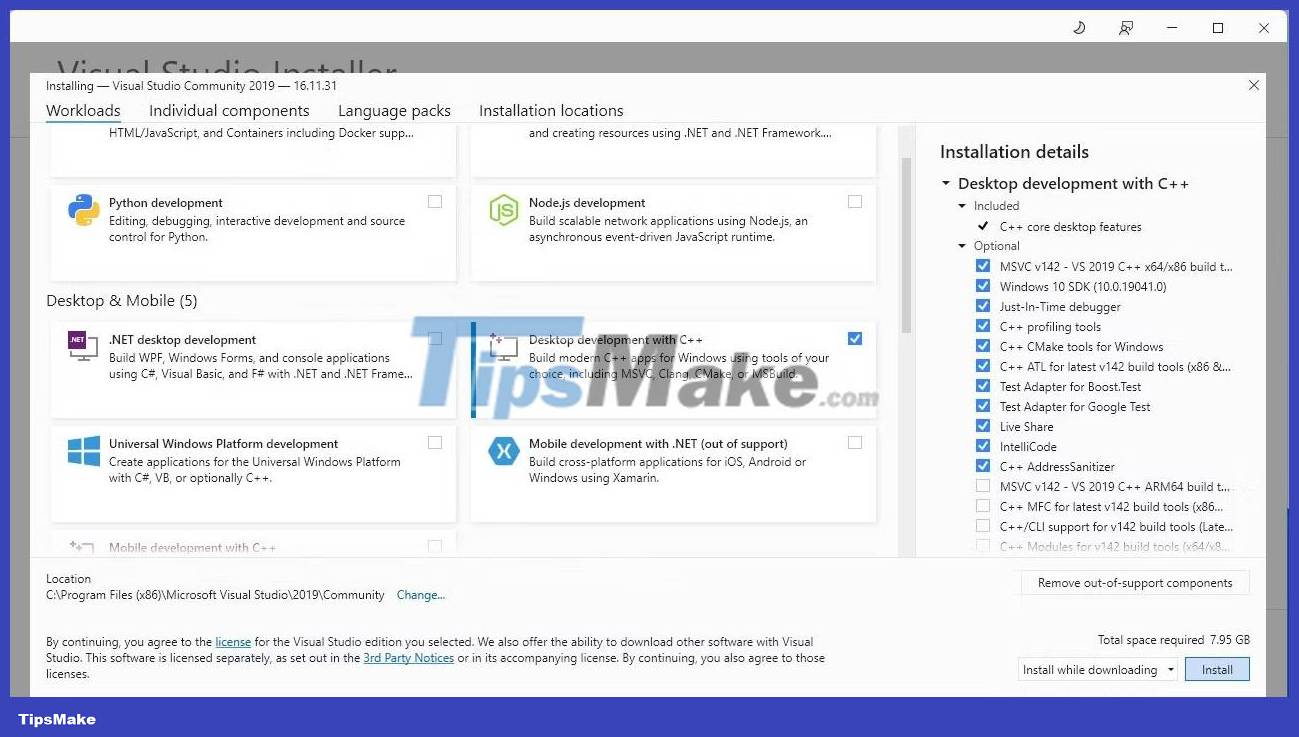
- Now, install Visual Studio 2019, then open the software. Once opened, check the Desktop development with C++ box and click Install.

Now that you have Desktop development with C++ installed, it's time to download the Text-Generation-WebUI one-click installer.
Step 2: Install Text-Generation-WebUI
The Text-Generation-WebUI one-click installer is a script that automatically creates the necessary folders and sets up the Conda environment and all the requirements needed to run the AI model.
To install the script, download the one-click installer by clicking Code > Download ZIP .
Download Text-Generation-WebUI installer (Free)
1. Once downloaded, extract the ZIP file to your preferred location, then open the extracted folder.
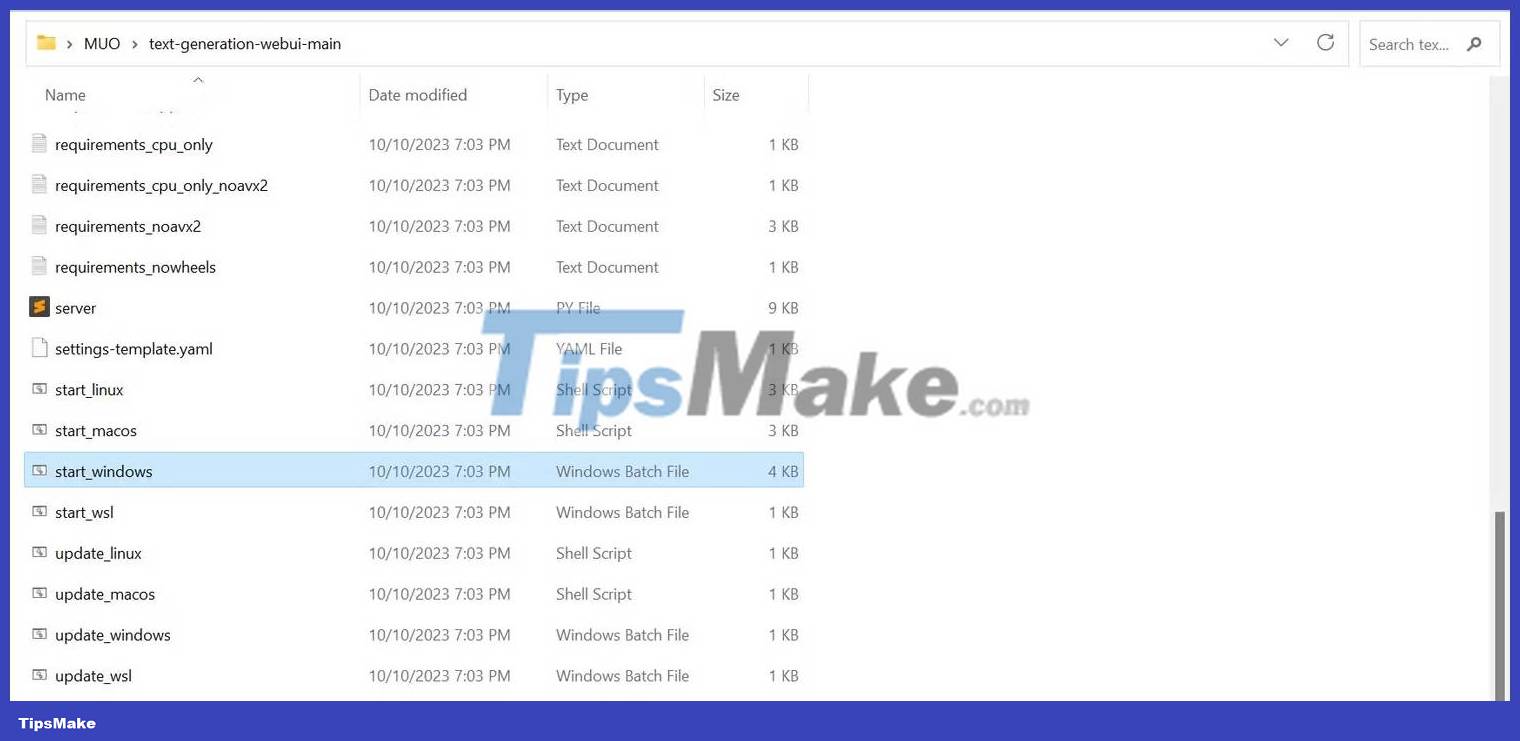
2. In the folder, scroll down and find the appropriate startup program for your operating system. Run the program by double-clicking the appropriate script.
- If you are using Windows, select the batch file start_windows
- For MacOS, select start_macos shell script
- For Linux, the shell script start_linux.

3. Your antivirus software may generate warnings; this is ok. The prompt is just a fake notification about anti-virus software when running a batch file or script. Click Run anyway .
4. A terminal will open and setup will begin. Right from the start, the setup process will pause and ask which GPU you are using. Select the appropriate GPU type installed on your computer and press Enter. For machines without a dedicated graphics card, select None (I want to run models in CPU mode) . Remember that running on CPU mode is much slower than running a model with a dedicated GPU.

5. Once setup is complete, you can now launch Text-Generation-WebUI locally. You can do so by opening your favorite web browser and entering the IP address provided on the URL.

6. WebUI is now ready to use.

7. However, the program is just a model loader. Download Llama 2 to get the model loader running.
Step 3: Download the Llama 2 model
There are quite a few things to consider when deciding which version of Llama 2 you need. These include parameters, quantization, hardware optimization, size, and usage. All this information will be clearly stated in the model name.
- Parameters : The number of parameters used to train the model. Larger parameters produce more capable models but at the cost of performance.
- Usage : Can be standard or chat. The chat model is optimized for use as a chatbot like ChatGPT, while the standard is the default model.
- Hardware optimization : Refers to which hardware runs the model best. GPTQ means the model is optimized to run on dedicated GPUs, while GGML is optimized to run on CPUs.
- Quantization : Indicates the precision of weights and activations in the model. For inference, q4 accuracy is optimal.
- Size : Refers to the size of the specific model.
Note that some models may be arranged differently and may not even display the same type of information. However, this type of naming convention is quite common in the HuggingFace Model library, so it's still worth learning about.

In this example, the model can be identified as a medium-sized Llama 2 model trained on 13 billion parameters optimized for conversational inference using a dedicated CPU.
For those running on a dedicated GPU, choose the GPTQ model , while for those using a CPU, choose GGML . If you want to chat with the model like with ChatGPT, choose chat , but if you want to test the model to its full capabilities, use the standard model . As for the parameters, know that using larger models will yield better results but at the cost of performance. The article recommends starting with model 7B. For quantization, use q4 as it is only for inference.
Download GGML (Free) Download GPTQ (Free)
Now that you know which version of Llama 2 you need, go ahead and download the model you want.
The example is running this application on an ultrabook so will use a tweaked GGML model for chat, llama-2-7b-chat-ggmlv3.q4_K_S.bin.

Once the download is complete, place the model in text-generation-webui-main > models .

Now that you have downloaded your model and placed it in the models folder, it's time to configure the model loader.
Step 4: Configure Text-Generation-WebUI
Now, let's begin the configuration phase.
1. Again, open Text-Generation-WebUI by running the start_(your OS) file (see previous steps above).
2. On the tabs above the GUI, click Model. Click the refresh button in the model drop-down menu and select your model.
3. Now click on the model loader drop-down menu and select AutoGPTQ for those using the GTPQ model and ctransformers for those using the GGML model. Finally, click Load to load your model.

4. To use the model, open the Chat tab and start testing the model.

Congratulations, you have successfully loaded Llama2 on your local computer!