How to display your working hours to others in Outlook
What is worse than being unable to meet with someone when needed? Getting a meeting request during non-working hours is impossible, but you can set up Outlook so at least everyone knows your working hours..
What is worse than being unable to meet with someone when needed? Getting a meeting request during non-working hours is impossible, but you can set up Outlook so at least everyone knows your working hours.
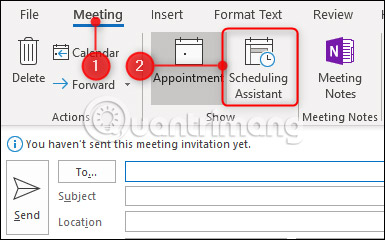
When creating a meeting request in Outlook, go to Meeting> Scheduling Assistant which will see the time that you and the recipient request the meeting to be available.
However, when opening the Scheduling Assistant, the number of hours displayed per day will not start from 00:00 to 24h00 as usual, but only from 8 am to 5 pm.
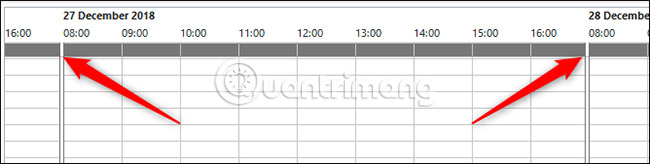
This is Outlook's default working day, but users can change it to any time they want. Click File> Options> Calendar and search for 'Work Time'. Users can change their working hours here.

For example, you want to change your working hours from 10 am to 4 pm and then click OK. If opening a new meeting request and clicking on the Scheduling Assistant, the working hours have changed to reflect the new time.

Outlook will display these hours for anyone with access to your calendar when you want to set a meeting with you.
Now, users can work remotely and set their own time. Suppose, you need to be in the afternoon to meet with colleagues, but prefer to start later, change your working hours to 12 noon to 8 pm. When creating a meeting request and adding a colleague, Outlook will display your working hours as 12 noon to 8 pm and any time that colleague does not work within this time period will display under in the form of a light gray bar.
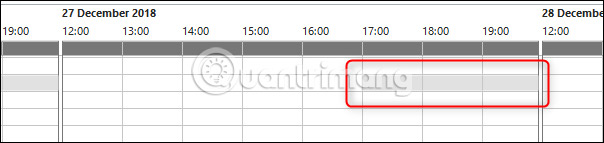
When someone tries to book a meeting with you, all hours before 12 noon will also be displayed with a light gray bar.
Users can also install their working days. So if you work part-time or work on weekends, you can change this in File> Options> Calendar> Work Week .
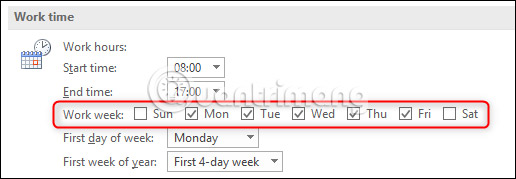
For example, we will change to show that Friday is not a working day. When creating a new meeting request, the Scheduling Assistant section displays the entire day as a light gray bar, indicating that you are not available at this time.

Users may need to explain to their colleagues the meaning of gray bars, as well as encourage them to set their own days and hours into Outlook.
Wishing you a successful change!
See more:
- Manage Outlook mail more efficiently with Xobni Plus
- Add time zone in Outlook Calendar
- Instructions for renaming display in Outlook