Table of Contents
This updated guide examines How to Delete Thumbs.db File on Windows 10 and organizes the essential facts, background, and practical takeaways in clear American English.
Although these files are harmless, they can sometimes cause problems. For example, if you moved content from a Windows 10 device to a shared network, then you want to delete the folder, you'll get the message 'The action can't be completed because the file is open in Windows Explorer ' , which involves the thumbs.db file preventing you from deleting the directory.
In this tutorial, you are guided step by step to delete thumbs.db file and remove network folders on Windows 10.
How to delete thumbs.db file with File Explorer
To delete file thumbs.db:
1. Open File Explorer.
2. Navigate to the directory you want to delete.
3. Click the View tab .
4. Select the Hidden items option .
5. In the Layout section, select the Details view option .
6. Select file thumbs.db.
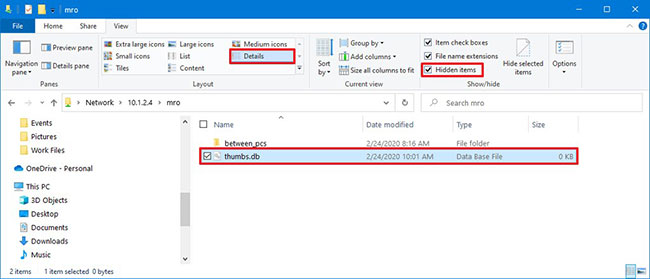
7. Click the Delete button from the View tab .
8. Click the Yes button .
When you complete the steps, the thumbs.db file will be deleted without a problem. However, if the steps above do not work, you can switch to another view, then select the Details view again .
How to delete thumbs.db file by turning off Preview Cashing
In case thumbs.db cannot be deleted, you can try disabling the Thumbnail Previews feature on Windows 10.
Disable thumbs.db with Group Policy
To disable thumbs.db cache writing for network folders, follow these steps:
1. Open Start.
2. Search for gpedit and click on the first result, open Group Policy Editor .
3. Click User Configuration from the left panel.
4. Browse to the following link:
Administrative Templates > Windows Components > File Explorer5. Double-click the policy Turn off the caching of thumbnails in hidden thumbs.db files .
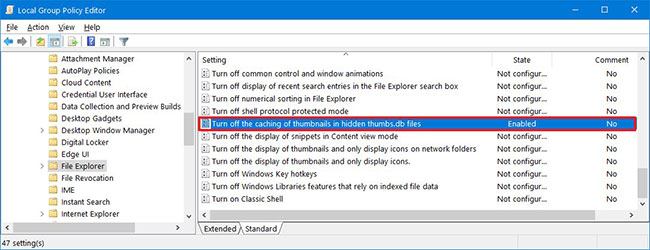
6. Select the Enabled option to turn off the feature.
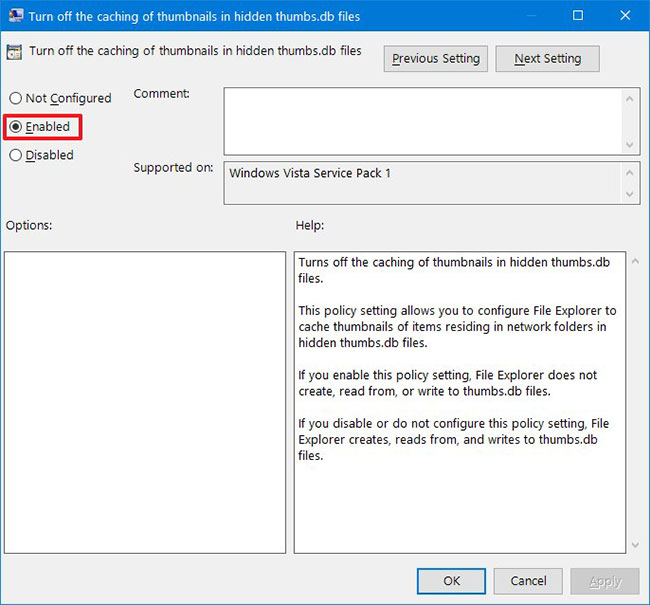
7. Click the Apply button .
8. Click the OK button .
9. Restart the computer.
After you complete the steps, you should now be able to delete the thumbs.db file.
Disable thumbs.db with the Registry
1. Open Start.
2. Search for regedit , right-click on the top result and select the option Run as administrator .
3. Browse the following link:
HKEY_CURRENT_USERSoftwarePoliciesMicrosoftWindows4. Right-click on the Windows folder, select New and click Key.
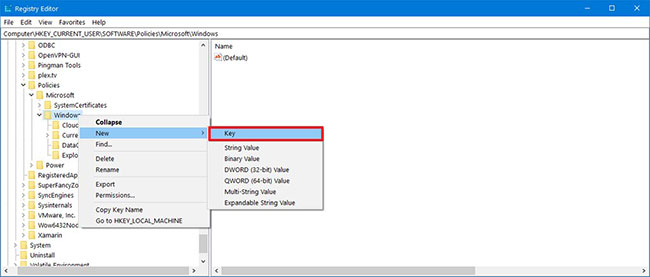
5. Name the key Explorer and pressEnter.
6. Right-click the newly created key and select New , then click the DWORD (32-bit) Value option .
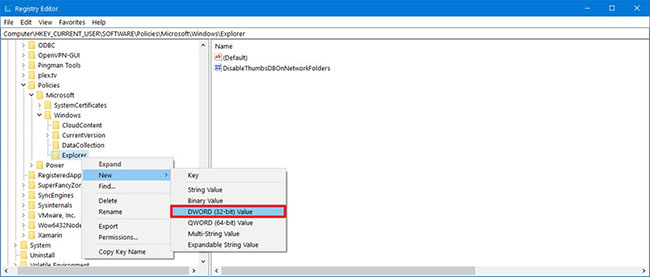
7. Double click on the newly created DWORD and change its value from 0 to 1 .
8. Click the OK button .
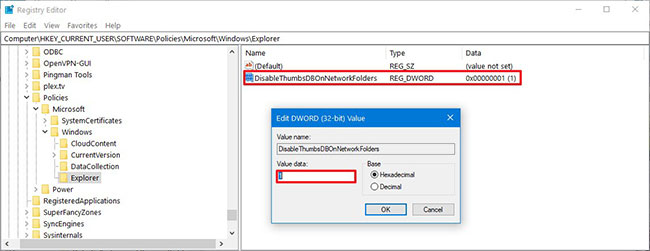
9. Restart the computer.
Once you complete the steps, the new settings will apply and you will now be able to delete the thumbs.db file without the message 'The action can't be completed because the file is open in Windows Explorer' .
FAQ
What is How to Delete Thumbs.db File on Windows 10 about?
It provides a structured overview of windows 10, explains the main context, and highlights practical takeaways for readers.
Why does this topic matter?
Understanding the main concepts helps readers evaluate the issue, avoid common mistakes, and make better-informed decisions.
How should readers use this information?
Use the guidance as a practical starting point, confirm details that may have changed, and follow current product, safety, or security recommendations.
Related Articles
 What Is a .Tmp File? How to Open .Tmp File on Windows5 minutes read
 6 Ways to Permanently Delete Files on Windows - You Will Not Be11 minutes read
 How to Delete Undeletable Files in Windows4 minutes read
 Instructions: How to Permanently Delete Data in Windows6 minutes read
 How to Delete the Old File History Version in Windows 103 minutes read
 What File Is Hiberfil. Sys? How to Delete Hiberfil. Sys File in Windows5 minutes read
Reader Comments 0
Sign in with email or Google to join the discussion.