Table of Contents
This guide explains how to create a Photo Size of 3x4 in Paint, with clear steps, practical tips, and important checks before you begin.

Step 1: You proceed to open the image you want to create 3x4 size and select View -> Rulers to display the ruler.

Step 2: By default on Paint using Pixel units, it will be difficult for us to follow the 3x4 size. We will convert to centimeters by selecting File -> Properties . Then, select Centimeters and select OK to save.

Step 3: Next, we will proceed to Resize the size of the image. You select the Resize tool and choose the Pixels mode.
One thing to consider is that your original image does not know the original proportions, so we will Resize the width of the image to 3cm and then handle it vertically later.
The width of 3cm is 85 pixels, enter Horizontal: 85 and click OK .

Step 4: After that, you will have an image with a width of 3cm. Now select the Select tool and click on the bottom edge of the image to drag it to 4cm above the ruler.
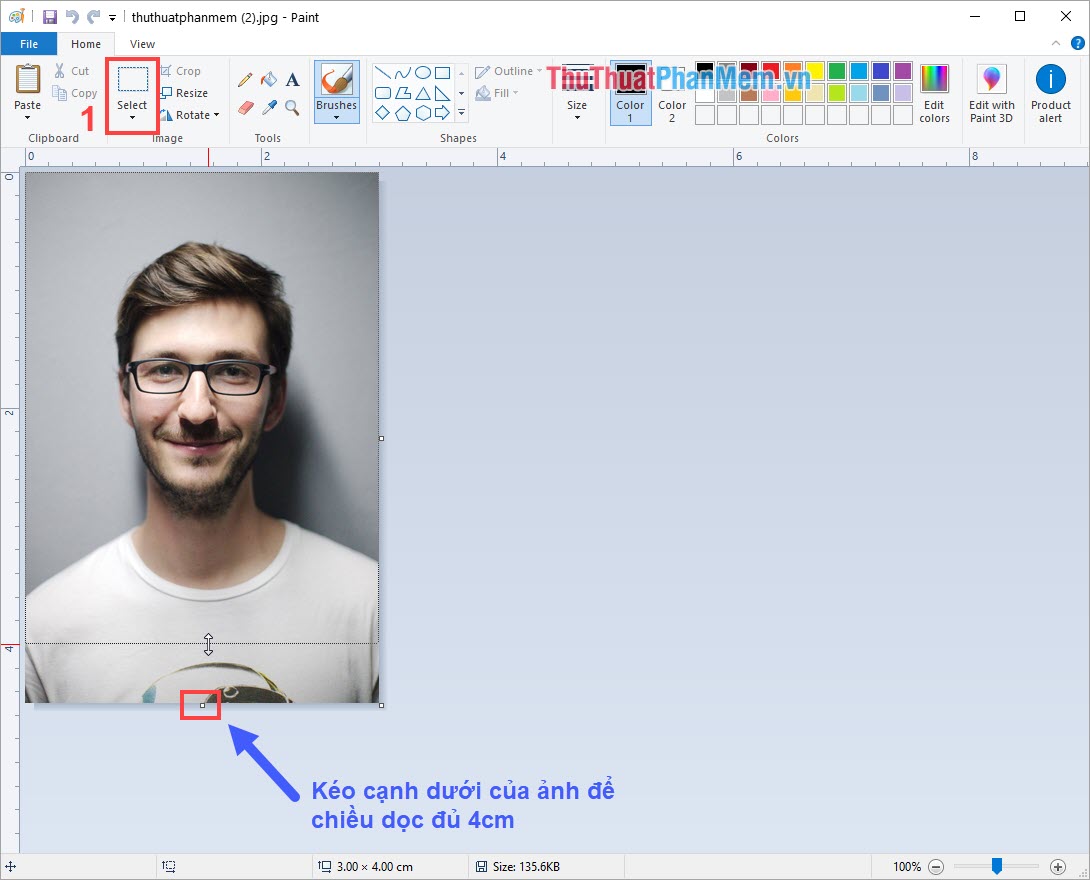
Step 5: Finally, we get the resulting 3x4cm image as follows.

Step 6: Choose File -> Save As -> PNG Picture to save the image and print it.

In this article, Software Tips showed you how to create 3x4 photos using Paint software on Windows. Good luck!
FAQ
What should I know about Create a Photo Size of 3x4 in Paint?
Focus on the key features, requirements, limitations, and practical use cases explained in this guide.
How do I get the best results with Create a Photo Size of 3x4 in Paint?
Follow the recommended steps, use current software or information, confirm compatibility, and review settings before major changes.
Are there any risks or limitations?
Potential limitations depend on compatibility, data quality, cost, privacy, support, and how the product or method is used.
Related Articles
 How to Download and Install Paint.net3 minutes read
 How to Create a 3x4 Photo in Paint: Step-by-Step Guide3 minutes read
 How to Use Paint: How to Create a Photo Frame on Paint4 minutes read
 Learn How to Use Paint to Edit Photos on Windows23 minutes read
 Image: How to Make Thumbnails8 minutes read
 Simple Photo Compositing on Microsoft Paint5 minutes read
Reader Comments 0
Sign in with email or Google to join the discussion.