How to create a Personal Wiki using Microsoft OneNote
Microsoft OneNote is a versatile note-taking application. Users can use it in any way to get the job done. With a simple wiki system, users can create connections with other notes in the same or other notebook.
Table of Contents
Microsoft OneNote is a versatile note-taking application. Users can use it in any way to get the job done. With a simple wiki system, users can create connections with other notes in the same or other notebook. Users can also link their notes to a website, Office documents, and more.
The deep link structure of OneNote ensures that users can quickly engage in building the knowledge base, dialectic thinking and academic research in specific contexts. Today's article will show you how to set up a wiki in OneNote and build your own knowledge store for information management.
What makes OneNote a great Wiki?
At the core, wikis are a web space where people can add or edit content. On any page, users can also visually link pages by highlighting keywords and topics.
The software then automatically catalogs and creates a hierarchy of categories from top to bottom. Although OneNote does not match a specialized wiki application, it has some great wiki related features.
- OneNote is free, multi-platform and easy to install. In a small group, you can share organized information without losing too much to learn.
- OneNote does not limit users to a specific information structure. Notebook includes sections. Each section can be divided into groups with different objects. And each section can contain multiple pages or sub-pages linked together.
- Anyone who has access to a notebook can edit OneNote content. They don't even need to know how to edit wiki style.
How to set up a Wiki in OneNote
1. Create the homepage
We will set up a wiki home page with a preliminary outline of the document. The outline provides an overview of a specific topic. They are often created to plan and summarize a project.
Users can create an outline with a large headline and 3 main ideas below, each with 5 to 6 detailed lines as shown in the example below.
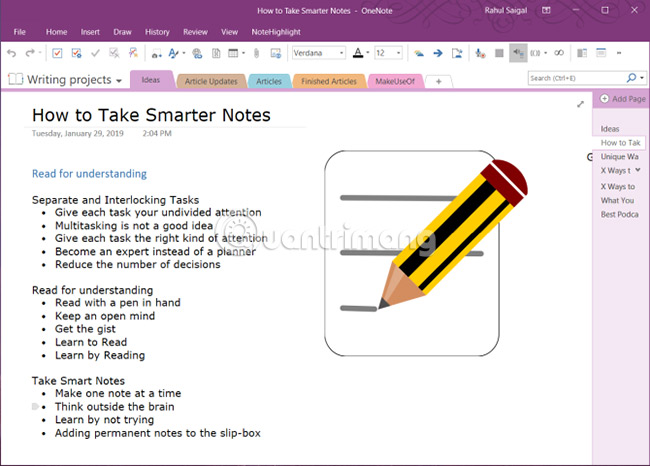
With each different project, users can add goals, to-do lists, calendars, Kanban tables or anything to personalize them. With the integration capabilities of OneNote, users can connect each topic to a page, paragraph, page in different sections or to a separate notebook.
2. Link to a page or section using Wiki syntax
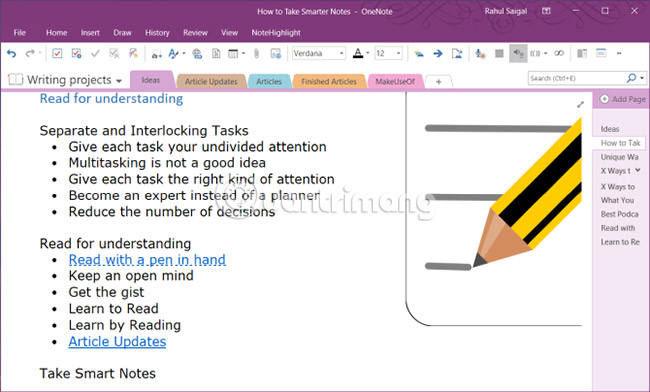
If it is just starting, users can immediately turn main ideas into individual pages. To do this, highlight the text and select Link to Pages from the context menu.
Each main idea forms a separate page in the notebook and inserts internal links that point to the corresponding page.

OneNote also supports link creation syntax used in some wiki packages. Enter 2 left brackets followed by the name of the page or section. This text must exactly match the name of the link target. Then end the link with 2 right brackets.
If the name of the link target already exists, the text will point to that location in a blue line. Or else, OneNote will create a new blank page with a blue dashed line so you know how to add content to this page.
Note : Even if the destination link is deleted, OneNote will still open the deleted page through the notebook trash. You can restore that page within 60 days. If there is a section and a page with the same name, the wiki links will prioritize the previous page. Try using manual methods to create links.
3. Link to a part via the Link dialog
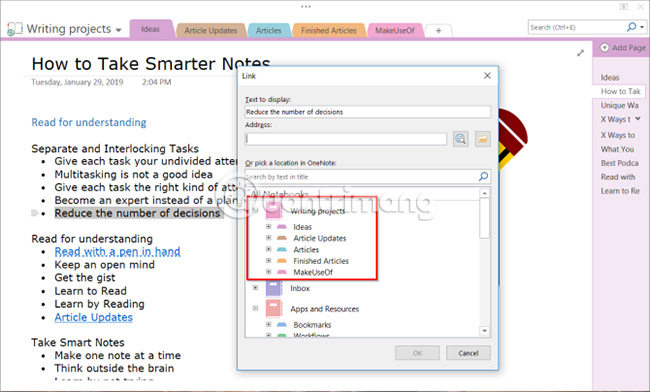
Highlight the text you want to link, then select Insert> Link . From the Link dialog box , click the + next to the notebook, expand the notebook and select the desired part. Click on the section or page you want to link and select OK.
Links created through the wiki or manual method will not be broken if you change the name of the page or section.
Even when moving pages and sections in a notebook, the link remains intact. OneNote will automatically update and maintain them when needed.
4. Link to a specific paragraph
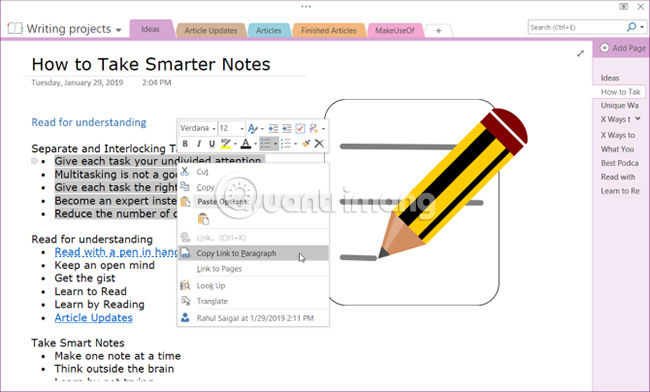
You can also link to a specific section in a notebook. This allows to go directly to the correct information. Open the notebook and navigate to the section you want to link.
Select text, right click and select Copy Link to Paragraph . Then switch to a page in another section, highlight the text and insert the link via the Link dialog .
5. Links to Office files and documents
The main advantage of using OneNote as a wiki platform is that it supports many different types of content. Users can get similar features with other wiki packages, but the implementation will be easier with OneNote. Navigate to the Files section , click the Insert tab and select File Attachment.
In addition, users can store attachments in the cloud. In OneNote for Windows 10, go to Settings> Options , then turn on the Store attachments option in the cloud. When inserting a file, such as a PDF file, OneNote will upload the file to OneDrive and insert a link to the file.

If it is a Microsoft Word document, OneNote will display a live preview of the document. Users can also link it to another page and see the changes made to the document in real time.
How to create a table of contents in OneNote
One of the best things about wikis is that it automatically does almost everything on the page. When users create titles in the page, the wiki will automatically create a table of contents.
Although OneNote does not allow creating table of contents by default, you can create a new top-level page and link to pages using wiki syntax.
To save time, install Onetastic and restart OneNote. Go to Macroland and install the macro table of contents. Select the link creation mode and select Create New TOC Page .

There are also macros to create table of contents in the notebook and the current page. And if you want to create more pages, you can update the table of contents without deleting the current pages.
How to view page history in OneNote
The history page shows all the edits the user has made to an article. In Wikipedia, users will see the page history as the View history in the top right corner of the page. There are many editing options for pages in this section.
In OneNote 2016, navigate to the History section and click Page Versions. The user will see all the edits made on that page with the execution date in the page navigation bar.
To restore the older version, click the yellow bar at the top of the page. The user can then choose to restore the page or delete this history from the page versions.

How to collaborate with other users in OneNote
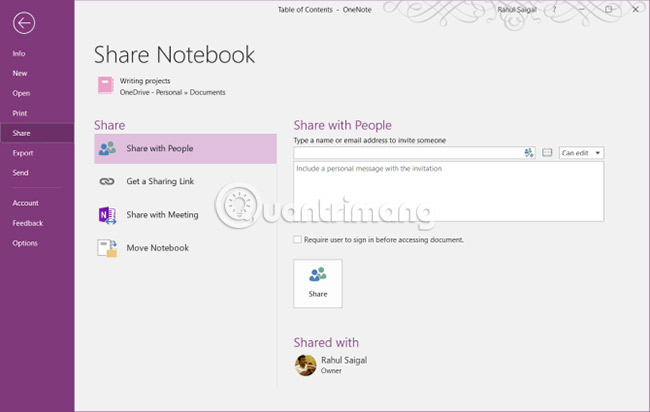
When working on a wiki project, you may want to share notes with other people in your group and collaborate together. Navigate to the File section and click Share to display sharing options. Click Share with People to display the Share with People box.
Enter the email addresses of people who want to share and choose Can edit. Then click the Share button . The invitee must click on the invitation email to open the notebook in OneNote Online.
When more than one user is editing the notebook, each change made will be determined by their name or initials. Hover over the name to see the date and the author of the page.
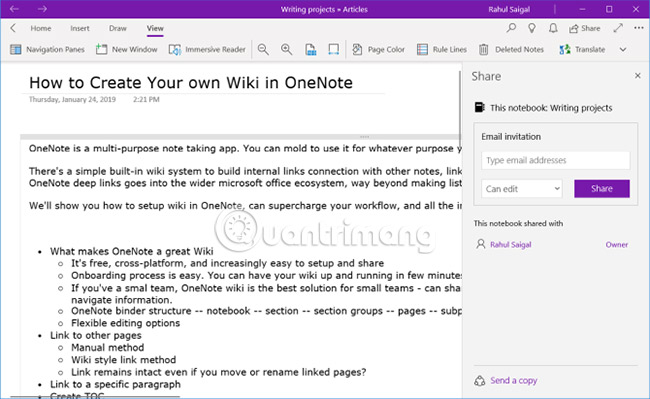
In OneNote for Windows 10, open the notebook you want to share. In the upper right corner of the application window, click Share. Then repeat all the steps.
When starting a partnership, maintaining wiki pages becomes simple and can manage a lot of information quickly.
OneNote is a powerful wiki platform. The best way to understand what suits you is to experiment. See what features are useful, make regular edits according to which information structure, and then integrate it into the workflow.
Good luck!
Was this article helpful?
Your feedback helps us improve.
Related Articles
 How to use OneNote template10 minutes read
 The best Microsoft OneNote download sites6 minutes read
 Microsoft has just freeed all features on OneNote2 minutes read
 Simple way to transfer Evernote data to OneNote2 minutes read
 Top 5 Sites to Download Free OneNote Templates5 minutes read
 How to Use OneNote8 minutes read
Reader Comments 0
Sign in with email or Google to join the discussion.