Table of Contents
This practical guide explains how to create a ''guest'' account on windows 11 with clear steps and useful context. It also covers common requirements, potential problems, and the details that can help you get better results.
Unfortunately, creating a guest account in Windows 11 is not as easy as it was in previous versions. There are two ways we can solve this problem. Both methods will create a local account with no password that anyone can use. Find out below.
What Is a ''guest Account'' in Windows 11?
Guest accounts feature on Windows in general has changed a lot over the years. Windows 7 and Windows 8 allow you to easily create a dedicated 'Guest' account. These accounts have limited access to the computer. For example, guest accounts will not be able to install software or change system settings.

Starting on Windows 10, Microsoft has hidden the guest account feature. Strictly speaking, Microsoft still retains the name "Guest" for the guest account, but basically users will not be able to create the same type of guest account as in Windows 7 and Windows 8.
Windows 11 is the same as Windows 10. The "real" guest account feature is not easily accessible. Instead, you'll create a local account that doesn't require a password. This account will still provide users with a productive space to interact, and without the limitations of Windows 7 and 8. Guest users can install software and adjust settings, but this will not affect your main profile (account).
Create a ""guest"" Account on Windows 11 Through the Settings App
First, open the Settings app on your Windows 11 device and navigate to Accounts > Family & Other Users.

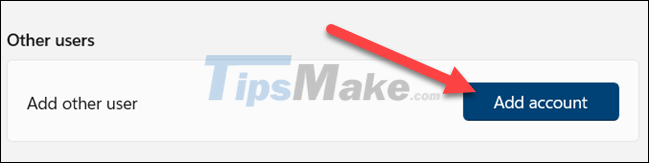
In the 'Other Users' section, click 'Add Account'.
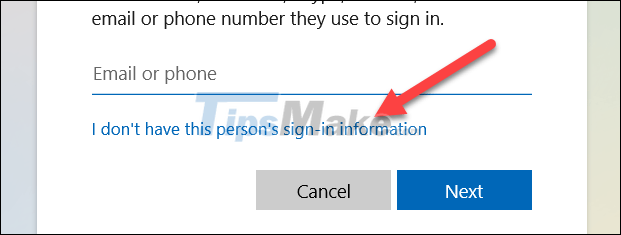
Windows will want you to sign in with a Microsoft account. Instead, click 'I don't have this person's sign-in information'.
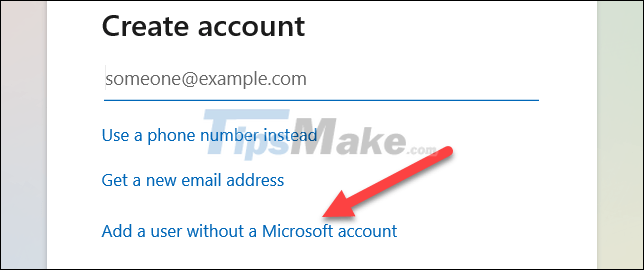
Next, select 'Add a user without a Microsoft account'.
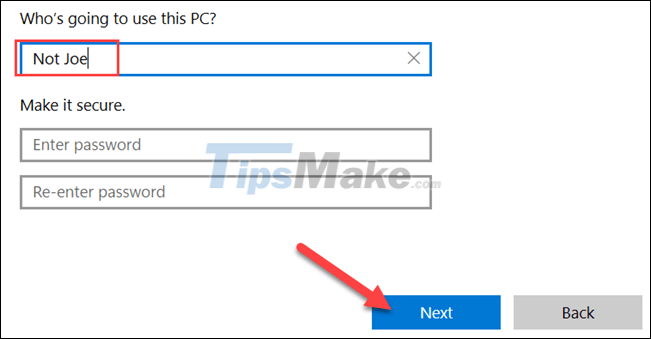
Now enter a name for the guest account. Leave the password fields blank and click 'Next'.
Done, this account will appear along with other existing accounts on the system. It will not ask for a password to log in and you can use it as a guest account.
Create Guest Account Via Command Line
This method requires a little more technique but has fewer steps.
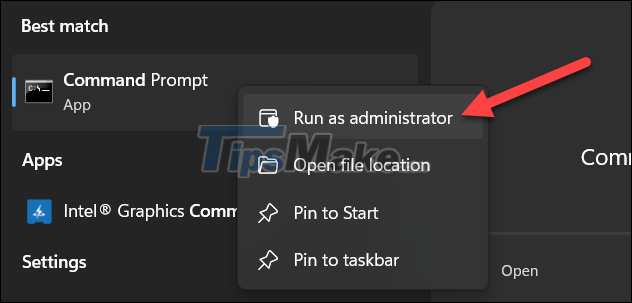
To get started, find the keyword 'Command Prompt' in the Start Menu and right-click to run it as administrator.
Type this command and press Enter:
net user Guest1 /add /active:yes
Note: You can replace "Guest1" with any other name, but "Guest" cannot be used.
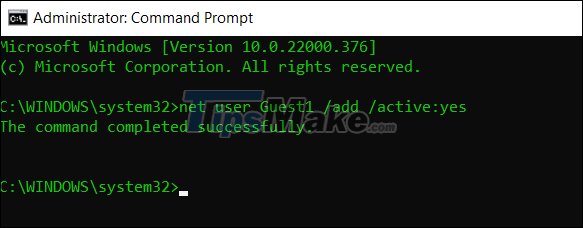
The system will show the message 'The command completed successfully', and you will see the newly created account listed in Settings > Accounts > Family & Other Users > Other Users.
It's not clear why Microsoft has removed the ability to create guest accounts like on older versions of Windows. Guest accounts actually have better limited features, but if you just want to let someone use your Windows 11 PC without affecting the data on it, here's the trick that can work!
Conclusion
Understanding Guest Account makes it easier to compare options, avoid common mistakes, and apply the information in this guide more effectively. Review the relevant requirements before making changes or choosing a solution.
FAQ
How do you create a ''guest'' account on windows 11?
Follow the steps in this guide in order, confirm the required settings or tools, and verify the result before making additional changes.
Is it safe to create a ''guest'' account on windows 11?
It is generally safe when you follow the recommended instructions, use trusted tools, and avoid changing settings you do not understand.
What should you do if the process does not work?
Recheck the requirements, restart the device or application when appropriate, and review each step for missed settings or compatibility issues.
Related Articles
 How to Use the Command to Create a Guest Account on Windows 105 minutes read
 How to Set Up Text-to-Speech on a Mac4 minutes read
 3 Simple Ways to Activate Guest Account on Windows 106 minutes read
 3 Ways to Activate Guest Account on Windows 8 // 8.14 minutes read
 Why Should You Activate the Guest Account on the Computer?5 minutes read
 How to Set Up a Secure Guest Account on a Windows Computer6 minutes read
Reader Comments 0
Sign in with email or Google to join the discussion.