How to Copy Your DVDs With Mac OS X
This wikiHow teaches you how to use your Mac to duplicate a data or video DVD. If the DVD is unprotected, you can copy it using Mac's built-in Disk Utility app. If the DVD is protected, which is usually the case with official movie...
Table of Contents
Method 1 of 2:
Copying an Unprotected DVD
-
 Insert the DVD that you want to copy into your Mac's CD slot. If your Mac doesn't have a built-in DVD-ROM drive, you can use an external one.
- This method should work for most data/software DVDs and home movies. If you're trying to copy a protected DVD such as an official movie or TV series release, see the Copying a Protected DVD Movie method.
-
 Open Disk Utility. An easy way to find the app is to click the magnifying glass icon at the top-right corner of the screen and type disk utility. The app's icon looks like a hard drive with a stethoscope.
 -
 Click your DVD's name in the left panel. It'll appear under the "External" header.[1]
 -
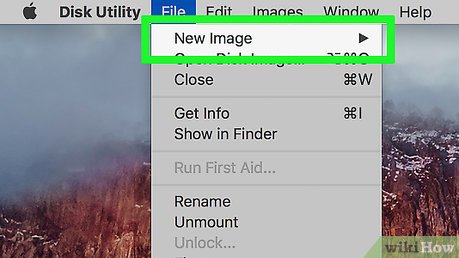 Click the File menu and select New Image.
 -
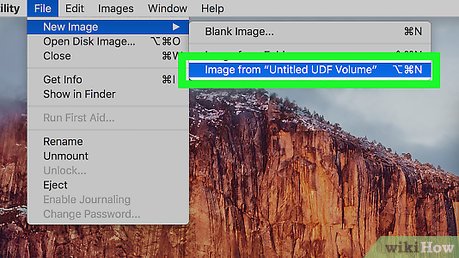 Click Image from [DVD name]. This opens a window with options for your DVD.
 -
 Enter a name for the file image. A file containing the contents of the DVD will be created with the name you type into the "Save As" field.
 -
 Select DVD/CD Master from the "Format" menu.
 -
 Select Desktop a saving location from the "Where" menu. This tells Disk Utility to save the ripped image to your desktop, which makes it easy to find. You can choose a different location if you'd like.
 -
 Click Save. This is at the bottom of the window. Disk Utility will now rip the DVD and create an image file ending with the .CDR file extension. You'll see a confirmation message once the process is complete.
- Eject the DVD from the drive when the ripping is complete.
-
 Insert a blank DVD into the DVD-ROM drive. When the blank DVD is recognized, you'll see an icon for it on your desktop.[2]
 -
 Double-click the disk image (.CDR file). If you saved the file to the desktop, just double-click the file ending in ".CDR" on your desktop now. This will mount the copied DVD image like a hard drive, causing a new hard drive icon to appear on your desktop.[3]
 -
 Right-click the disk image and select Burn. Make sure you're right-clicking the icon that looks like a hard drive, NOT the file ending in .CDR. A window will burning options will appear.
 -
 Select your options and click Burn. The defaults should be fine, but you're welcome to change them to your desired name and speed. A progress bar will keep you updated of the burn in real-time. Once the burn is complete, you'll see a confirmation message.
Method 2 of 2:
Copying a Protected DVD Movie
-
 Install HandBrake. HandBrake is an open-source application that allows you to copy DVDs to your Mac. HandBrake can rip any unprotected DVD by default, but you'll still need to install more tools before you can use it to copy protected/encrypted DVDs. You can download HandBrake from https://handbrake.fr/downloads.php.[4]
- After downloaded the HandBrake installer, double-click the file (it ends with .DMG), then double-click the HandBrake icon to install it.
-
 Download Burn for macOS. Burn is a free application that lets you burn playable movie DVDs on your Mac. Since your Mac doesn't come with such an app, using Burn is a great workaround. To download burn:[5]
- Go to https://burn-osx.sourceforge.io/Pages/English/home.html.
- Click the Download Burn link to save the ZIP to your Downloads folder. You can just run the app later without installing it, so just move to the next step for now.
-
 Install Homebrew. Homebrew is a package manager for your Mac that allows you to easily download and install software, including the libraries you'll need for ripping protected DVDs. Here's how to install Homebrew:[6]
- Open the Terminal app. You can do this by clicking the Spotlight icon at the top-right corner, typing terminal, and then clicking Terminal in the search results.
- Type the following at the prompt: ruby -e "$(curl -fsSL https://raw.githubusercontent.com/Homebrew/install/master/install)"
- Press ⏎ Return to run the command.
- Follow the on-screen instructions to complete the installation. Leave the Terminal window open when you're finished.
-
 Type brew install libdvdcss into Terminal and press ⏎ Return. This installs the necessary library for ripping protected DVDs on your Mac. Follow any on-screen instructions that appear to confirm the installation.
 -
 Insert the DVD that you want to copy into your Mac's CD slot. If your Mac doesn't have a built-in DVD-ROM drive, you can use an external one.
 -
 Open HandBrake and select your DVD. Now that the app is installed, you'll find it in your Applications folder. Information about the DVD will appear.[7]
 -
 Select a title from the "Title" drop-down menu. It's at the top-left corner of the window. If you only have one option here, great! If not, your DVD likely has some bonus features that'll need to be ripped separately. Select the option with the longest running time to begin by ripping the main presentation. If you want to rip the remaining files afterward, you can do so by selecting another title.
 -
 Select a preset from the right panel. The option you select depends on the quality of the DVD. If you want to use surround sound, be sure to select one of the options with Surround in the title.
- If you're ripping a DVD sold in the United States, choose one of the 480p presets. If the DVD is European, choose 576p. Larger presets will only make the file size bigger rather than improving overall quality.
- If you don't see a panel on the right side of HandBrake that displays a list of qualities (e.g., "Very Fast 1080p30"), click the Toggle Presets icon at the top-right corner of the app.
-
 Click Browse to select a saving location. The button is in the "Destination" section. Once you select a folder (e.g., Desktop), click Choose to select it.
 -
 Click Start. HandBrake will now copy the DVD to the selected location as an MP4 file. This can take a while depending on the size of the DVD and the speed of your DVD-ROM drive. HandBrake will notify you once the process is complete.
- Remove the DVD from the drive once the rip is complete.
-
 Insert a blank DVD. Once the DVD is detected, its icon will appear on your desktop.[8]
 -
 Open Burn. This is the burning software you downloaded earlier. Follow these steps to open it:
- Double-click the BURN ZIP file in your Downloads folder.
- Double-click the Burn folder inside.
- Double-click the yellow-and-black Burn icon.
-
 Click the Video tab. It's at the top of the Burn window.
 -
 Drag the ripped movie file(s) into the Burn window. For example, if your MP4 file is on your desktop, drag it to the main area of Burn to add it to the burning list. If you ripped multiple titles from one DVD, drag all necessary files to Burn now.
- If you are prompted to convert the file, click Convert to do so, and follow the on-screen instructions.
-
 Enter a name for the DVD. This goes into the blank at the top of the window.
 -
 Click the Burn button. It's at the bottom-right corner of the Burn window.
 -
 Select your preferences and click Burn. The default options should be fine, but make sure the correct DVD-ROM drive is selected. Once you click Burn, the movie will begin to write to the DVD. This can take several minutes depending on the movie size and the speed of your DVD-ROM drive. A progress bar will keep you updated in real-time. Once the burn is complete, you'll see a confirmation message.
Was this article helpful?
Your feedback helps us improve.
Related Articles
 How to Copy (rip) DVD discs with VLC10 minutes read
 How to Store DVDs8 minutes read
 How to Copy a DVD on a Windows Computer3 minutes read
 Instructions for copying CDs/DVDs using Nero2 minutes read
 How to Copy DVD Discs onto a PC and Burn a New DVD6 minutes read
 How to Copy DVD Audio to MP3 with VLC Media Player9 minutes read
Reader Comments 0
Sign in with email or Google to join the discussion.