Table of Contents
This practical guide explains how to burn iso image file to usb using etcher with clear steps and useful context. It also covers common requirements, potential problems, and the details that can help you get better results.
Although operating systems have this feature built-in, it is difficult to use. That's where the Balena-developed Etcher comes in. This tutorial will show you how to burn an ISO file to USB using Etcher, no matter what operating system you use.
Developed by Balena, Etcher is now freely available for macOS, Windows (installable and portable) and Linux (AppImage 32-bit and 64-bit).
- Download Etcher (Free)
Just click the Download button. The website will detect your operating system and make sure you download the correct version.
On Windows and macOS, you'll need to install Etcher. For Linux users whose system accepts AppImage files, you can simply double-click the downloaded file and Etcher will run.
Flash ISO File to USB or SD Memory Card with Etcher
To create a bootable USB or SD card from the ISO file you downloaded to your computer:
Step 1. Connect the USB or insert the SD card into the card reader
Step 2. Launch Etcher
Step 3. Click Flash from file
Step 4. Browse your computer for the downloaded ISO file
Step 5. With the file selected, click OK
Step 6. Next, click Select target.
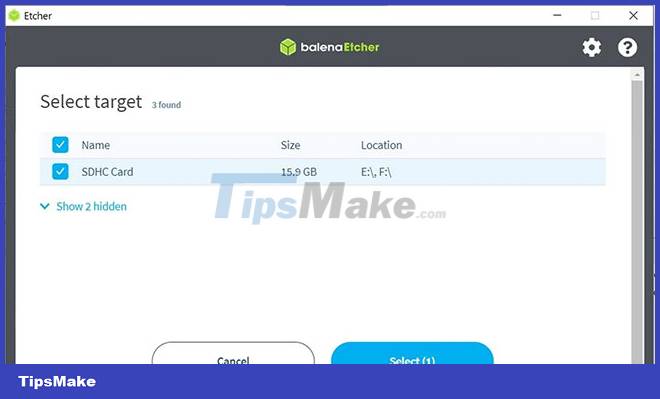
Step 7. Find the USB or SD card
Step 8. Click OK
Step 9. Click Flash
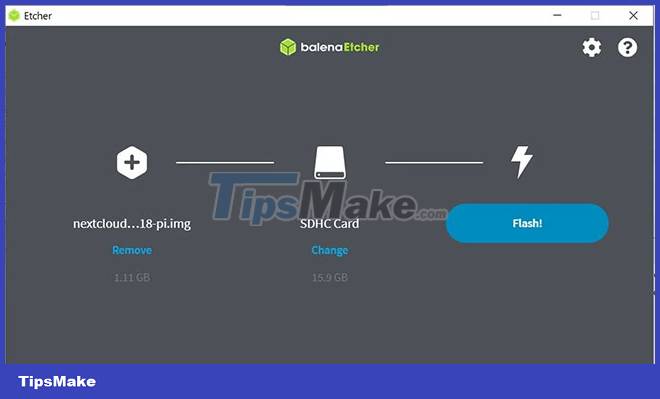
Then, Etcher will proceed to burn the ISO file to the selected media. Wait until the process is complete, as there will be a verification phase.
The app will notify you when the process is complete. Only then should you remove the USB or SD card.
How to Burn ISO File to USB from Internet with Etcher
Sometimes, you won't have the ISO file available on your computer. Instead, it will be available as a downloadable file.
Instead of downloading the file to your computer first, you can instruct Etcher to get the file directly from the Internet and write it to a USB or SD card.
Step 1. Open the website that provides the ISO file's URL in the browser.
Step 2. Connect the USB or insert the SD card into the card reader.
Step 3. Launch Etcher.
Step 4. Click Flash from URL.
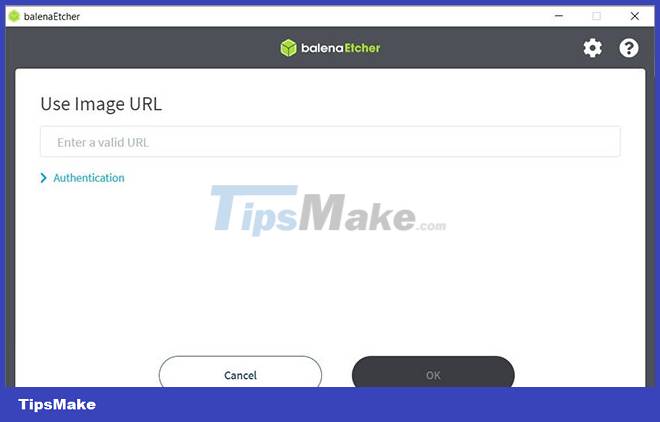
Step 5. Copy the URL of the file into the Enter valid URL field.
Step 6. If login information is required, click Authentication, then enter username and password
Step 7. Click OK
Step 8. Click Select target
Step 9. Browse USB or SD card
Step 10. Click OK, then click Flash
Wait until the process is complete before removing the USB or SD card.
If you want to know the best way to burn ISO files to USB or SD card, congratulations, you have found what you need. Etcher makes the process simple and easy (in most cases, just 5 clicks).
With the ability to flash from downloaded or online files, Etcher is the kind of app everyone should have. You may not use it often, but when needed, Etcher will do exactly what you want.
However, Etcher will not allow you to mount or browse the disk image ISO. But that shouldn't be a problem, as the OS will do it for you.
Conclusion
Understanding Etcher makes it easier to compare options, avoid common mistakes, and apply the information in this guide more effectively. Review the relevant requirements before making changes or choosing a solution.
FAQ
How do you burn iso image file to usb using etcher?
Follow the steps in this guide in order, confirm the required settings or tools, and verify the result before making additional changes.
Is it safe to burn iso image file to usb using etcher?
It is generally safe when you follow the recommended instructions, use trusted tools, and avoid changing settings you do not understand.
What should you do if the process does not work?
Recheck the requirements, restart the device or application when appropriate, and review each step for missed settings or compatibility issues.
Related Articles
 ISO File: How to Burn ISO Image File to CD, DVD6 minutes read
 How to Burn ISO File to DVD: Clear Instructions6 minutes read
 Instructions to Change DMG File to ISO File3 minutes read
 How to Burn MP4 to DVD: Step-by-Step Guide12 minutes read
 Tips to Burn ISO File from Command Prompt on Windows 104 minutes read
 Burn: How to Export Imovie Project to Dvd12 minutes read
Reader Comments 0
Sign in with email or Google to join the discussion.