Table of Contents
This updated guide examines Click: How to Convert Any Type of Audio in Windows Media Player and organizes the essential facts, background, and practical takeaways in clear American English.
Method 1of 2:
Using a CD to Convert Audio
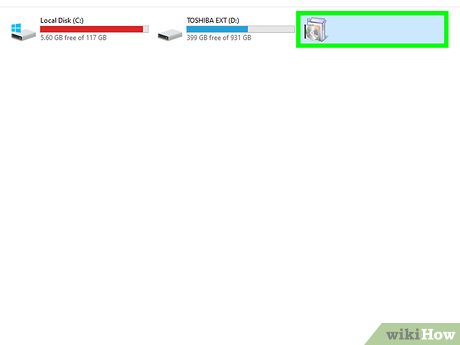 Insert a blank CD into your computer. Windows Media Player technically can't convert audio from one format to another. To do this, you'll need to burn audio files to an audio CD. You can then use Windows Media Player to rip the audio CD and save the audio files to WMA, MP3, WAV, ALAC, or FLAC formats.
- It's best to use a CD-RW for this step since you can burn, erase, and re-burn a CD-RW hundreds of times before needing to replace it.
- If your computer doesn't have a DVD drive built into it, you'll need to buy and attach a USB DVD drive.
 Open Start
 . Click the Windows logo in the bottom-left corner of the screen.
 Type inwindows media player. This will search your computer for the Windows Media Player program.
 ClickWindows Media Player. It's the white "Play" button on a blue-and-orange background that's at the top of the Start window. Doing so opens Windows Media Player.
- If you don't see Windows Media Player here, it isn't installed on your computer. WMP is installed if you clean-install Windows 10 or if you upgraded to Windows 10 from Windows 7 or 8.[1]
 Click theMusictab. This option is on the left side of the Windows Media Player window. A list of your Windows Media Player's music will open.
 Click theBurntab. It's in the upper-right side of the window. This will open the Burn pane on the right side of the window.
 Add music to the CD. Click and drag each song that you want to convert into the Burn pane. You can select as many as 80 minutes of music for most CDs.
- If the music that you want to add isn't already in Windows Media Player, find on your computer the music files in question and then click and drag them into the Burn section of Windows Media Player.
 ClickStart burn. It's at the top of the Burn section. Your music will begin burning onto the CD.
 Wait for the burn to finish. This can take anywhere from a few seconds to a few minutes. Once the CD is burned, you can enable CD ripping so you can rip it back to your computer in the desired format.
 Click theOrganizetab. It's in the upper-left side of the Windows Media Player window. A drop-down menu will appear.
 ClickOptions…. Clicking it prompts a window to open.
 Click theRip Musictab. It's at the top of the window.
 Select a save location. Click Change near the top of the Rip Music page, then select a folder and click OK .
 Select a file format. Click the "Format" drop-down box in the middle of the page, then click the file format that you want to use.
- Popular formats include the universal MP3 format and the lossless WAV format.
- Any format labeled "Windows Media" is only compatible with Windows, so avoid these options if you're trying to convert your audio files into something that you can play anywhere.
 Adjust the quality. Click and drag the slider at the bottom of the page to the right to increase each file's prospective quality if necessary. Keep in mind that increasing quality will also increase the file size for each music file.
 ClickApplyand thenOK.
 Insert the CD you ripped. Your computer will treat it like a normal audio CD. You can go ahead and hit the pause button so it stops playing.
 ClickRip CD. It's at the top of the Windows Media Player window. Clicking it will prompt Windows Media Player to begin copying the CD's files onto your computer in your specified file format. This will usually take between 10 and 30 seconds per song. Once the rip is complete, the files will appear in the directory you selected in the desired format.
Method 2of 2:
Converting Audio Files With VLC
 Download and install VLC Media Player. If you are unable to burn or rip audio CDs using Windows Media Player, or just want an easier method, you can use VLC to convert audio files from one format to another. You can download VLC from https://www.videolan.org/vlc/index.html.
 Open VLC. It has an icon with an orange cone. Click the Windows Start menu in the lower-left corner and typeVLC. Then click VLC to open it.
 ClickMedia. It's the first option in the menu bar at the top of VLC. This displays a drop-down menu.
 ClickConvert / Save. It's near the bottom of the Media menu in VLC. This opens the converter.
 Click+ Add. It's to the right of the file selection box in VLC.
 Select the files you want to convert and clickOpen. Navigate to the audio files you want to convert and click them to select them. Then click Open in the lower-right corner to add the files to the File Selection box in VLC.
- To select multiple files at once, press and holdCtrland click all the files you want to select.
 ClickConvert / Save. It's in the lower-right corner of the Converter window.
 Select an audio profile. Use the drop-down menu next to "Profile" to select an audio format. You can select OGG, MP3, FLAC, or CD.
 Click the wrench icon (optional). It's the icon next to the Profile drop-down menu. This allows you to edit the audio profile.
 Select a format (optional). Click the radial button next to one of the listed formats to select a different format.
 Click theAudio Codectab (optional). This tab allows you to edit how the files will be converted.
 Select an audio codec (optional). Use the drop-down menu next to "Codec" to select the audio format the files will ultimately be converted to
 Adjust the audio bit rate. You can click the up or down arrows next to the Bitrate box to adjust the bit rate, or you can type in your own bitrate number. Higher bitrates produce better quality audio but take up more space on your hard drive and devices.
- In MP3 format, a bitrate of 128 kb/s produces average quality audio,!92 kb/s produces above-average quality audio, 320 kb/s produces CD perfect audio quality.
 ClickSave. This saves the changes you made to the profile.
 ClickStart. This starts the conversion process. This starts the conversion process. the converted files can be found in the same location as the original files.
FAQ
What is Click: How to Convert Any Type of Audio in Windows Media Player about?
It provides a structured overview of click, explains the main context, and highlights practical takeaways for readers.
Why does this topic matter?
Understanding the main concepts helps readers evaluate the issue, avoid common mistakes, and make better-informed decisions.
How should readers use this information?
Use the guidance as a practical starting point, confirm details that may have changed, and follow current product, safety, or security recommendations.
Related Articles
 How to Copy DVD Audio to MP3 with VLC Media Player: Step-by-Step Guide11 minutes read
 How to Reinstall Windows Media Player4 minutes read
 File: How to Convert Wma to Wav4 minutes read
 8 Tips to Make VLC the Best Open-source Media Player9 minutes read
 22 Shortcuts to VLC for Windows and Mac8 minutes read
 Summary of Shortcuts in Windows Media Player5 minutes read
Reader Comments 0
Sign in with email or Google to join the discussion.