Table of Contents
To connect a Windows PC to Wi-Fi, select the network icon on the taskbar, choose the correct network name, and enter its password. The current Windows 11 interface differs from older Windows 10, 8, and 8.1 screens, but the basic sequence is the same.
Connect in Windows 11
- Select the combined Network, volume, and battery area on the right side of the taskbar.
- Next to Wi-Fi, select Manage Wi-Fi connections or the arrow that opens the network list.
- Make sure Wi-Fi is on and Airplane mode is off.
- Select the network name, choose Connect, and decide whether to enable Connect automatically.
- Enter the network security key and select Next.
- If Windows asks whether the PC should be discoverable, choose No on public networks. Choose Yes only on a trusted private network when you need local sharing.
Microsoft's current Windows Wi-Fi guide also explains connecting by scanning a supported network QR code.
Connect in Windows 10
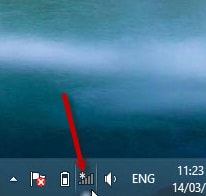
- Select the network icon in the notification area.
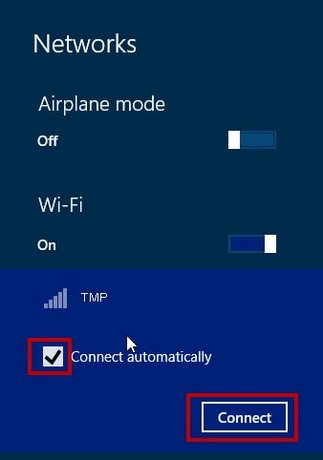
- Choose the Wi-Fi network from the list.
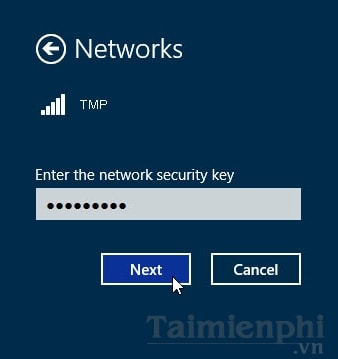
- Select Connect, enter the password, and choose Next.
The screenshots below show the familiar Windows 8/10-era interface and the same connection flow.
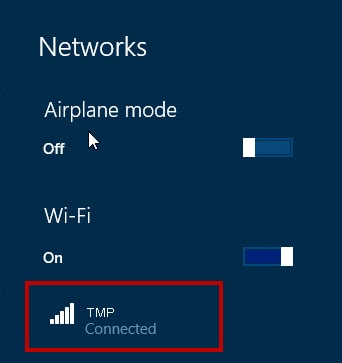
Windows 8 and 8.1
Select the network icon on the taskbar or open the Charms bar and choose Settings > Network. Select the network name, choose Connect, enter the security key, and select Next. If prompted about sharing, enable it only for a trusted home or work network.
Windows 8.1 support ended on January 10, 2023, and Microsoft no longer provides standard technical assistance or security updates. Use the steps above only to maintain a legacy device while planning a move to a supported operating system; see Microsoft's Windows 8.1 support notice.
Connect to a hidden Wi-Fi network
A hidden SSID will not appear by name in the normal list. In Windows 11 or 10:
- Open Settings > Network & internet > Wi-Fi > Manage known networks.
- Select Add network.
- Enter the exact network name, security type, and password supplied by the owner.
- Choose whether to connect automatically, then save.
Hiding an SSID is not a substitute for encryption; use WPA2-Personal or WPA3-Personal and a strong password.
If the network does not appear
- Confirm Wi-Fi is on and Airplane mode is off.
- Move closer to the router and refresh the network list.
- Check for a physical wireless switch or function-key shortcut.
- Open Device Manager > Network adapters and verify that the wireless adapter is enabled.
- If only a 5GHz or 6GHz network is missing, the adapter may not support that band.
If Windows shows no Wi-Fi controls, use TipsMake's guide to fixing a missing Wi-Fi icon. For a network that appears but will not connect, follow the Windows 11 Wi-Fi troubleshooting steps.
Fix an incorrect or changed password
Open Manage known networks, select the network, and choose Forget. Then reconnect and enter the current password. This removes the old profile only from the PC; it does not change the router's password.
Use automatic connection carefully
Connect automatically is convenient for a trusted home or workplace network. Leave it off for temporary public hotspots so the PC does not reconnect later without your attention. On public Wi-Fi, confirm the network name with the venue and avoid enabling local discovery or file sharing.
Related Articles
 KDE Connect - Download the Latest KDE Connect Here4 minutes read
 How to Install Miracast Connect App on Windows 103 minutes read
 Network: How to Connect to Wi-Fi in Windows 104 minutes read
 How to Fix Windows Cannot Connect to the Printer Error6 minutes read
 How to Connect a Computer to Wi-Fi Without a Password on Windows5 minutes read
 Connect 2 Windows Xp Laptops Without Cables6 minutes read
Reader Comments 0
Sign in with email or Google to join the discussion.