Table of Contents
This updated guide explains how to Configure Your PC to a Local Area Network through clear steps, practical examples, and important checks that help prevent common errors.
Method 1 of 3:
Setting Up the LAN
-
 Determine the number of computers you may need to connect. The number of computers you're connecting will determine the type of network hardware you'll need.
- If you are connecting four or less computers, you'll just need a single router, or one switch if you don't need internet.
- If you're connecting more than four computers, you'll want a router and a switch, or just a switch if you don't need internet.
-
 Determine your network layout. If your installing a permanent LAN solution, you'll want to keep cable length in mind. CAT5 Ethernet cables should not run longer than 250 feet. If you need to cover larger distances, you'll need switches at regular intervals, or you'll need to use CAT6 cables.
- You'll need one Ethernet cable for each computer you may need to connect to the LAN, as well as an Ethernet cable to connect the router to the switch (if applicable).
-
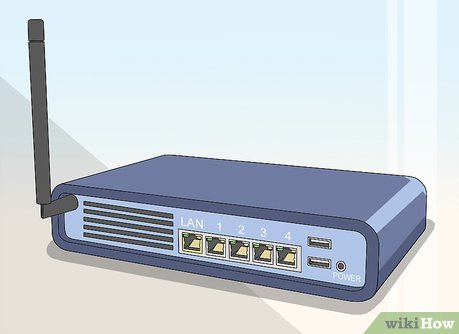 Obtain the network hardware. To create a LAN, you'll need a router and/or a network. These pieces of hardware are the "hub" of your LAN, and all of your computers will be connected to them.
- The easiest way to create a LAN where every computer has access to the internet is to use a router, and then add a network switch if the router doesn't have enough ports. A router will automatically assign an IP address to every computer that is connected to it.
- Switches are similar to routers but do not automatically assign IP addresses. Switches typically have many more Ethernet ports than a router has.
-
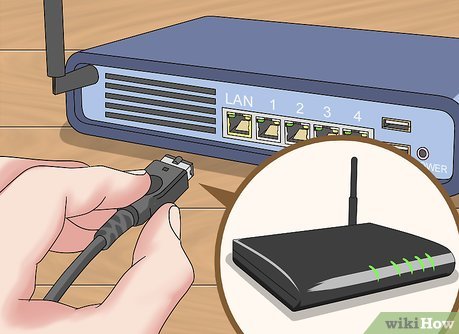 Connect your modem to the WAN port on the router. This port may be labeled "INTERNET" instead. This will provide internet access to every computer that is connected to your LAN.
- You can skip this if you're setting up a LAN without internet access.
- You don't need a router at all to create a LAN, but it makes things easier. If you just use a network switch, you'll need to manually assign IP addresses to each computer after connecting them.
-
 Connect the switch to a LAN port on the router. If you're using a network switch to connect more computers, connect it to one of the LAN ports on the router. You can use any open port on the switch to make the connection. When connected, the router will provide IP addresses for every computer that is connected to either device.
Method 2 of 3:
Connecting Your PC
-
 Find the Ethernet port on your PC. You can usually find this on the back of your desktop tower, or along the side or back of a laptop.
- Slim laptops may not have an Ethernet port, in which case you'll need to either use a USB Ethernet adapter or connect wirelessly if your router allows it.
-
 Plug one end of an Ethernet cable into your computer. Make sure you're using an Ethernet cable (RJ45), not a telephone cable (RJ11).
 -
 Plug the other end of the cable into an open LAN port. This can be any open LAN port on either the router or the switch, depending on your LAN setup.
 -
 Test out your network (router only). If you're using a router, your work is complete. Once all of the computers are connected to a LAN port, they will be assigned IPs automatically and will appear on the network. If you set up your LAN for gaming, you should be able to start your LAN game and have each computer connect.
- If you're using a switch and no router, you'll still need to assign IP addresses to each computer.
-
 Enable file and printer sharing. You won't be able to access resources on a networked computer until file and printer sharing is enabled. You can select specific files, folders, and drives to share on each computer, as well as share access to printers.
Method 3 of 3:
Assigning IP Addresses (No Router)
-
 Right-click your network connection. You'll see this in your System Tray. If you are connecting your computers through a switch with no router, you'll need to assign each computer on the network its own individual IP address. This process is handled automatically if you're using a router.
- Think of an IP address as a mailing address. Each computer on the network needs a unique IP address so that information sent across the network reaches the correct destination.
-
 Click Open Network and Sharing Center.
 -
 Click the Ethernet link at the top of the window. You'll see this next to "Connections."
 -
 Click Properties.
 -
 Click Internet Protocol Version 4 (TCP/IPv4). Make sure you don't uncheck it, just highlight it.
 -
 Click Properties.
 -
 Click the Use the following IP address radio button.
 -
 Type 192.168.1.50 into the IP address field.
 -
 Type 255.255.0.0 into the Subnet mask field.
 -
 Type 192.168.0.0 into the Default gateway field.
 -
 Click OK. This will save the settings for that computer. This computer is now configured on your network with a unique IP address.
 -
 Open the Internet Protocol Version 4 properties on the next computer. Follow the steps above on the second computer to open the Internet Protocol Version 4 (TCP/IPv4) Properties window.
 -
 Click the Use the following IP address radio button.
 -
 Type 192.168.1.51 into the IP address field. Notice that the final group of numbers has incremented by 1.
 -
 Enter the same values for Subnet mask and Default gateway. These values should be the same as they were on the first computer (255.255.0.0 and 192.168.0.0 respectively).
 -
 Give each additional computer a unique IP. Repeat these steps for each additional computer, incrementing the IP address by 1 each time (up to 255). The "Subnet mask" and "Default gateway" fields should be the same on each computer.
FAQ
What is the easiest way to Configure Your PC to a Local Area Network?
Start with the requirements in this guide, then follow each step in order. Check the result after every major change so problems are easier to identify.
Can beginners follow these instructions?
Yes. The process is organized into practical steps, and you can repeat any step before moving forward.
What should I check if the method does not work?
Confirm your software or device version, permissions, settings, file format, and internet connection when the task depends on online services.
Related Articles
 How to Configure Computers on a Local Network: Clear Instructions9 minutes read
 How to Set Up a Local Area Network (LAN): Practical Guide11 minutes read
 Learn About Local Area Network -- LAN (Part I)6 minutes read
 Learn About Local Area Networks -- LAN: Ethernet -- Part Ii3 minutes read
 Wide Area Network WAN -- Next Part18 minutes read
 How to Scan Local Area Network with Terminal on macOS5 minutes read
Reader Comments 0
Sign in with email or Google to join the discussion.