How to Connect Two Computers Together with an Ethernet Cable
This wikiHow teaches you how to connect to computers to one another by using an Ethernet cable. Once you've connected the computers, you can share files between them by using both computers' file sharing settings. Determine whether or not...
Table of Contents
Part 1 of 3:
Connecting the Computers
-
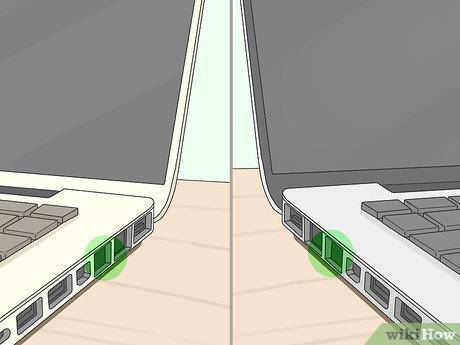 Determine whether or not your computers have Ethernet ports. Ethernet ports resemble large, rectangular ports which usually have a three-box icon next to them. You'll usually find Ethernet ports on one side of your computer's housing (laptop) or on the back of the tower (desktop).
- On iMac computers, the Ethernet port is found on the back of the monitor.
-
 Buy an Ethernet adapter if necessary. If your computer doesn't have an Ethernet port, you'll need to buy a USB Ethernet adapter for your computer. You can find these online (e.g., Amazon) and in tech stores (e.g., Best Buy).
- If you have a Mac, check your USB ports as well. You might have only USB-C ports (e.g., oval ports instead of rectangular ports) meaning that you'll either need an Ethernet to USB-C adapter or a USB to USB-C adapter as well.
-
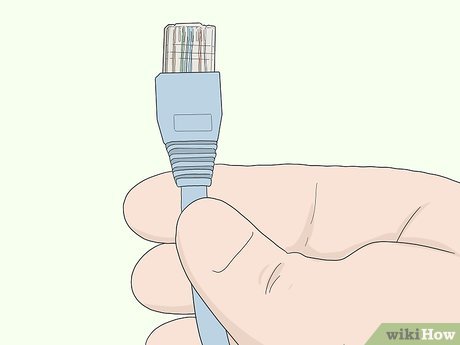 Check to see if you have a crossover Ethernet cable. While most Ethernet ports support both conventional Ethernet cables and crossover Ethernet cables, you can avoid potential errors by using a crossover Ethernet cable. To determine whether or not you have a crossover cable, view the colored wires at the end of each side of the cable:[1]
- If the colors are differently ordered on one end, you have a crossover cable.
- If the colors are the same for both ends from left to right, you have a conventional cable. You can still use this cable for most computers, but if you're connecting older computers to each other, consider buying a crossover cable if you run into issues.
-
 Plug one end of the Ethernet cable into one computer. The Ethernet cable's head should fit into the Ethernet port on your computer with the lever side facing down.
- If you have to use an Ethernet adapter, plug the USB end of the adapter into one of your computer's free USB ports.
-
 Plug the other end of the Ethernet cable into the other computer. The other end of the Ethernet cable should plug into the other computer's available Ethernet port.
- Again, if you have to use an Ethernet adapter for the other computer, plug it in first.
Part 2 of 3:
Using File Sharing on Windows
-
 Open Control Panel. Click Startin the bottom-left corner of the screen, type in control panel, and click Control Panel at the top of the menu.
-
 Click Network and Internet. It's in the middle of the Control Panel window.
- Skip this step if you see the phrase "Small icons" or "Large icons" next to the "View" heading in the upper-right corner of the window.
-
 Click Network and Sharing Center. You'll find this link near the top of the window.
- If your Control Panel is using the "Small icons" or "Large icons" view, you'll find Network and Sharing Center on the right side of the page.
-
 Click the Advanced sharing settings link. It's in the upper-left side of the window.
 -
 Check the "Turn on file and printer sharing" box. You'll find this box in the "File and printer sharing" section of the menu.
 -
 Click Save changes. It's at the bottom of the window. Doing so saves your changes and enables file sharing on your PC.
 -
 Share a folder. To allow the connected computer to view and edit the contents of any shared folder, do the following:
- Open the folder you want to share.
- Click the Share tab.
- Click the Specific people... entry.
- Click the downward-facing arrow in the drop-down box, then click Everyone in the resulting drop-down menu.
- Click Share, then click Done when prompted.
-
 Access a shared folder. If you want to view a shared folder on your PC, you can do so from within File Explorer:
- Make sure you shared the folder from your connected PC or Mac computer.
- Open File Explorer.

- Click the other computer's name in the left-hand sidebar.
- Enter the other computer's password if prompted.
- Open the shared folder to view its files.
Part 3 of 3:
Using File Sharing on Mac
-
 Open the Apple menu. Click the Apple logo in the top-left corner of the screen. A drop-down menu will appear.
-
 Click System Preferences.... You'll find this in the drop-down menu. Doing so prompts the System Preferences window to open.
 -
 Click Sharing. It's in the System Preferences window. This will open the Sharing window.
 -
 Check the "File Sharing" box. You'll find this on the left side of the Sharing window.
 -
 Change the "Everyone" permissions. Click the icon to the right of the "Everyone" heading, then click the Read & Write option in the resulting menu. This allows the connected computer to view and edit the contents of any shared folder.
 -
 Share a folder. To share a folder from your Mac to the attached computer, do the following:[2]
- Click + below the list of shared folders in the Sharing window.
- Find a folder you want to share.
- Click once the folder to select it.
- Click Add to add the folder to the list of shared folders.
-
 Access a shared folder. If you want to view a shared folder on your Mac, you can do so from within Finder:
- Make sure you shared the folder from your connected PC or Mac computer.
- Open Finder.

- Select the other computer's name in the left-hand column of options in the Finder window.
- Enter the other computer's password if prompted.
- Open the shared folder to view its files.
Was this article helpful?
Your feedback helps us improve.
Related Articles
 How to Connect Two Computers10 minutes read
 How to create an Ethernet crossover cable8 minutes read
 Ethernet cable and how it works4 minutes read
 Stop misusing Ethernet cables!7 minutes read
 These are the types of printer cables needed to connect to the computer6 minutes read
 How to Protect an Outdoor Ethernet Cable5 minutes read
Reader Comments 0
Sign in with email or Google to join the discussion.