Create P2P programs on the network using a broadband router
If you have built a network using a broadband router, this router will automatically prevent any peer-to-peer file sharing program (eMule, Shareaza, .) from working on your network: it will probably show up. display 'firewalled' or 'low ID'. As a result, you will suffer from a lower transfer rate and also cannot initiate file downloads since users are also 'firewalled'. In this tutorial we will show you how to configure the router to allow peer-to-peer file sharing programs to work.
The reason for this is because peer-to-peer (P2P) programs use non-standard ports to work. Because broadband routers work as a firewall, they block all connections that use non-standard ports. Therefore in theory it will be a problem of opening ports so that P2P programs can use the broadband router control panel to solve this problem. However this is not simple. Usually by simply opening the ports on the firewall program, you can access the server on the Internet with those ports, but it does not allow other computers on the Internet to access it. your computer. In other words, when the firewall allows outgoing connections (outgoing), it still works normally and blocks incoming connections. Note that when using P2P programs, your computer will work as a server, distribute files (and incomplete file sections) to other users.
In this tutorial we will use eMule as an example. The basic idea shown in this tutorial is the same for other programs; The only other thing is the exact location of the parts to be changed on the program. You will be able to apply this guide to other programs quickly.
Let's first take a look at the problem. After downloading and installing eMule on your computer, click ' Connect ', then you will get ' low ID ' status, as shown in Figure 1 (follow the red arrow). (For security reasons, we have deleted the IP address on this screen).

Figure 1: Low ID status with eMule
To check your connection, go to Options > Connection and click on Test Ports . This will check the connection to check if everyone on the Internet can access the files on your computer. Due to the low ID problem, the result will be no different than the figure shown in Figure 2.

Figure 2: Test connection failed
The goal in this tutorial is to get your computer to pass this test, thus obtaining a high ID status in eMule.
The first thing we should do is reconfigure eMule to use another set of TCP / IP ports. In the eMule version of the article, it is using ports 19034 for TCP protocol and 17157 for UDP protocol. You need to change it to 4660 for TCP protocol and 4670 for UDP protocol. This is done in Options > Connection . In Figure 3, you can see how the eMule has been configured and in Figure 4 eMule has been properly configured. Don't forget to click ' Apply ' after changing this configuration. Exit eMule.

Figure 3: The eMule ports are in use

Figure 4: eMule has been properly configured
If you use another P2P program, you should go to its configuration menu and change the default TCP and UDP ports to the suggested numbers in the article for the purpose of making it easier to follow instructions. this.
Now we need to configure the internal firewall of Windows XP.
Configure Windows XP firewall
Windows XP SP2 has an internal firewall that can block P2P connections (if you don't have SP2 installed, Windows Firewall is not available). Therefore, we have to configure Windows XP to open the used ports. If you have another firewall program installed such as ZoneAlarm or Norton Personal Firewall, you need to create a procedure on your firewall program. After running the P2P program for the first time, you can unlock it on Windows Firewall (by clicking Unblock on the screen shown in Figure 5 below) but all that is not enough.
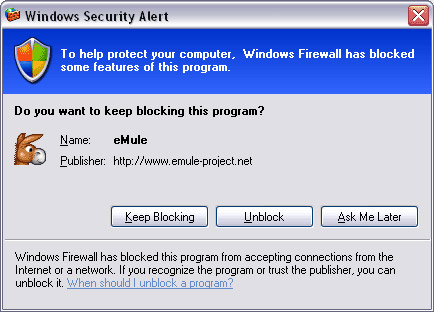
Figure 5: Windows asks if you want to unlock the P2P program when you first run it
Open Control Panel > Windows Firewall and click on the Exceptions tab. Your P2P program will probably be listed here (as shown in Figure 6), eMule has been listed. If not, click Add program and select your P2P program.
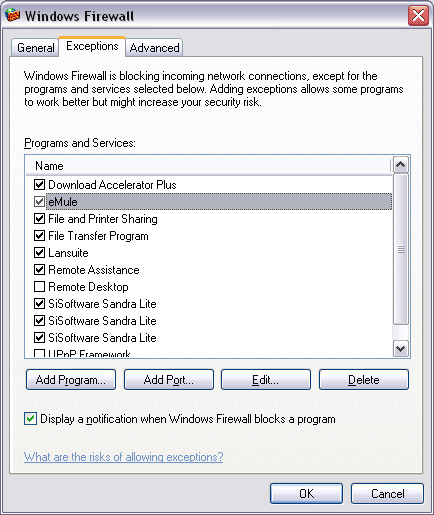
Figure 6: Configuring Windows firewall
Even if your P2P program is listed in the Windows Firewall Exceptions tab, you still have to click Add port . Then name this rule (eg 'eMule TCP Port'), add the TCP port number that eMule uses (4660), select ' TCP ' and click OK (see Figure 7).
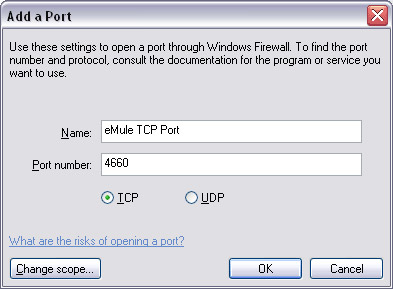
Figure 7: Adding the TCP port used by eMule.
Click again on Add port , name this rule (eg 'eMule UDP Port'), add the UDP port number used by eMule (4670), select ' UDP ' and click OK (see Figure 8 ).

Figure 8: Adding UDP port used by eMule
New rules will now be listed in the Windows Firewall Exceptions tab, see Figure 9.
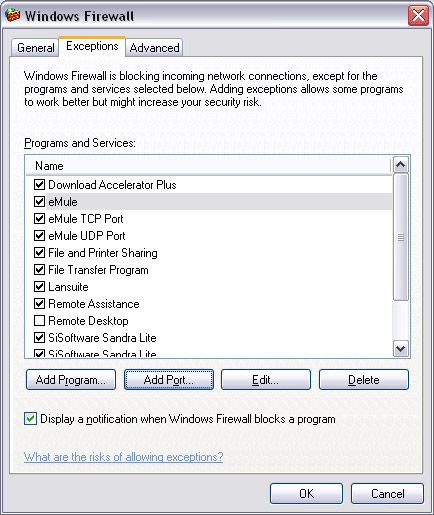
Figure 9: Exceptions of Windows Firewall
Now click the Advanced tab. The screen shown in Figure 10 will be turned on. Click the first Settings button in the " Network Connection Settings " field.

Figure 10: Windows Firewall
As you can see in Figure 11, there will be no configuration for your P2P program, so we need to add two configurations here, one for each protocol (TCP and UDP).
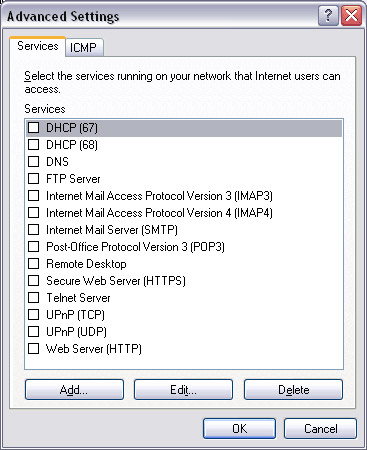
Figure 11: Advanced settings of the firewall
Click Add , then enter a name for this configuration (such as' eMule TCP Port '), the computer name or the IP address of the computer you are using, TCP port number (4660) in both' External Port number 'and' Internet port number ', click TCP and click OK . In this case, we used the computer name ' Gabe '.
If you don't know your computer's name, go to Control Panel > System > select the Computer Name tab. It will show your computer name here. If you prefer to use your computer's IP address and don't know it, click Start > Run > Cmd then type Ipconfig and press Enter . This command will list the IP address of the computer you are using. We know that your computer's IP address may change but will configure the router to assign the same IP address below, so you don't worry about this problem.

Figure 12: Adding the used TCP port
Now repeat the process for the UDP port: click Add , then enter a name for this configuration (such as 'eMule UDP Port'), the computer name or the IP address of the computer you are using, the port number UDP (4670) in both the 'External Port number' and 'Internet port number' fields, accumulate UDP and click OK .
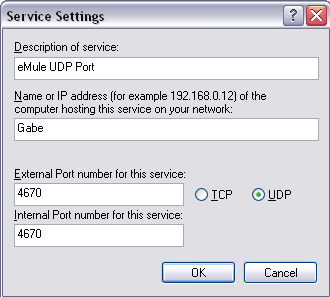
Figure 13: Adding UDP port has been used
Now you will see both selected configurations on the ' Windows Firewall advanced settings ' tab, see Figure 14.

Figure 14: Configurations using eMule are currently in user mode
Click OK and now you have configured Windows Firewall
The next step is to configure the router.
Configure the router
The name options for your router configuration will vary depending on the type of router and its model. In the examples of the lesson, we use D-Link DI-524 router.
The first thing you need to do here is go to the router's control panel. If you don't know how to read it, read our guide on setting up a network using a broadband router.
Here you need to find an option called 'Virtual Server' or similar. In this router, this option is the first option in the ' Advanced ' section, see Figure 15.
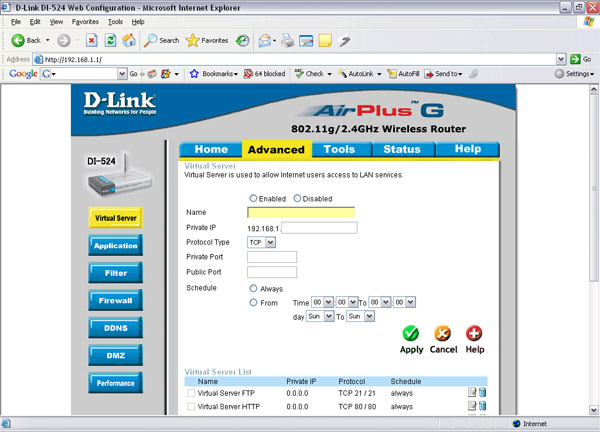
Figure 15: Virtual server options
Here you need to select 'Enable', name this configuration (eg 'eMule TCP Port'), enter the IP address of your computer (or the computer running the P2P program), integrate TCP, enter on TCP port number (4660) in both 'Private Port' and 'Public Port' fields (these fields also have the name 'Internal Port' and 'External Port' respectively), select Always and click Apply . If you don't know your computer's IP address, click Start > Run > Cmd then type Ipconfig, press Enter . This command will list the IP address that your computer is using.

Figure 16: Open the TCP port used by eMule
Repeat the above process with UDP port: select ' Enable ', name this configuration (eg 'eMule UDP Port'), enter the IP address of your computer (or the computer running the P2P program) , accumulate UDP, enter UDP port number (4670) in both 'Private Port' and 'Public Port' fields (these fields also have the names of 'Internal Port' and 'External Port' respectively), select Always and Click Apply .
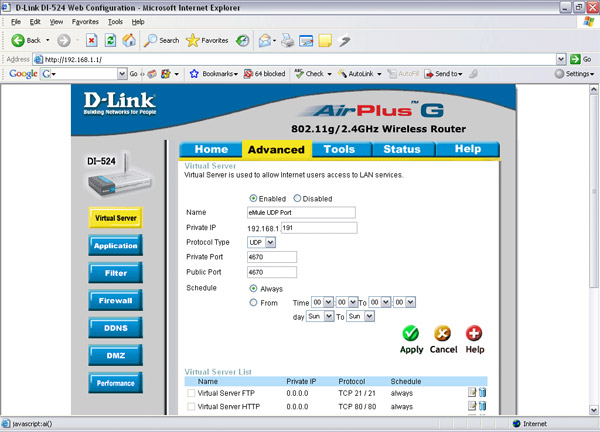
Figure 17: Open the UDP port used by eMule
Now you will see here two new rules that have been added and activated in the Virtual Server section of the router, see Figure 18.
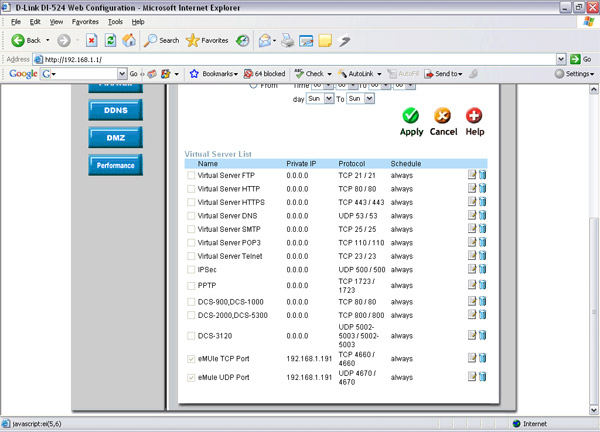
Figure 18: The eMule TCP and UDP ports have been opened on your router
Now you need to make the router always assign the same IP address to the computer, otherwise the configuration will stop working if your router assigns another IP address at the next moment when it is turned on.
You need to find the DHCP configuration in your router control panel. In the router of this article, it is located at Home > DHCP . Here you can find a configuration called ' Static DHCP '.
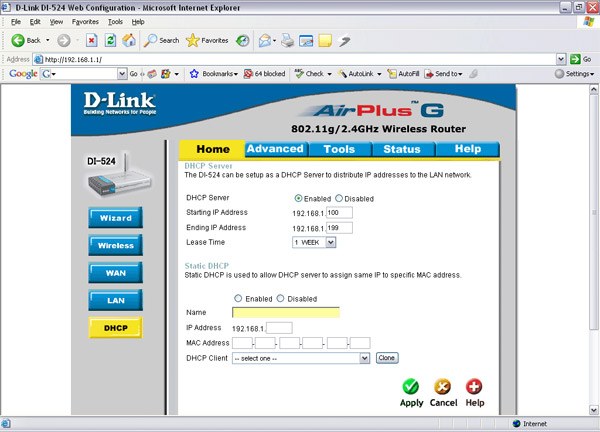
Figure 19: DHCP configuration
Configuring your router's router always assigns the same IP address very easily. In the list box named ' DHCP Client ' there is a list of all computers connected to the router. So it's easy to select the computer on that list (the computer is called 'Gabe'), click ' Clone ', select Enable and then click Apply .
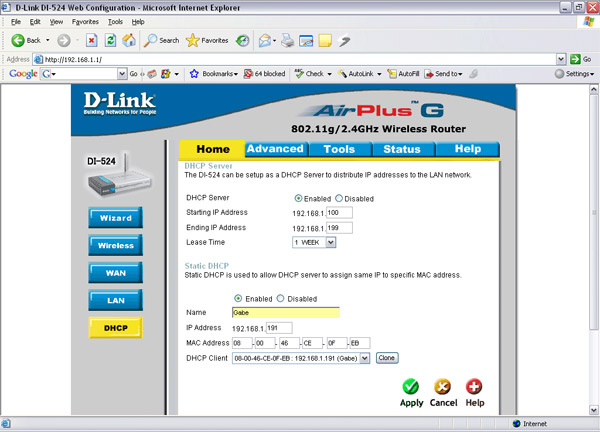
Figure 20: Configuring the router to always assign the same IP address to your computer
With this configuration, your computer will always have the same IP address, so we will not lose the previous configuration.
Now it's time to check if everything is configured correctly. You enter the P2P program, click Connect and will get the status of 'open' or high ID (instead of 'firewalled'), at the red arrow in Figure 21. In eMule, we can re-run its internal test ( Option > Connection > Test Port ) to see if your configuration is done, see Figure 22.
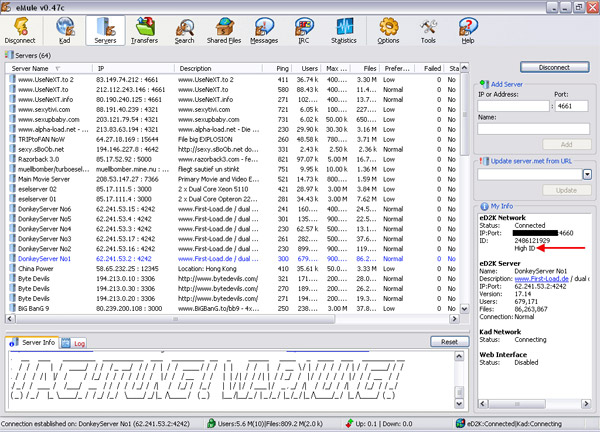
Figure 21: High ID status with eMule

Figure 22: Connection test successful