How to change DNS server on Chromebook
You can get a faster browsing experience by changing the DNS server that your device uses to look up Internet names. Chromebooks allow users to set up a customized DNS server for wireless networks. This article will show you how to do it.
You can get a faster browsing experience by changing the DNS server that your device uses to look up Internet names. Chromebooks allow users to set up a customized DNS server for wireless networks. This article will show you how to do it.
- How to change DNS to be able to surf faster, don't worry about being blocked
Changing the DNS server at the device is quite easy with any device the user can use. If you intend to change all devices, you should change the DNS server on the router. However, if you only need to change those settings on a Chromebook, this is how.
- How to change Google DNS for the router
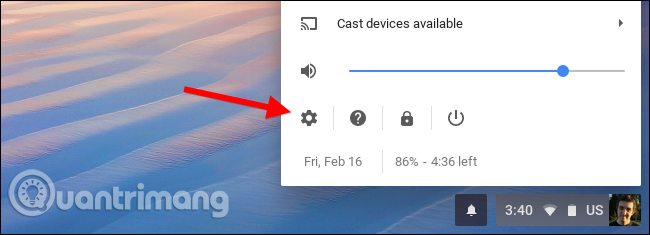
First, open the Settings screen on the Chrome OS device. You can do this with the browser by opening the main menu and then clicking the " Settings " option. You can also click on the notification tray and then click the " Settings " icon with the wheel.
Click on the " Wi-Fi " option in Network at the top of the Settings screen.

Click on the name of the Wi-Fi network to which you are currently connected to change the network settings. Note that you can come back later and follow this procedure again to change the DNS server for other Wi-Fi networks.

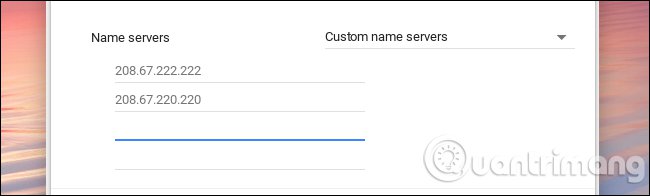
Click to expand the " Network " section, find the Name servers option at the bottom of the Network extension, then click on the drop-down menu on the right, select " Google name servers " to use Google's Public DNS server or select " Custom name servers "to provide your own address.

If you choose Google's DNS server, the IP address will automatically enter for you. If you choose the custom name server, you need to enter the IP address of the DNS server you want to use here. For example, you can enter 208.67.222.222 and 208.67.220.220 to use OpenDNS. Enter the primary and secondary DNS server addresses on its own line.
When typing the IP address, be sure to press Tab or click outside the text field after entering the second address. If you close the window while typing the second IP address, it will only save the first IP address without saving the second IP address. When done filling in both addresses, you can close the window.
Chromebooks will remember these settings when reconnecting to the network in the future, but the settings only apply to the Wi-Fi network you just changed. If there are many different Wi-Fi networks that want to use custom DNS, you will have to change your own DNS server options for each network.
See more:
- The best top 10 Public DNS Server you should know now
- 3 "legitimate" reasons to change DNS Server
- Instructions to change DNS Server on Windows, Mac, iOS and Android
Was this article helpful?
Your feedback helps us improve.
Related Articles
 How to change DNS server on the most popular routers15 minutes read
 How to change a password on a Chromebook5 minutes read
 6 ways to customize your Chromebook's interface to make it more beautiful and easier to use5 minutes read
 3 'legitimate' reasons to change DNS Server13 minutes read
 Instructions to change DNS Server on Windows, Mac, iOS and Android9 minutes read
 The best Chromebook models in 20145 minutes read
Reader Comments 0
Sign in with email or Google to join the discussion.