Table of Contents
This practical guide explains how to assign admin rights to users in ubuntu with clear steps and useful context. It also covers common requirements, potential problems, and the details that can help you get better results.
Make User Admin in Ubuntu Via GUI
To change user settings through the user interface, you need to open the Users tab in the System Settings utility . You can access it through the following two ways:
Enter the keyword users into the system Dash and click on the Users search result.

Or
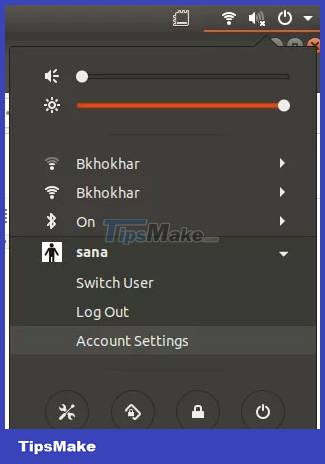
Click the down arrow located in the upper right corner of the Ubuntu screen, click your username in the following view, and then click Account Settings from the drop-down menu.
The Settings utility will open, displaying the Users tab. Please note that only authorized users can change user settings in Ubuntu. First, you need to unlock the tab to make changes as an admin by clicking the Unlock button located at the top right corner of the Users view:
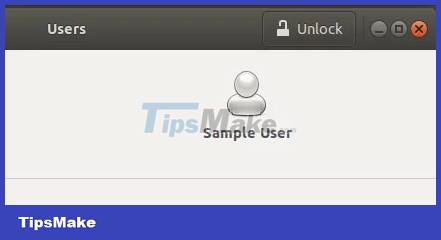
This will open the following Authentication dialog, where you can provide the password for the authorized user:

Enter the password and then click the Authentication button. You can now change any user's settings. Click the username of the user you want to set as admin.

Under the user's Account Type, you'll see two buttons ; Standard button and Administrator button. Click the Administrator button to set this user to admin. As soon as you do this, the user will be granted admin rights and can now do all the operations that require root privileges.
Make User Admin in Ubuntu Via Command Line
The article will describe two ways to turn a standard Ubuntu user into an admin via the command line:
- Through the command usermod
- Via the gpasswd. command
We will use Ubuntu's command line application, Terminal, to do this. You can open Terminal via the system Dash or the keyboard shortcut Ctrl+Alt+T .
Method 1: Usermod. Command
Open Terminal and enter the following command as sudo because only authorized users can edit user settings in Ubuntu:
Syntax:
$ sudo usermod -aG sudo 'username'This example will use the following command to set the user with the username 'sampleuser' as admin:
$ sudo usermod -aG sudo sampleuser
Enter the password for sudo and the user will be added to the 'sudo' group which means that the person can perform all administrative tasks on Ubuntu.
You can verify that the user is currently in the 'sudo' group by checking the groups the user belongs to, via the following command:
$ groups 'username'The following output of the groups command for "sampleuser" indicates that the user is now part of the sudo group.

Method 2: Command Gpasswd
Open Terminal and enter the following gpasswd command as sudo because only authorized users can edit user settings in Ubuntu:
Syntax:
$ sudo gpasswd -a 'username' sudoThis example is adding 'sampleuser' to the sudo group via the following command:
$ sudo gpasswd -a sampleuser sudo
You can also remove a user from the sudo group via switch -r in the same gpasswd command:
Syntax:
$ sudo gpasswd -d 'username' sudoThis example is removing 'sampleuser' from the sudo group via the following command:
$ sudo gpasswd -a sampleuser sudo
Through the methods described in this article, you can turn a normal Ubuntu user into an admin so that they can perform all the tasks that require root privileges on the system.
Conclusion
Understanding Ubuntu makes it easier to compare options, avoid common mistakes, and apply the information in this guide more effectively. Review the relevant requirements before making changes or choosing a solution.
FAQ
How do you assign admin rights to users in ubuntu?
Follow the steps in this guide in order, confirm the required settings or tools, and verify the result before making additional changes.
Is it safe to assign admin rights to users in ubuntu?
It is generally safe when you follow the recommended instructions, use trusted tools, and avoid changing settings you do not understand.
What should you do if the process does not work?
Recheck the requirements, restart the device or application when appropriate, and review each step for missed settings or compatibility issues.
Related Articles
 How to Assign Administrator Permissions on a Windows 7 Computer?4 minutes read
 How to Open Admin and Folder Permissions in Nautilus4 minutes read
 6 Ways to Run Software with Administrator Rights in Windows11 minutes read
 How to Grant Admin Rights to a User in Win 103 minutes read
 Lost Admin Rights on Windows 10, This Is How to Fix It: What You Need to Know9 minutes read
 How to Get Admin Rights on Windows: Step-by-Step Guide11 minutes read
Reader Comments 0
Sign in with email or Google to join the discussion.