Efficiently exploit printers in Windows Server 2003 (Part 2)
In Part 1 of this article, I have shown you how to configure single printers to manage managed printers on a server running Windows Server 2..
In Part 1 of this article, I have shown you how to configure single printers to manage managed printer chains on a server running Windows Server 2003. In this next section, we will talk about In case the print string has been moved to Windows Server, and learn how to protect your printers.
Start by looking at the part of the printer properties. You can access these properties by navigating through the server's Start menu> Control Panel | Printers and Faxes . When you select the Printers and Faxes menu, the print string being managed by the server will display on the submenu. Right-click the print string that you want to protect and select Properties .
When the printer properties window is open, the General tab is selected by default. There aren't really many things you want to do about security in this tab, so go to the Sharing tab. As you can see in Figure A, the Sharing tab allows you to specify a shared printer name. The shared name is used as part of the popular Universal Naming Convention (UNC) convention . There are a number of commands that can be used here for UNC-used printers. For example, if you want to map the LTP1 port to the printer, use the following command:
NET USE LPT1: servernamesharename
At the above command, the server name servername will indicate that a server is managing the shared printer, and the shared name sharename is the shared printer name below.

Figure A : The Sharing tab allows you to set the printer's sharing name
At first glance, this tab has very similar content and form to the window used to share folders. However, looking closely, there will be some other points. The main difference is that, in the file folder sharing window, you can set permissions at either the share level or the NTFS level. If you look at Figure A, you will see that there is no mechanism to establish those permissions here. Instead, all permissions are set through the Security tab, the content of this tab will be introduced later.
There are a few things you can do in the Sharing tab to increase printer security. An option allows not to list printers in Active Directory. Failure to list the printer in Active Directory will make the printer invisible to others, so that users can still browse the printer network (using NetBIOS type, not by browsing Active Directory). It reduces cases where many users accidentally jump into the printer.
If you notice in Figure A, you will see the Additional Drivers button. Windows is designed so that when a user attaches a printer via sharing, the necessary drivers will be installed automatically on the user's computer. If in this situation, the situation where you know that someone needs a printer running on a separate operating system, you can install drivers only for that operating system. This is not a security solution because a user can install a driver on their computer by downloading it from the Internet (assuming they have permission to do so). Not automatically giving the user a driver when they attach the printer simply by forcing the user to jump over the tests.
There are no settings on the Sharing tab that give what are really security settings, they are simple things but can improve security at a minor level in some cases, so they are I still mention.
Advanced tab
The Advanced tab doesn't really have a lot of security settings, but it has a setting that we want to introduce to you. If you look at Figure B, you will see the Advanced tab, which includes a setting that allows you to control the printer when printing or not printing. If you know that no one in the company needs to print out of the hour, you can set up a printer so that it only works for your office hours.
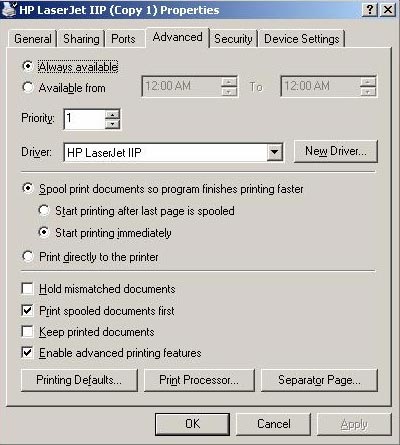
Figure B : The Advanced tab contains a setting that allows you to control the print time.
Tab Security
The Security tab is shown in Figure C, allowing you to control the print string. Here you can control both users and user groups like file system security. However, we should use group security in this case.
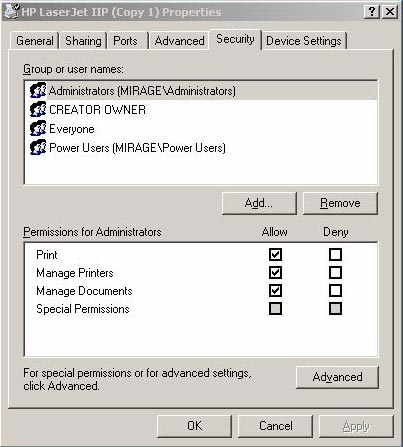
Figure C : The Security tab allows you to control users or groups
If you look at the picture, you can see 4 different options for different security functions that can be set up for the printer. This window doesn't really tell the security features, they only offer the available permissions. If you really want to further enhance the security for your printer, click the Advanced button.
When you click that, Windows will show you the advanced security properties. These properties allow setting permissions for users and groups in the same way as the screens shown in Figure C. However the difference is that this screen allows you to intervene further. about printer properties. Figure D below shows this clearly.
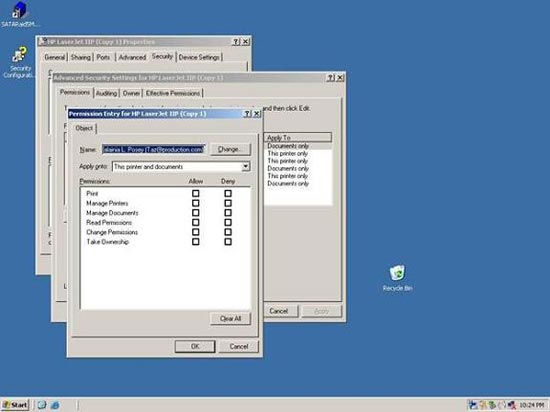
Figure D : Advanced security properties allow you to have features
Security is more advanced than the functions available in the Security tab.
Here, you can allow or restrict permission, which facilitates use. If the user is a member of two different groups, the group's permissions will be combined to make the user effective. Usually a similar situation often applies to the lowest level restrictions. However, unless the user has special restrictions, this restriction will have the highest priority. You can use this concept to increase control over permissions. Before we show you how to do this, let's take a look at what different functions these permissions have.
Print - If a user is allowed to print, this user will be allowed to use the printer.
Manage Printers - With this permission, users can change the printer properties and change the permissions to apply to other users.
Manage Documents - This feature allows users to perform certain tasks such as stopping, restarting, or deleting a certain print job.
Read Permissions - If the user is assigned to this function, they can see the permissions assigned to each user.
Change Permissions - This function allows users to change permissions for other users.
Take Ownership - This feature allows users to obtain printer ownership.
You can use different permissions to combine (between permissions and restrictions) to create high-level security settings.
Conclude
As introduced, there are many settings that you can use to control the printer in your company. In Part 3 of this article, I will continue the discussion by showing you how to verify printer usage.
( Also )