Introduction to Network Access Protection (Part 6)
In the previous articles, I have shown you how to create an authentication policy for both the computer to be checked and without checking. In this article, we will continue the server configuration procedure. First step
Introduction to Network Access Protection (Part 1)
Introduction to Network Access Protection (Part 2)
Introduction to Network Access Protection (Part 3)
Introduction to Network Access Protection (Part 4)
Introduction to Network Access Protection (Part 5)
In the previous articles, I have shown you how to create an authentication policy for both the computer to be checked and without checking. In this article, we will continue the server configuration procedure. The first step in this is to create a default authentication policy that can be applied to any computer that is authenticated through the RRAS server.
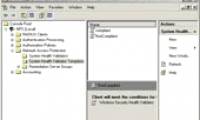
Start the process by opening the Network Policy Server window and entering NPS (Local) | Authentication Processing | Authentication Policies. Once entered here, the details window must display any pre-existing audit policies. Delete existing policies by clicking on them and selecting the Delete command from the right-click menu.
Now we create a default authentication policy. To do this, click on the New link in the Actions window, then select the Custom option. Windows will show you the New Authentication Policy properties window as shown in Figure A.

Figure A : Enter RRAS as a policy name and then verify that policy is enabled
Enter RRAS as a policy name and then verify the selected Policy Enabled check box. Next, make sure the Available Sources button is also selected, then select the Remote Access Server (VPN-Dialup) option in the available list of Available Sources.
Now, switch to the Setting tab and select Authentication from the control tree. Select Override Authentication Settings from the Authorization Policy checkbox. After that, a detailed window will appear with a variety of authentication methods, as shown in Figure B. Select the EAP check box and then click the EAP Methods button.
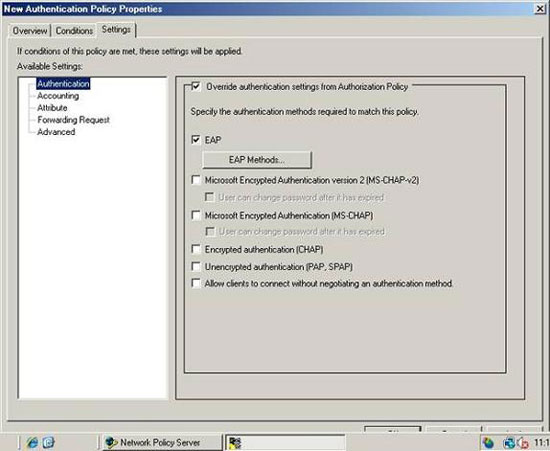
Figure B : Select the EAP check box and then click EAP Methods
Windows will display the Select EAP Providers dialog box. Click the 'Add' button to reveal the list of EAP authentication methods. Select EAP-MSCHAPv2 and Protected EAP (PEAP) from the list and click OK. The selected EAP authentication methods must now be displayed in the Select EAP Providers dialog box as shown in Figure C. Click OK to continue.
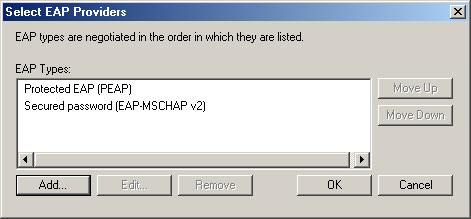
Figure C : You must enable authentication for MSCHAPv2 and PEAP
Now go to the Conditions tab. You must select at least one condition for the policy to be enforced. You can set any condition you want, we recommend connecting to Connection Properties | Tunnel Type and then select Point to Point Tunneling Protocol and Layer Two Tunneling Protocol, then click the 'Add' button. By doing so, the new authentication policy will apply to VPN connections. Click OK to save the new authentication policy you just created.
RADIUS client configuration policy
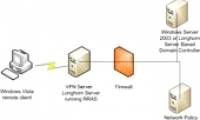
In this type of deployment, the Network Policy Server works as a RADIUS server. Rather, clients are performing a RADIUS authentication directly to the Network Policy Server, RRAS server is executing like a VPN server that will work as a RADIUS client
The last step in the server configuration process involves providing the Network Policy Server with a list of authenticated RADIUS clients. Only when the RADIUS client becomes the VPN server will you enter the VPN server's IP address. When RRAS services are running on the same physical server as the Network Policy Services network policy services, you will use the server's IP address.
To create a RADIUS client configuration policy, in the Network Policy Server, find NPS (Local) | RADIUS Clients. Click the New RADIUS Client link in the Actions window. Windows will launch the New RADIUS Client Wizard.
On the initial screen of the wizard you will have to enter the name and IP address for the new RADIUS client. In a real deployment, you should enter RRAS and the RRAS server's IP address into the space provided. When you call back RRAS will run on the same server in the Network Policy Services. Therefore, enter the server's own IP address into the space provided and click Next.
The wizard will now display an Additional Information window. This window asks you about the client and shared secrets. Select the RADIUS Standard in Client Vendor. For the purposes in the article, enter RRASS in the shared password. Select the Client is NAP Capable check box, as shown in Figure D and click Finish.
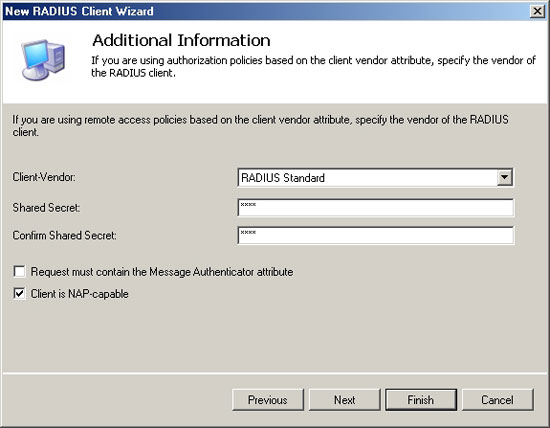
Figure D : Enter the shared password and select the Client is NAP Capable check box
Client configuration
We have finished configuring the Network Policy Server, which is when configuring the client to connect to the server. Remember that the technique I introduced for you will only work on clients running Windows Vista.
For the purposes of this article, we are assuming that the client is running Windows Vista and that it is configured with a static IP address. As you know, Windows Vista is designed to run IPv6 by default. Network Access Protection must be IPv6 supported, but Windows Longhorn Server is still in beta and it seems that IPv6 is not currently supported when it comes to Network access protection. In that case you must disable IPv6 on the computer's network configuration. When Longhorn Server is released, we plan to write an upgrade to this series aimed at using IPv6 as well as anything that has changed compared to the Beta.
The client must also be configured as a member of the domain that has the Network Policy Server. In addition, the domain must contain a user account that you can use to log into the created Routing and Remote Access Server.
Now create a Virtual Private Network connection that you will use to check the Network Access Protection server. To do this, open the Control Panel and click your mouse on the Network and Internet link, so that is the Network Center link. When Network Center is opened, click the Set up a Connection or Network link. You must look on the screen asking what kind of connection you want to create. Click on the Connect to a Workplace option and then click Next.
Select the connection option via VPN and you will have to enter the Internet address and destination name. Enter the IP address of the RRAS server into the Internet Address field. You can enter anything you want in the Destination Name field. Select Allow Other People to use the Connection check box, then click Next. Now enter the user name and password for the user, who is allowed to login to the RRAS server as well as the domain name that you will log into.
Click the Connect button, Vista will connect to your RRAS server. When you receive the message that the wizard cannot connect to your destination, click the Setup a Connection Anyway icon. This will save the settings so we can stop customizing them in the next part of this series.
Conclude
In this article, I have shown you how to configure the Network Policy Server and start configuring a client. In the next section, I will continue the discussion by showing you how to complete client configuration.
Introduction to Network Access Protection (Part 7)
Was this article helpful?
Your feedback helps us improve.
Related Articles
 Introduction to Network Access Protection (Part 2)8 minutes read
 Introduction to Network Access Protection (Part 4)7 minutes read
 Introduction to Network Access Protection (Part 7)8 minutes read
 Introduction to Network Access Protection (Part 5)8 minutes read
 Introduction to Network Access Protection (Part 1)8 minutes read
 Introduction to Network Access Protection (Part 3)10 minutes read
Reader Comments 0
Sign in with email or Google to join the discussion.