10 tips with PowerShell in Windows Server 2008 - Part 2
In the previous article, I have shown you some of the basic functions and tricks that can be done with PowerShell in Windows Server 2008. And this time, we will continue with part 2, which is also the end. in PowerShell series in Windows Server environment ...
Table of Contents
TipsMake.com - In the previous article , we have introduced some basic functions and tricks that can be done with PowerShell in Windows Server 2008. And this time, we will continue with part 2, is also the last part in the PowerShell series in the Windows Server environment :
- Collect information of the latest 10 errors
- Resetting control on the folder
- View server uptime
- Collect information Service Pack
- Delete unnecessary files and data
6. Collect information of the last 10 errors:
Every day, you may have to browse each log file in the system to find detailed information about the most recent error events on 1 or more computers. However, we can simplify this process by using the cmdlet Get-EventLog in PowerShell .
All you need to do here is specify the name of the log file and the corresponding component. The usual command structure will look like this:

In the screenshot above, the name of the log file is system , the participant component is Error . And so, PowerShell will collect all the information related to the 10 most recent errors from the system log. This command is executed on any local computer, so you will not need to specify the computer name. Note that if the above statement does not display the results as required, we can slightly edit the information according to the syntax below:

We simplify the process by converting the output of the previous statement to ft , with the alias Format-Table , and requesting the following properties: Timewritten , Source , EventID , and Message . At the same time, we add - wrap and - auto to make the results more 'easy to see'. Specifically, - the wrap activates the wrap mode for text, and - auto information is an auto-resizing feature.
And our results will be as follows:

Next, we will create another command, and this time the request is set to sort properties by the Source field, then merge them. The end result will be assigned more options to display each individual screen size, users will not have to drag down to see all:

And results:
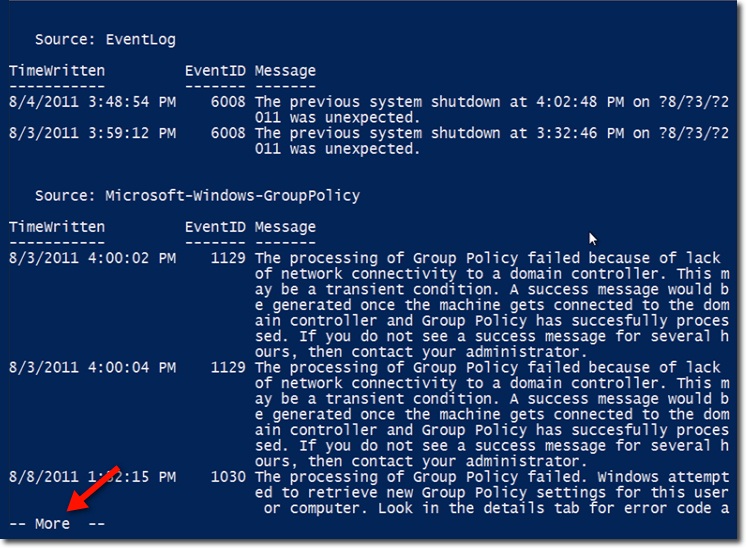
Now is the time to include components according to the source . The first group of information has the same EventLog as the source , while the second group is Microsoft-Windows-GroupPolicy. You should note that - More - appears at the bottom of the screen, is responsible for informing users to press any key to view more information.
All Get-EventLog statements are executed on the local computer, but what if you want to do it on the remote computer?
For example, we want to see the results of the latest error report 5 that occur on some domain controller computers at a branch in Chicago . The computers named respectively chi-dc01 and chi-dc02 , assuming that the administrator wants to sort the results by Machine Name. To do this, we'll display the following properties: Timewritten, Source, EventID, and Message. Again, you should use the - wrap , - auto , and more parameters here:

And this is the result:

7. Resetting control on the directory:
In fact, there are many cases where the NTFS permissions of a directory are not set up properly. And to fix this, we only need to reset the control corresponding to the Set-Acl (Set-ACL) cmdlet command on PowerShell .
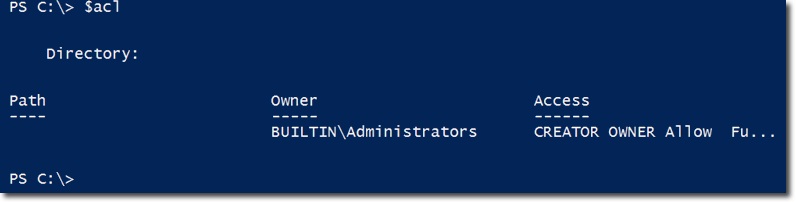
The simplest way to do this is to use Get-Acl to collect ACL information from a completely normal directory, then assign it to the directory in question. Suppose that we have shared files named sales on the CHI-FP01 computer, and that file has a fairly stable ACL . If you want to copy the ACL data of sales and then save the $ acl variable, then use the following command:

And here is the information inside the ACL :
Do you see the Access attribute in the right corner? It is actually just another object, and to know the content inside, we use the command:

Results show:

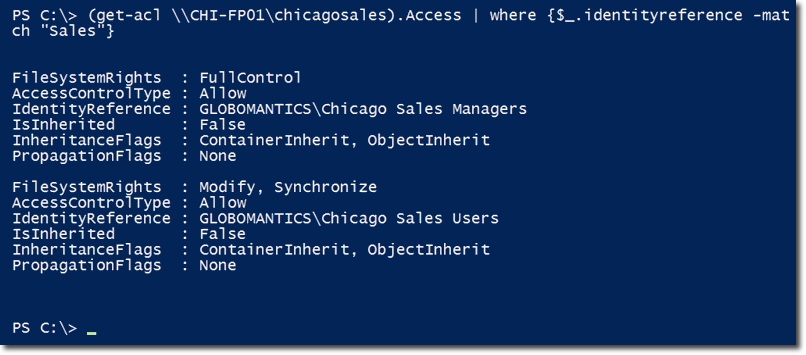
We can easily see that this is just a collection of many other Access Control components. If you just want to see the relevant information for sales , use the syntax:

Next, use the same command to check the information inside the Access property, belonging to the newly created shared file named chicagosales , we won't receive anything.

The reason why the system does not display any information may be because the sharing mode has been set but the NTFS permissions are not applied correctly. The best solution is to copy ACL information from a stable file to a problem file. But first, we need to get chicagosales ' current NTFS permissions and save them as XML files. With this way, we can easily recover if an error occurs during the execution:

After that, you continue to implement and apply the Set-Acl command on chicagosales using the $ acl attribute :

To check if our implementation is successful, use the previous command to check Sales related information as shown below:
And now NTFS permissions on the chicagosales folder are similar to sales .
8. Check server operation time:
To do this, we only need to apply the WMI Win32_OperatingSystem class in PowerShell , which can meet your needs, work directly on a local or remote machine - remote control. The technical property to search here is LastBootUpTime , but the original format is WMI , so we will have to convert the format - convert to another object that is easier to handle.
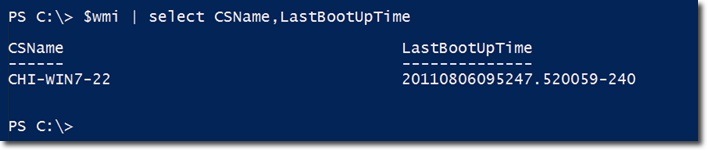
Let's start with an example of using a local computer with Windows 7 operating system. First, save the result of GetWmiObject syntax into another variable named $ wmi:

And from now on, we can work directly on $ wmi , namely CSName - Computer Name and LastBootUpTime properties :
As mentioned above, the LastBootUpTime attribute is WMI timestamp , which is not really useful in this case. Therefore, we will have to convert to another format, specifically here is another variable named $ boot:

In this case, you should apply the ConverToDateTime function, which is included in the WMI object when using GetWmiObject . The parameter to pass here is the LastBootUpTime property of the $ wmi object of WMI . If we show the value of $ boot , the system will display as follows:

Obviously, this information is much more useful than the original LastBootUpTime attribute . To find out how long the system worked, we just need to subtract $ boot from the current date / time - by using the Get-Date function :

The result here is another object like TimeSpan , if you want this information to be 'compact', then you just apply the formula to convert into string with the function ToString ():

Our system in this case has been active for 2 days, 5 hours, 46 minutes. The next thing we need to do here is to put the entire calculation function into a single function named get-boot:
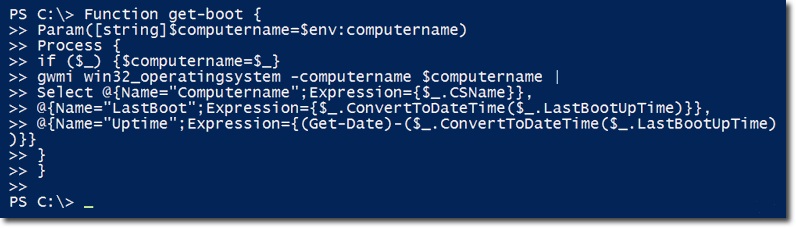
This function will have parameters to get the name of the computer, the default value will be the local machine:

Besides the Process script to block the value of Computer Name , basically when any value is passed here, the $ computername variable will continue to pass the corresponding value into it. Besides, other components will be used if there is no value or equivalent to computername:

Within the Process script is the GetWmiObject formula - applied to determine the name of the remote computer:

On the other hand, we have a few hashtable pairs here. The CSName attribute is not easy to use, so it needs to be replaced with the newly created value named Computername . And there is another attribute - LastBoot , which stores the LastBootUpTime value via ConvertToDateTime () . Finally, the Uptime - attribute is in the form of a TimeSpan object, corresponding to the period of time the system has run:

If we test on the local (for example, do not specify the computer name value), the system will apply directly to the local computer name value in the default mode. Examples are as follows:

With what we have shown in part 1 of the article, in the section Turn off or restart the server, you can save the name of the server in a text file, applicable to the ping components, later. then pass those values into the function get-boot:
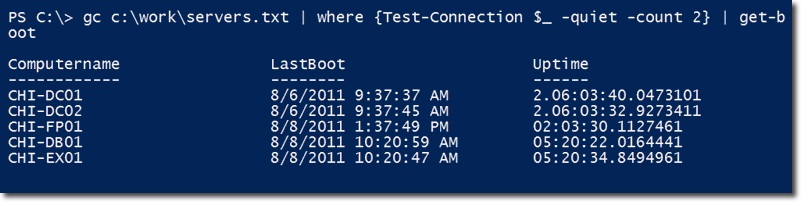
The screenshot above shows the list of remote computers, the total uptime and the most recent reboot.
9. Collect information Service Pack:
In fact, there are many reasons we need to know about the service pack information of the server. And to do this, you'll apply WMI and the Win32_Operating System class , the attributes used here include: ServicePackMajorVersion (with key values of 0, 1 or 2), ServicePackMinorVersion , CSDVersion (usually shown below Service Pack 1 ) .
Specifically, we will start by using Get-WmiObject and Win32_operatingsystem class to collect information in the system from PowerShell . The most important attributes here are: CSName (computer name), Caption (operating system), CSDversion and ServicePackMajorVersion .
The main syntax used here is of the form:
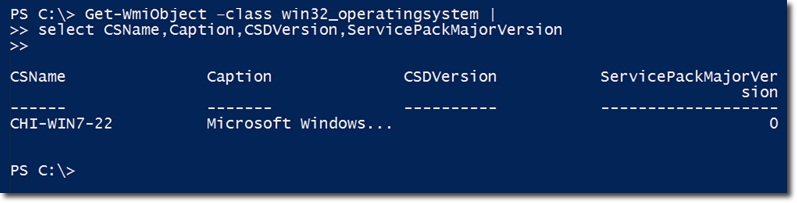
Looking at the screenshot above, we can see that this Windows 7 operating system does not use any Service Pack version, so the ServicePackMajorVersion value is 0 , and the CSDVersion part is left blank. But our main job here is to create a new function named Get-SP , the first thing to do is to get the value of the computer name, the default is local machine:

Next is the Process script, if a computer name value is passed, the $ computername variable will initialize the value for that object. The main part of this syntax is the Get-Wmiobject / Win32_operatingsystem class.
Then, you need to deploy a pair of Hashtable , here we select the CSName property and assign it to another property named ComputerName . Similarly the attribute Caption - Operating System . Instead of using CSDVersion , we use SPName , finally Version replaces ServicePackMajorVersion .

And this is our full function when operating on the local:

When we're done, we're ready to filter the list of computer names from the text file, our rest is just a ping issue and pass the corresponding computer name parameter to the newly created get-sp function. Our results here will look like this:
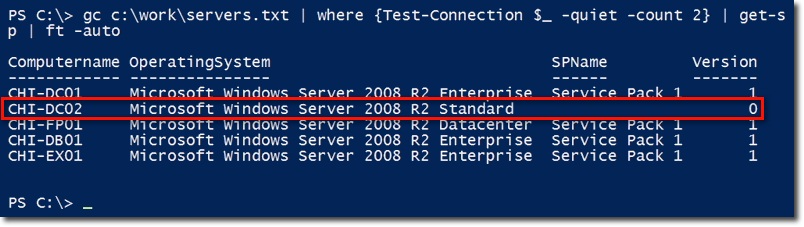
You can see that the CHI-DC02 computer lacks Service Pack 1 information, which was released for Server 2008 R2.
10. Delete unnecessary files in the system:
To do this, we will use the cmdlet Get-ChildItem , with the corresponding alias dir. Technically. The best way is to compare the LastWriteTime property of the file or directory within a certain time period. If LastWriteTime exceeds a certain time, it is the file to delete.
While LastWriteTime specifies the final file editing time, and LastAccessTime can be defined or changed by the application in the system, such as security software or defragment program - Defragment . Therefore, LastAccessTime is not really accurate at the time of using the file and is determined whether the action is performed by the user or the software.
Once you have found the files you want to remove, you can turn all of them into Remove-Item . Because Remove-Item syntax supports - WhatIf and - Confirm , so we will execute the command with those parameters, save the result to a text file, and finally decide to apply the delete command with the file list .
However, the more optimal way is still the use of script. With this method, users can assign additional functions to save the log file and support whatif to confirm whether you really want to delete the file. Below is an example of a complete sample function called Remove-OldFiles.ps1 . And this is part of the code:
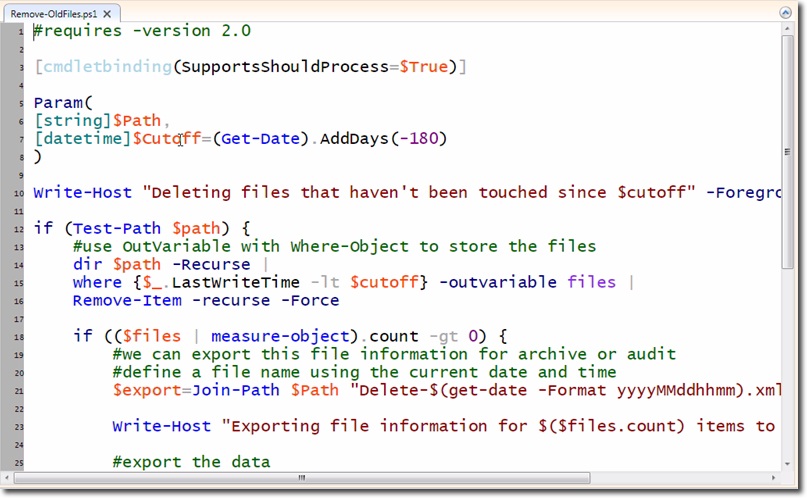
This can be considered an advanced code, with the cmdlet binding structure set to SupportShouldProcess = $ True . That means, if the user specifies what - whenif scripts run, whatif - whatif will be chosen by Remove-Item (because there is a support mechanism - whatif ).
Please note that the parameter is named $ Cutoff - with the initial default value of 180 days from the current time, but the user can still change and be considered an object of the date format - Other time in the system.
The body of the code:

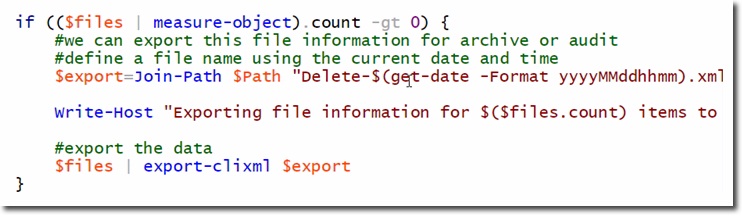
This structure will list the recursive list of the specified path, and it will also find all files with the LastWriteTime shorter than the $ cutoff , then save the list as a The name is the file using the generic parameter - outvariable . And finally, any file with the where attribute selected is pushed to Remove-Item.
Assuming that the system has found files that meet the deletion criteria, the XML file will be created and stored in the current directory, and the file will be in the form Delete-yyyyMMddhhmm.xml, with yyyyMMddhhmm being the current timestamp , format - year - month - day - hour - minute. And this is the main code of the above function:
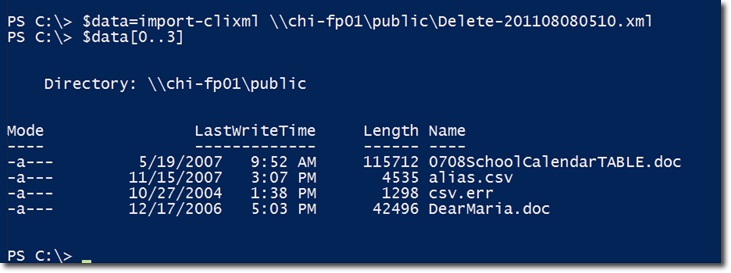
Next, we will run that code, assuming that the user wants to delete the file server's public directory on the Chicago remote computer - named chi-fp01 , another requirement is to delete all the files long period of cutoff days. And this is the main statement, accompanied by a notification about the result:

Note that we can see the path of the created XML file, for example there have been 4 files deleted. And to do this, please import the XML file content into the $ data variable and see the first 4 components in $ data :
Good luck!
Was this article helpful?
Your feedback helps us improve.
Related Articles
 Microsoft Windows PowerShell and SQL Server 2005 SMO - Part 26 minutes read
 10 tips with PowerShell in Windows Server 2008 - Part 116 minutes read
 Microsoft Windows PowerShell and SQL Server 2005 SMO - Part 77 minutes read
 Microsoft Windows PowerShell and SQL Server 2005 SMO - Part 58 minutes read
 Microsoft Windows PowerShell and SQL Server 2005 SMO - Part 32 minutes read
 Test SQL Server with Windows PowerShell - Part 25 minutes read
Reader Comments 0
Sign in with email or Google to join the discussion.