Disable Windows Update Active Hours on Windows 10
On Windows 10 Anniversary Update, the new feature is Windows Update Active Hours. This feature allows users to optionally set Active Windows hours.
Table of Contents
On Windows 10 Anniversary Update, the new feature is Windows Update Active Hours. This feature allows users to optionally set up Active Windows "hours". After each Windows update process is complete, the system will automatically restart. If you don't want Windows 10 to automatically reboot when you're working, you can disable Windows Update Active Hours.
Windows 10 allows users to disable this feature on the Settings application. However, if you do not want to use this feature and want to hide it on the Settings application, you can use the Registry Editor.
1. Disable Windows Update Active Hours on the Settings menu
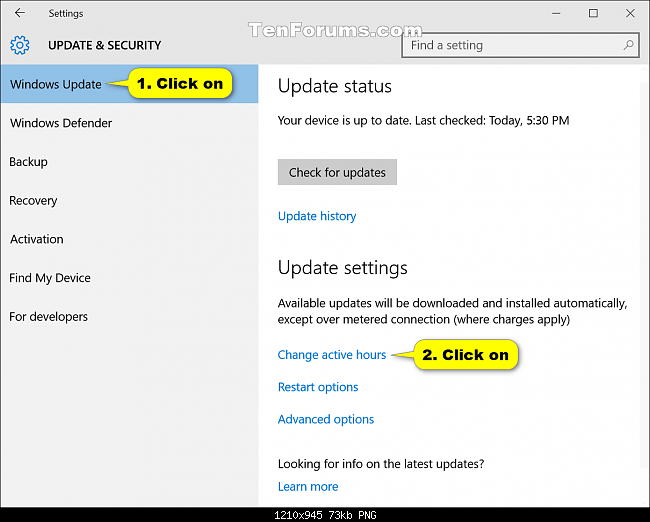
1. Open the Settings menu, then click the Update & Security icon.
2. Next click on Windows Update in the list of left pane, then click on Change active hours link under Update settings.
3. Set the start time and end time in the Start time section and select the time in the menu, then click the check mark on the menu. Similarly in the End time section, you also select the time and then select the mark on the menu. .

Finally click Save .
4. Close the Settings menu.
2. Disable Windows Update Active Hours by using Registry Editor
To disable Windows Update Active Hour on Windows 10, follow the steps below:
Step 1:
Close the Settings menu.
Step 2:
Press Windows + R key combination to open the Run window. On the Run window, enter regedit and click OK to open the Registry Editor.
If a UAC prompt appears, click Yes to continue.
Step 3:
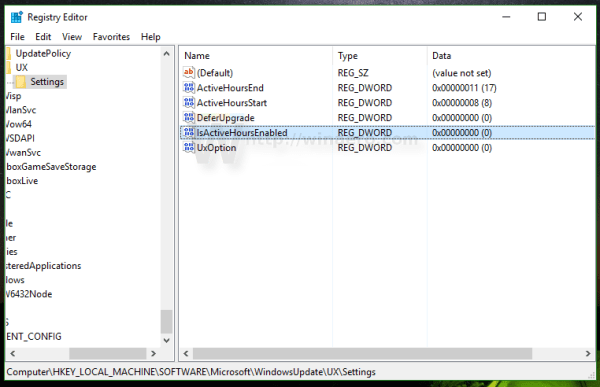
On the interface of the Registry Editor, navigate to the following key:
HKEY_LOCAL_MACHINESOFTWAREMicrosoftWindowsUpdateUXSettings
Step 4:
Next proceed to create a 32-bit DWORD value and name this new value IsActiveHoursEnabled , then proceed to set the value in the Value data frame to 0.
Step 5:
Open the Settings menu and check if the Active Hours feature is disabled.
If Active Hours is disabled, it will look like this:
If you want to re-activate Active Hours, follow the same steps and change the value in Value data to 1 .
Refer to some of the following articles:
- Instructions for setting up and managing FTP Server on Windows 10
- How to use Cortana to turn off or restart Windows 10?
- Instructions for setting up and managing Network Bridge on Windows 10
Good luck!
Was this article helpful?
Your feedback helps us improve.
Related Articles
 How to disable Windows 10 Creators Update ads6 minutes read
 Trick to enable / disable Windows Updates on Windows 10 quickly and easily3 minutes read
 How to hide Windows Update on Windows 102 minutes read
 Turn off the Win 10 update, stop Windows 10 from updating automatically8 minutes read
 Instructions to disable Cortana on Windows 10 Anniversary Update5 minutes read
 How to disable Lock Screen lock screen on Windows 10 Anniversary Update6 minutes read
Reader Comments 0
Sign in with email or Google to join the discussion.