Create a Site-to-site VPN on ISA 2006 (Part 6)
In the first five years of a series of how to create a Site-to-Site VPN between the main office ISA Firewall and the branch office, we have focused on issues related to creating and managing the Site-to-VPN VPN connection itself. Site. Now, when the details of Site-to-Site VPN connection are available
Create a Site-to-site VPN on ISA 2006 (Part 1)
Create a Site-to-site VPN on ISA 2006 (Part 2)
Create a Site-to-site VPN on ISA 2006 (Part 3)
Create a Site-to-site VPN on ISA 2006 (Part 4)
Create a Site-to-site VPN on ISA 2006 (Part 5)
Starting with the advanced configuration settings used to link the branch office Domain Controller to the main office Domain Controller in intra-domain communications.
In the first five years of a series of how to create a Site-to-Site VPN between the main office ISA Firewall and the branch office, we have focused on issues related to creating and managing the Site-to-VPN VPN connection itself. Site. Now that we have the Site-to-Site VPN connection details created, we can adjust it to get a higher level of security than a regular VPN 'hub' or port 'hard drive'. into virtual private network (VPN gateway).
First we should start with the minimum privilege in configuring the branch office ISA Firewall for branch computers, to support internal communications between the branch office Domain Controller and the main office Domain Controller. The branch office ISA Firewall configuration supports the main office Domain Controller as a good example, because we need some other configuration steps to help the branch office Domain Controller work.
Some of the following steps can be called relatively complete:
-
Stop DDNS activity on demand-dial interfaces and Main Office machines, Branch Office ISA Firewall.
-
Allows the use of DDNS on msfirewall.org Forward and Reverse Lookup Zone.
-
Create internal communications access rules on the Branch Office ISA Firewall.
Stop DDNS operation on Demand-dial interfaces and Main, Branch Office ISA Firewall machines
You may recall that, in part one or two of this series, we mentioned DDNS downtime on the msfirewall.org forward lookup zone. Perhaps you also remember why we did it? This is because we do not want the ISA Firewall in both the main office and the branch office to register the demand-dial interface IP address on DNS. When the demand-dial interfaces register with the DDNS, it has many problems that will occur, because the client handles the name of the ISA Firewall through the deman-dial interface address instead of the real IP address.
In the first two articles, one question is whether we really need to disable DDNS? Is there a better way, can you help us configure to manually dial-dial interfaces without address registration in DDNS? Because it is quite inconvenient to stop using DDNS on DNS server, it is even unrealistic.
The good news is that we can automatically disconnect the DNS registration process on demand-dial interfaces for both the main office ISA Firewall and the branch office ISA Firewall through the use of the RRAS console. In general, we need to avoid making VPN configuration changes on the ISA Firewall using the RRAS console, since these settings may override changes in RRAS. Fortunately, we can now change the DDNS registration information for the demand dial interface so that they do not override the ISA Firewall VPN configuration.
Follow these steps on the main office ISA Firewall:
-
Go to Start , point to Administrative Tools and click Routing and Remote Access .
-
In the Routing and Remote Access window, expand the server name button.
-
Click the Network Interfaces button in the left pane. Right-click on Branch in the right pane and select Properties .
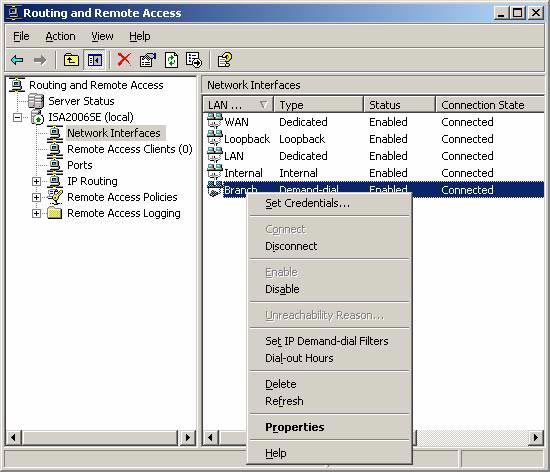
Figure 1
-
In the Branch Properties dialog box, click the Networking tab and click the Properties button.
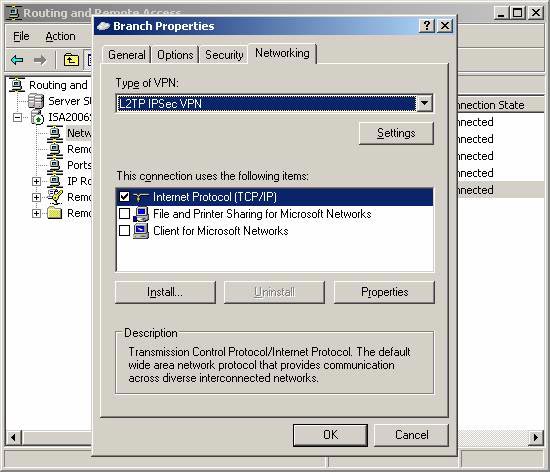
Figure 2
-
On the Internet Protocol (TCP / IP) Properties dialog box, click the Advanced button.
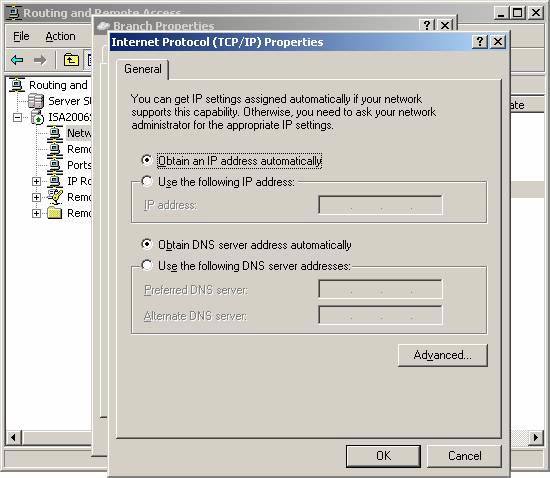
Figure 3
-
In the Advanced TCP / IP Settings dialog box, click your mouse on the DNS tab. On the DNS tab, uncheck the Register the connection's addresses box in DNS . Click OK .
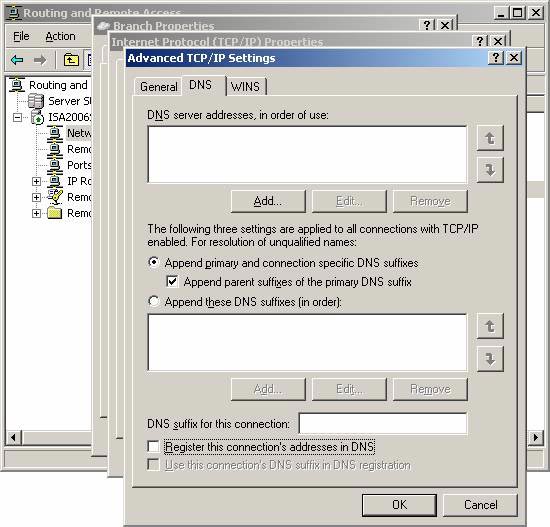
Figure 4
-
Click OK in the Internet Protocol (TCP / IP) dialog box Properties . Click OK next on the Branch Properties dialog box. If the current demand-dial interface is connected, the dialog box will inform you that the changes have not yet taken effect, and must wait until the next connection.
-
Close the Routing and Remote Access console.
Follow these steps on the branch office ISA Firewall:
-
Go to Start , point to Administrative Tools and click on Routing and Remote Access .
-
In the Routing and Remote Access window, expand the server name.
-
Click on the Network Interfaces button in the left pane. Right-click on the Branch entry in the right pane and select Properties .
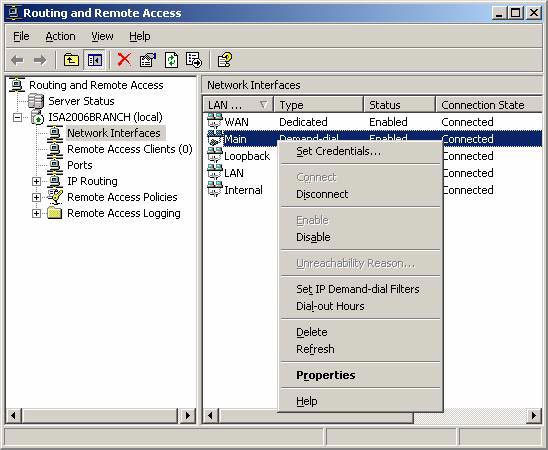
Figure 5
-
In the Main Properties dialog box, click on the Networking tab and then the Properties button.

Figure 6
-
On the Internet Protocol (TCP / IP) Properties dialog box, click the Advanced button.

Figure 7
-
In the Advanced TCP / IP Settings dialog box, select the DNS tab. On the DNS tab, uncheck the Register the connection's addresses box in DNS . Click OK .

Figure 8
-
Click OK in the Internet Protocol (TCP / IP) dialog box Properties . Click OK next in the Branch Properties dialog box. If the current deman-dial interface is connected, the dialog box will probably announce that the changes have not worked yet, waiting for the next connection of the dial-dial.
-
Close the Routing and Remote Access console.
-
Restart both the main office ISA Firewall and the branch office ISA Firewall and wait for the Site-to-Site VPN connection to be established.
Allows the use of DDNS on msfirewall.org Forward and Reverse Lookup Zone
Now, the problem with the demand-dial interfaces has been resolved, we can allow the use of DDNS on the msfirewall.org domain. DDNS is generally useful, especially in specific areas: automatically registering all branch branch domain domain domains related to DNS records in the main office DNS. We can manually create these 'manual' logs, but there can be many administrative problems and increase the level of danger when causing errors.
Log in to the Domain Controller in the main office and perform the following steps:
-
Go to Start > Administrative Tools > DNS .
-
In the DNS console, expand the server name, then expand the Forward Lookup Zones button.
-
Click msfirewall.org and select Properties .
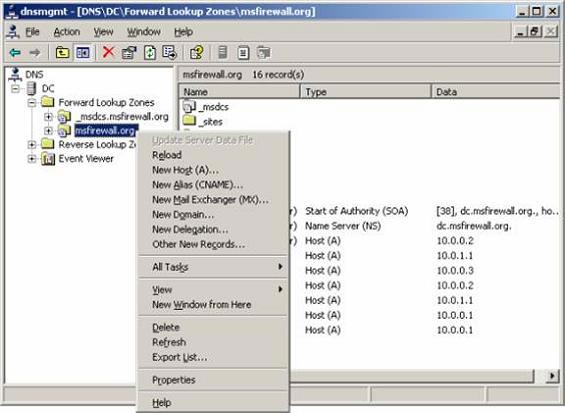
Figure 9
-
In the msfirewall.org Properties dialog box, select the General tab. On the General tab, click the button down in the Dynamic updates list and select Secure only . This option only allows domain members to enter information into the DDNS. Click OK .
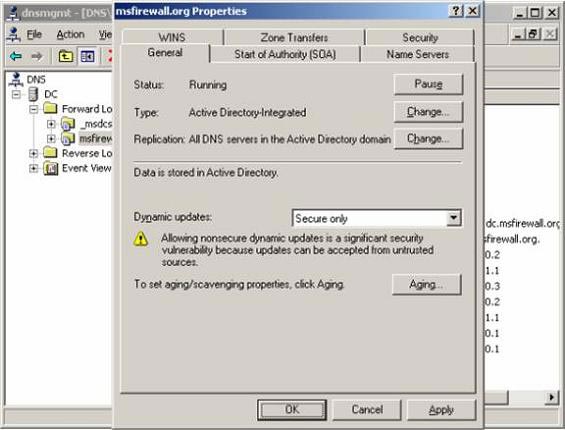
Figure 10
-
Right-click on the DNS server name in the left pane of the console and return to All Tasks , then press Restart .
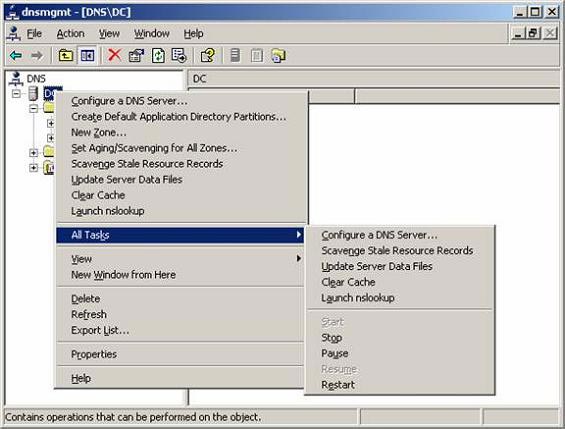
Figure 11
Create Intra-domain Communication Access Rule on the Branch Office ISA Firewall
With the above platform, we can now switch to the ISA Firewall configuration. The first thing we need to do is create a rule that allows the branch office Domain Controller to use the internal protocols needed for domain communication to work with other Domain Controllers. In this example we will work with a Domain Controller at the main office.
The table below is a set of Access Rule settings for common local protocols:
DNS
Kerberos-Adm (UDP)
Kerberos-Sec (TCP)
Kerberos-Sec (UDP)
LDAP (TCP)
LDAP (UDP)
LDAP GC (Global Catalog)
RPC (all interfaces)
NTP
Ping
From Branch Office DC To Main Office DC Users All Schedule Always Content Types All content typesTable 1 : Protocols required for intra-regional communications.
One thing to note here is that this method not only allows intra-domain communications from the domain controller at the branch office to the domain controller in the main office. This method also focuses on controlling traffic from branch to headquarters with the assumption that all traffic is allowed to move from the main office to the branch office. This is not the optimal method (we will change the following Access Rule main office), but it is considered the best method for access control: the area is more dangerous than the branch office. Therefore, we will pay much attention to controlling the transition between the branch office and the head office.
On the other hand, you can set up access policies at the headquarters and focus on the main office ISA Firewall, creating an Access Rule there to control what can come from branch offices.
The most appropriate and flexible method for controlling access between the branch office and the main office is to use Enterprise Policies. When creating an Enterprise Policy, you can assign each policy to an array, representing each branch office installation program. This greatly simplifies managing firewall policies for branches. Because you can just make changes once, then they are automatically populated for all branch office arrays.
In this example, we will use an Enterprise Policy to explain how Enterprise Policies work.
The first step is to create a new Enterprise Policy. We need to create a new one because we cannot make any changes on the default Enterprise Policy. Next, create an Access Rule that can be applied to all Enterprise Policy arrays defined. The final step is to connect Enterprise Policy to the branch office ISA Firewall array.
Perform the following steps on the CSS machine to create an Enterprise Policy:
-
On the CSS machine at the main office network, open the ISA Firewall console .
-
In the ISA Firewall console , expand the Enterprise node , then the Enterprise Policies button. Right-click the Enterprise Policies button, point to New, and click Enterprise Policy .
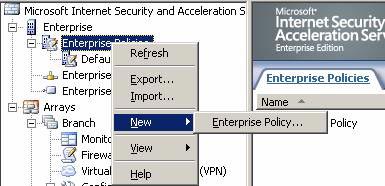
Figure 12
-
On the Welcome to the New Enterprise Policy Wizard page , enter a name for Enterprise Policy in the Enterprise Policy box. In this example we will name the policy Branch Policy . Click Next .
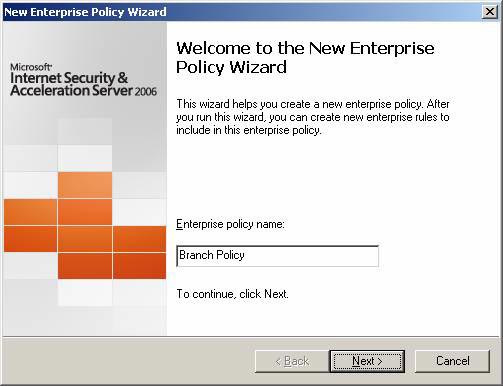
Figure 13
-
Click Finish on the Completing the New Enterprise Policy Wizard page .
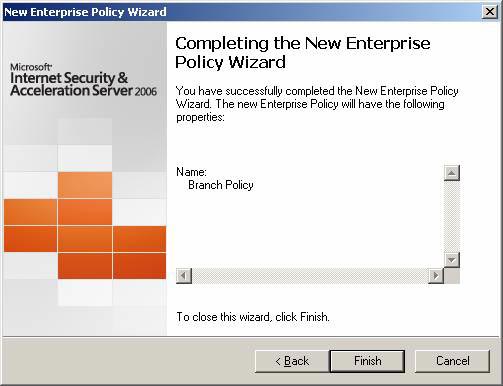
Figure 14
-
Hover over the Branch Policy button in the left pane of the console, then select the Tasks tab in the Task Pane. On the Task Pane, click on the Create Enterprise Access Rule option .
-
On the welcome to the New Access Rule Wizard page , enter a name for the rule in the Access Rule name box . In this example, we will create an Access Rule that allows branch controllers to connect to the domain controller at the main office. So we will name the rule Branch DCs> 5 Main DC . Click Next .
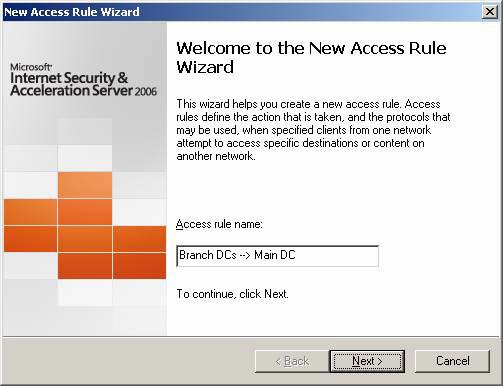
Figure 15
-
On the Rule Action page, select the Allow option and click Next .
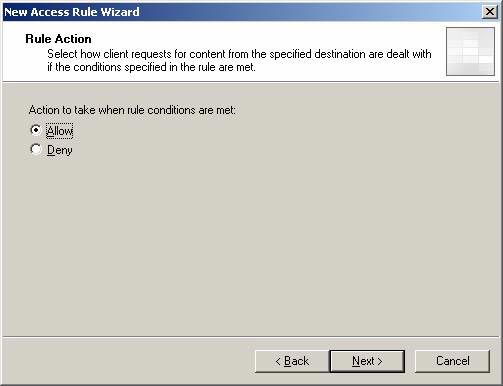
Figure 16
-
On the Protocols page, verify that the Selected protocols option is selected from the this rule applies to drop- down list . Then press the Add button. In the Add Protocols dialog box, click the All Protocols folder. Double click on one of the protocols listed in Table 1 above. Click Close .
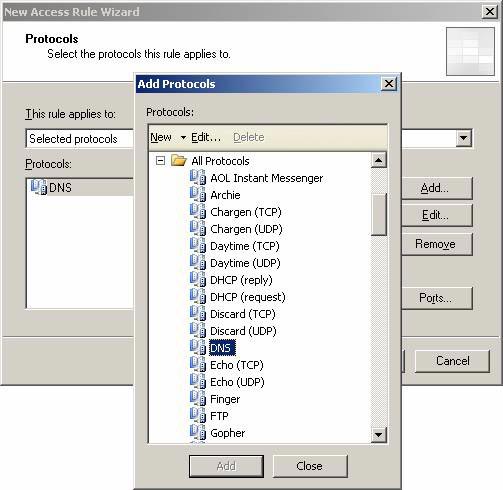
Figure 17
-
Click Next on the Protocols page.
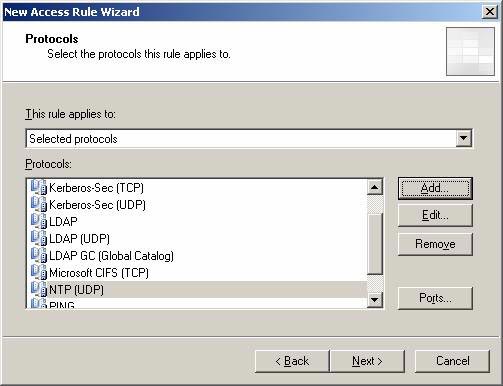
Figure 18
-
On the Access Rule Sources page, click the Add button. In the Add Network Entities dialog box, click the New menu, then Computer Set . In the New Computer Set Rule Element dialog box, enter Branch Office DCs in the Name box.
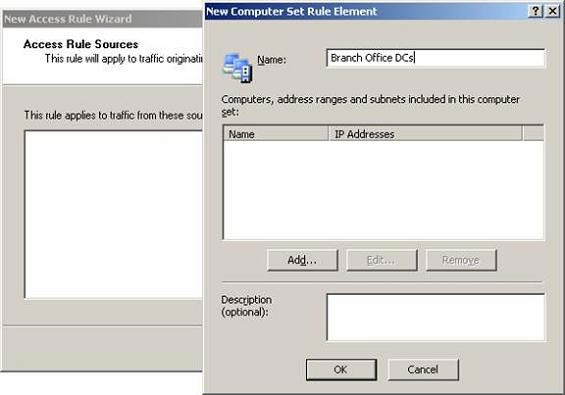
Figure 19
-
Click the Add button in the New Computer Set Rule Element dialog box and click on Computer in the list.
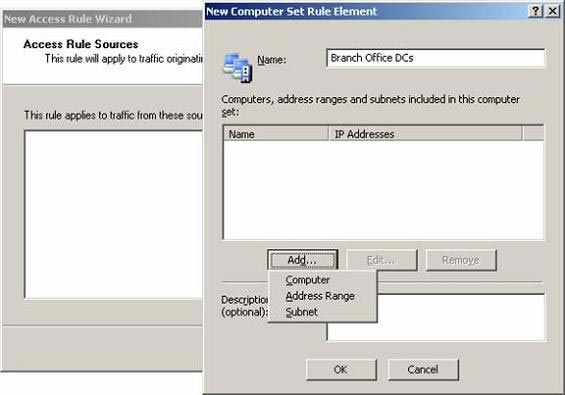
Figure 20
-
In the New Computer Rule Element dialog box, enter the computer name in the branch in the Name box. In our example, the computer name is set to Branch1 DC , which helps us distinguish this DC from other branch DCs. Enter the IP address of the branch domain controller in the Computer IP Address box, in this example 10.0.1.2 . Click OK .
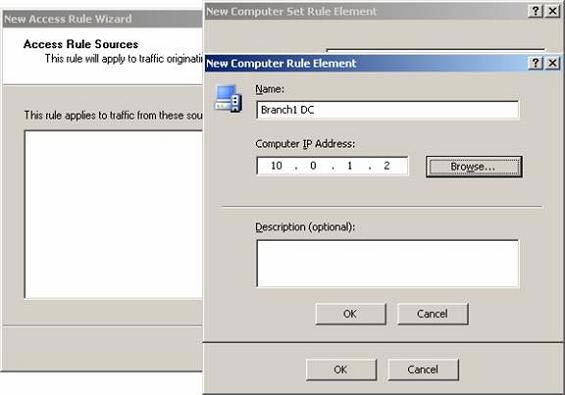
Figure 21
-
Click OK in the New Computer Set Rule Element dialog box.
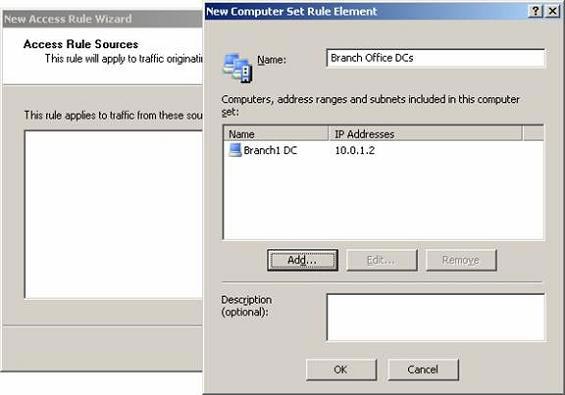
Figure 22
-
In the Add Network Entities dialog box, click on the Computer Sets folder and double-click on Branch Office DCs . Click Close in the Add Network Entities dialog box.
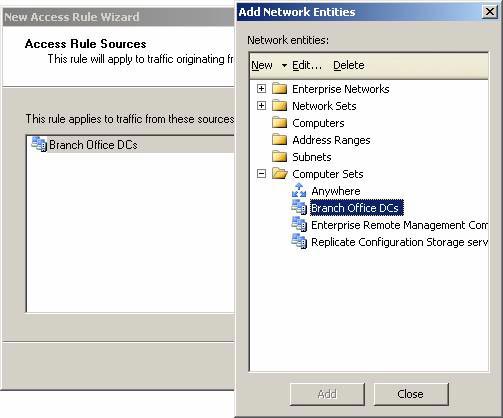
Figure 23
-
Click Next on the Access Rule Sources page.
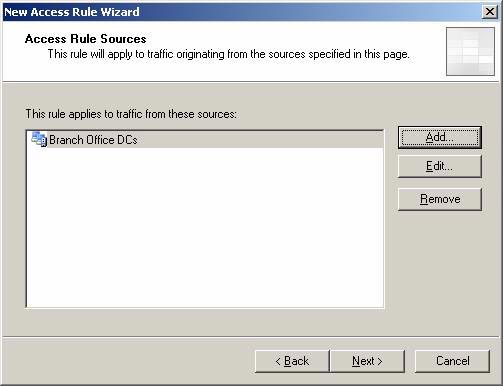
Figure 24
-
On the Access Rule Destinations page, click the Add button. In the Add Network Entities dialog box, click the New menu and click Computer .
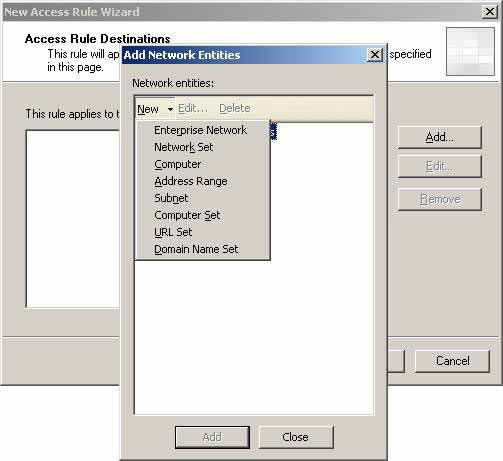
Figure 25
-
In the New Computer Rule Element dialog box, enter a name for the computer in the Name box. In this example we will enter the name of the Domain Controller in the main office, so we will name it the Main Office DC . Enter the IP address for the main office Domain Controller in the Computer IP Address box and click OK .
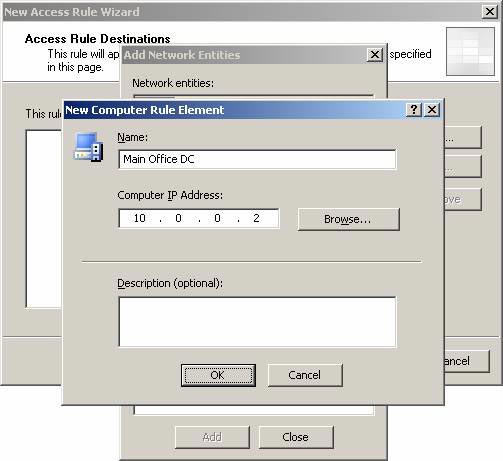
Figure 26
-
In the Add Network Entities dialog box, select the Computers folder and double-click Main Office DC . Click Close .
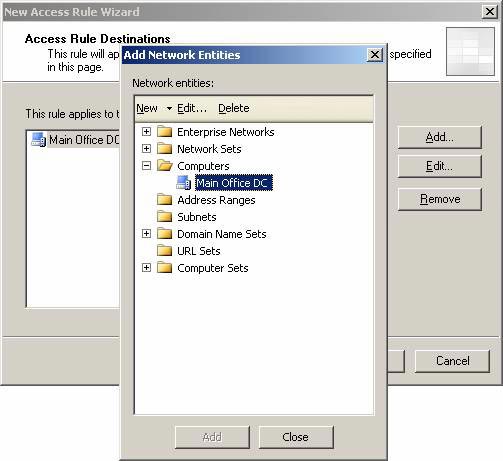
Figure 27
-
Click Next on the Access Rule Destinations page.
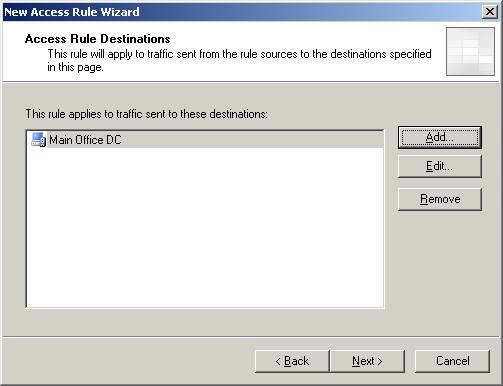
Figure 28
-
On the User Sets page, accept the default All Users setting . The reason we need to allow all users is because these domain controllers do not specify user login. To verify, you need Firewall Client. Firewall Client is not installed on Domain Controller. Click Next .
-
Click Finish on the Completing the New Access Rule Wizard page .
-
Click Apply to record the changes and update the firewall policy. Click OK on the Apply New Configuration dialog box.
Now that the Enterprise Policy is configured, the next step is to mount the Enterprise Policy with the branch array. At the present time, the default Enterprise Policy has been attached to the branch office array. We will change some things so Branch Policy is attached to this array.
Follow these steps:
-
In the ISA Firewall console, expand the Arrays node and click on the Branch button. Right-click on Branch and select Properties .
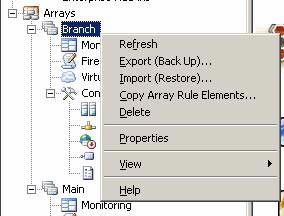
Figure 29
-
In the Branch Properties dialog box, select the Policy Settings tab. On the Policy Settings tab, click the button down in the Enterprise policy list. Select the Branch Policy option. This option will import and apply the defined rules in Enterprise Policy to the array policy. Remove the Publishing rule checkbox ('Deny' and 'Allow') checkbox so that Web and Server Publishing rules cannot be created at the branch for some safety reasons. Click OK .
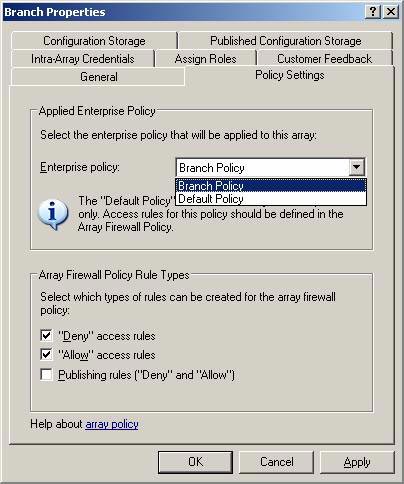
Figure 30
-
Expand the Branch array in the left pane of the console and click on the Firewall Policy (Branch) button . Note that the Access Rule we created at the Enterprise Policy level is also applied to the array policy.
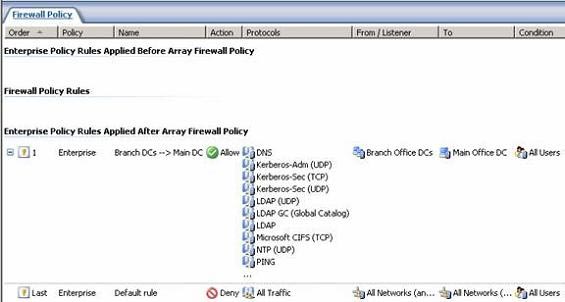
Figure 31
-
We want this Domain Controller policy to always be applied to the local array policy. To do this, click on the Branch Policy Enterprise Policy button in the left pane of the console. Right-click the Branch DCs> Main DC Access Rule and select the Move Up command.
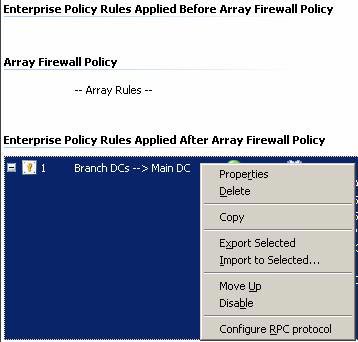
Figure 32
-
Click on the policy for Firewall Policy (Branch) . You will see Enterprise Policy applied before the local array policy.
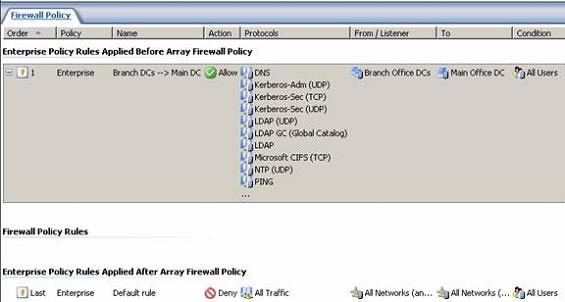
Figure 33
As you can see on the Enterprise Policy illustration, it is much easier to apply policies to multiple branch offices by making changes once on the Branch Policy Enterprise Policy. These changes will be automatically replicated to all areas associated with the policy. Certainly it is much easier to make changes to each array, especially with about 30 or more domains. For example, if you want to add more Domain Controllers, all you need to do is update Computer Set Branch. Office DCs . This rule will apply to new DCs in the branch.
Summary
In Part 6 of this series on how to use the Site-to-Site Branch Office Connectivity VPN to connect between these branch offices and headquarters, we started with some advanced configuration settings used. in linking the branch office Domain Controller and the Domain Controller main office with intra-domain communications. In this article, I introduced an event that breaks the usual rules, how to create and use Enterprise Policy to streamline policy development and deployment of distributed Enterprise Firewall. In the next article in this series, we will run depromo on the branch office Domain Controller, install Active Directory to integrate the DNS server on the branch office Domain Controller and change DNS settings on the branch office ISA Firewall.
After the Branch Office Domain Controller is installed, the next step is to create firewall policies for branch offices, allowing access to resources at the main office. We will also create an optional group or user based policy that allows users to access Exchange Server resources at the main office, etc. If we have time we will also begin configuring an alternate CSS to make it possible to tolerate errors for the ISA Firewall Enterprise configuration.
Create a Site-to-site VPN on ISA 2006 (Part 7)
- Create a Site-to-site VPN on ISA 2006 (Part 4)
- Create a Site-to-site VPN on ISA 2006 (Part 3)
- Create Site to Site VNP with the ISA 2006 Firewall Branch Office Connection Wizard - Part 2
- Instructions for creating web pages in Wordpress from A to Z (Part 2)
- Create a Site-to-site VPN on ISA 2006 (Part 5)
- Create a Site-to-site VPN on ISA 2006 (Part 2)
- Create VNP Site to Site with the ISA 2006 Firewall Branch Office Connection Wizard - Part 1
- Create a Site-to-site VPN on ISA 2006 (Part 1)
- Create a Site-to-site VPN on ISA 2006 (Part 7)
- Configure IIS for an FTP Site - Part 3
- How to Make Your Own Animation
- How to Add Subtitles to a Downloaded Video
- How to Rotate a Video
- How to Embed Subtitles in Videos
- How to Upload an HD Video to YouTube
- How to Create a Website Privacy Policy
- How to Use Git Effectively
- How to Set Up and Use Git
- How to Create a Pull Request on Github
- How to Edit Group Policy in Windows XP
-
 Specter vulnerability is still an obsession for Intel CPU users, Microsoft officially offers a solution
-
How to draw beautiful mind maps with iMindMap
-
Instructions for drawing the mind map with Imindmap
-
How to Create a Pull Request on Github
-
Create a Site-to-site VPN on ISA 2006 (Part 5)
-
Network design for branches (Part 2)
 Specter vulnerability is still an obsession for Intel CPU users, Microsoft officially offers a solution
 How to draw beautiful mind maps with iMindMap
 Instructions for drawing the mind map with Imindmap
 How to Create a Pull Request on Github
 Create a Site-to-site VPN on ISA 2006 (Part 5)
 Network design for branches (Part 2)