Instructions for configuring IPv6 on Windows Server
On IPv4 networks, you can assign addresses to interfaces in three ways: manually assigning by static address, dynamically assigning addresses using DHCP, or automatically assigning using APIPA. Administrators of small networks often configure IPv4 addresses manually, in medium and larger organizations using DHCP. Automatic address configuration using APIPA is usually done in very small networks such as at home, or your LAN, connecting to the Internet through a DSL router.
- About IPv6 address
Assigning addresses on an IPv6 network is a bit different from IPv4. IPv6 can be assigned to an Interface in the following ways:
- Manually configure one or more IPv6 addresses on the Interface
- Configure the address with status using DHCPv6 server
- Configuring stateless addresses - stateless, based on messages received by Router Advertisement
- Automatically configure both status and stateless addresses
In addition, link-local address is always automatically configured whether the status or stateless status (automatically configured) is being used.
The main difference between IPv4 and IPv6 is that the IPv6 protocol is designed to automatically configure. This means that, in most cases, you will not need to manually assign addresses, or deploy DHCPv6 servers, and you will instead use the stateless address autoconfiguration feature. for most of my network servers. Do you see the opposite of physical interfaces on IPv4 servers? Servers such as network adapters on IPv4 are usually assigned an address, but most physical interfaces on IPv6 are assigned multiple addresses. Specifically, a physical Interface of IPv6 uses at least two addresses:
- Link-local is created automatically, used for traffic on internal links.
- Additional Unicast addresses, used for traffic, need to be routed outside the internal link.
Assign IPv6 address manually
Manually assigning IPv6 addresses is generally done in 2 cases:
- For current servers on your network
- On most routers interface
On Windows Server 2012 or Windows Server 2012 R2-based machines, you can assign IPv6 addresses by using one of the following options:
- Use Internet Protocol Version 6 (TCP / IPv6) Properties
- Use the New-NetIPAdress cmdlets and Set-DnsClientServerAddress of Windows PowerShell
- Use the netsh commands from the Netsh.exe command line context menu
Method 1: Use Internet Protocol Version 6 (TCP / IPv6) Properties
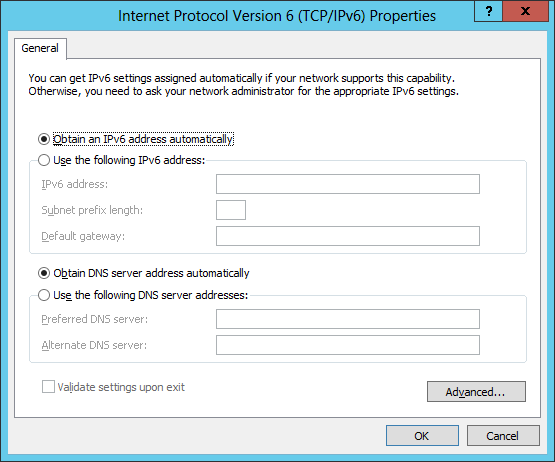
Right click on the network icon in the taskbar> Open network and sharing center> look to the left select Change adapter settings> right click on the network icon select Properties> Select Internet Protocol Version 6 (TCP / IPv6)> Properties to open the dialog box Internet Protocol Version 6 (TCP / IPv6) Properties. Here you configure the IPv6 address, the length of the subnet prefix, the default gateway and the DNS server address as shown.
Method 2: Use Windows PowerShell
The following example will use Windows PowerShell to configure the addition of an IPv6 address on the Physical Interface of a Windows Server 2012/2012 R2 computer. First, run the Ipconfig command on the server, this is the result:
PS C:> ipconfig
Windows IP Configuration
Ethernet Ethernet adapter:
Connection-specific DNS Suffix.:
Link-local IPv6 Address.....: fe80 :: 2025: 61fb: b68: c266% 12
IPv4 Address...........: 172.16.11.75
Subnet Mask...........: 255.255.255.0
Default Gateway.........: 172.16.11.1
Tunnel adapter isatap. {DD59BFFD-706A-4685-9073-647788046335}:
Media State...........: Media disconnected
Connection-specific DNS Suffix.:
Tunnel adapter Teredo Tunneling Pseudo-Interface:
Media State...........: Media disconnected
Connection-specific DNS Suffix.:
From this command you will notice that the physical interface named Ethernet is assigned two addresses:
- IPv4 address: 172.16.11.75
- Link-local IPv6: fe80 :: 2025: 61fb: b68: c266% 12
% 12 at the end of the link-local address is called the Zone indentifier, used to identify the links on the set address. On Windows, Zone identifier is equivalent to the Interface index, you can use the Get-NetAdapter cmdlet to display the list of physical Interface names and indexes on a Windows Server 2012/2012 R2 computer as shown below:
PS C:> Get-NetAdapter |fl Name, ifIndex
Name: Ethernet
ifIndex: 12
Instead of using the Ipconfig command, you can also use the Get-NetIPAdress cmdlet as shown below to display the Address information for an Ethernet named:
PS C:> Get-NetIPAddress |where {$ _. InterfaceAlias -eq "Ethernet"}
IPAddress: fe80 :: 2025: 61fb: b68: c266% 12
InterfaceIndex: 12
InterfaceAlias: Ethernet
AddressFamily: IPv6
Type: Unicast
PrefixLength: 64
PrefixOrigin: WellKnown
SuffixOrigin: Link
AddressState: Preferred
ValidLifetime: Infinite ([TimeSpan] :: MaxValue)
PreferredLifetime: Infinite ([TimeSpan] :: MaxValue)
SkipAsSource: False
PolicyStore: ActiveStore
IPAddress: 172.16.11.75
InterfaceIndex: 12
InterfaceAlias: Ethernet
AddressFamily: IPv4
Type: Unicast
PrefixLength: 24
PrefixOrigin: Manual
SuffixOrigin: Manual
AddressState: Preferred
ValidLifetime: Infinite ([TimeSpan] :: MaxValue)
PreferredLifetime: Infinite ([TimeSpan] :: MaxValue)
SkipAsSource: False
PolicyStore: ActiveStore
Did you notice this command returns more information than Ipconfig?
You can use cmdlet NewNetIPAdress to assign a new Unicast IPv6 global address with prefix length of 64 and the default gateway address for Ethernet Interface as follows:
PS C:> New-NetIPAddress -InterfaceAlias "Ethernet" -IPAddress 2001: DB8: 3FA9 :: D3: 9C5A `
PrefixLength 64 -DefaultGateway 2001: DB8: 3FA9 :: 0C01
IPAddress: 2001: db8: 3fa9 :: d3: 9c5a
InterfaceIndex: 12
InterfaceAlias: Ethernet
AddressFamily: IPv6
Type: Unicast
PrefixLength: 64
PrefixOrigin: Manual
SuffixOrigin: Manual
AddressState: Tentative
ValidLifetime: Infinite ([TimeSpan] :: MaxValue)
PreferredLifetime: Infinite ([TimeSpan] :: MaxValue)
SkipAsSource: False
PolicyStore: ActiveStore
IPAddress: 2001: db8: 3fa9 :: d3: 9c5a
InterfaceIndex: 12
InterfaceAlias: Ethernet
AddressFamily: IPv6
Type: Unicast
PrefixLength: 64
PrefixOrigin: Manual
SuffixOrigin: Manual
AddressState: Invalid
ValidLifetime: Infinite ([TimeSpan] :: MaxValue)
PreferredLifetime: Infinite ([TimeSpan] :: MaxValue)
SkipAsSource: False
PolicyStore: PersistentStore
To confirm the result, you need to use Get-NetIPAddress with the AddressFamily parameter to display only IPv6 information as follows:
PS C:> Get-NetIPAddress-AddressFamily IPv6 |where {$ _. InterfaceAlias -eq "Ethernet"}
IPAddress: fe80 :: 2025: 61fb: b68: c266% 12
InterfaceIndex: 12
InterfaceAlias: Ethernet
AddressFamily: IPv6
Type: Unicast
PrefixLength: 64
PrefixOrigin: WellKnown
SuffixOrigin: Link
AddressState: Preferred
ValidLifetime: Infinite ([TimeSpan] :: MaxValue)
PreferredLifetime: Infinite ([TimeSpan] :: MaxValue)
SkipAsSource: False
PolicyStore: ActiveStore
IPAddress: 2001: db8: 3fa9 :: d3: 9c5a
InterfaceIndex: 12
InterfaceAlias: Ethernet
AddressFamily: IPv6
Type: Unicast
PrefixLength: 64
PrefixOrigin: Manual
SuffixOrigin: Manual
AddressState: Preferred
ValidLifetime: Infinite ([TimeSpan] :: MaxValue)
PreferredLifetime: Infinite ([TimeSpan] :: MaxValue)
SkipAsSource: False
PolicyStore: ActiveStore
The interface is now multihomed (connecting multiple networks) because it has an IPv6 address link-local and IPv6 global. Open the Internet Protocol Version 6 dialog box (TCP / IPv6) Properties you will see the address information is configured manually as desired, like the following figure:
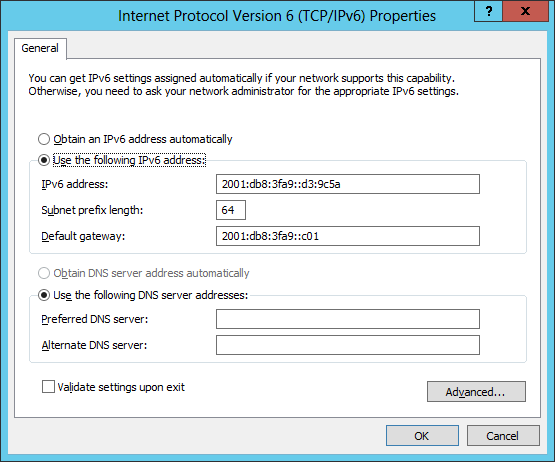
This snapshot confirms the successfully configured IP address using Windows PowerShell
Automatically configure stateless addresses
This is the most valuable feature of IPv6 because it allows IPv6 nodes to communicate on the network without manually assigning addresses to them or using a DHCP server.
Assigning link-local addresses automatically for Interface on IPv6 servers is an example of automatically configuring IPv6 addresses, which allows servers on the same communication link to each other. This type of automatic address configuration is called stateless because it does not use the address configuration protocol like DHCP.
Another example of automatic stateless address configuration is when the IPv6 server uses a router to automatically configure additional addresses, such as a link-local or global Unicast address, a gateway address to wear. and other IPv6 configuration parameters. As follows:
- Host (here is the Windows Server 2012/2012 R2 computer) sends a Router Solicitation notification to request Router Advertisement notifications from any router that is "listening" on the host's link.
- The router (IPv6 or ISATAP) on the host's link will respond to the server's message by sending Router Advertisement messages to the server.
- The server uses the information in this message to assign an expected address to it along with the additional settings specified. The configured IPv6 address can be in any of the following states:
- Tentative: The address still needs to be verified as unique by performing duplicate address detection. The expected address cannot receive Unicast traffic until they are validated.
- Valid: Address is unique. A valid address can also be a preferred or outdated address.
- Preferred: Valid address and therefore can be used to send or receive traffic Unicast.
- Deprecated: Is a valid address and can therefore be used to send or receive Unicast traffic, but not used to initiate a new communication session.
- Invalid (Invalid): This address is no longer used to send or receive traffic Unicast anymore.
- The time when the address is assigned a specific status will be determined by the information provided by the router.
Note: Automatic address configuration is not available for routers. In addition to configuring link-local addresses, address autoconfiguration is only used to assign addresses to servers. Addresses for routers must be configured using other methods, such as manual assignment.
- Cisco Router Configuration Guide 1800 series (Cisco 1801, 1802, 1803, 1811, 1812)
Automatic configuration of addresses with status
Automatic address configuration is based on the use of address resolution protocols. On IPv4 networks, DHCP is such a protocol, it is used to assign automatic IP addresses and other configuration settings to the Interface on the host. DHCP infrastructure includes: DHCP server, DHCP clients, DHCP Relay Agent (can relay DHCP messages between server and client on different subnets).
The IPv6 version of this protocol is called DHCPv6, which uses the same infrastructure as that of DHCPv6 servers, DHCPv6 clients, and DHCPv6 Relay Agent. However, DHCPv6 can provide IPv6 hosts both stateless and automatically configured. This can be a bit confusing because it leads to additional addresses being assigned to the host. If you want to prevent this, you only need to configure IPv6 routers reasonably so that the DHCPv6 server can only assign addresses with status to the host.
One reason to deploy a DHCPv6 server on an IPv6 network is because Windows does not support automatically configuring the stateless address of DHCPv6 server settings by using Router Advertisement messages. This means that you need to use a DHCPv6 server if Windows must perform domain resolution using IPv6.
DHCPv6 client software is integrated into the following Windows versions:
- Windows 8.1
- Windows 8
- Windows 7
- Windows Vista
- Windows Server 2012 R2
- Windows Server 2012
- Windows Server 2008 R2
- Windows Server 2008
Configure DHCPv6 server
The DHCP server service in the following Windows Server versions supports both stateless and status addresses:
- Windows Server 2012 R2
- Windows Server 2012
- Windows Server 2008 R2
- Windows Server 2008
You can configure a Windows Server 2012/2012 R2 computer as a stateless or stateless DHCPv6 server by following these steps:
- Start by installing the role of the DHCP server on the server.
- Assign static IPv6 addresses for DHCPv6 interfaces to "listen" to request messages sent to DHCPv6.
- Open DHCP and expand IPv6 node on the server node.
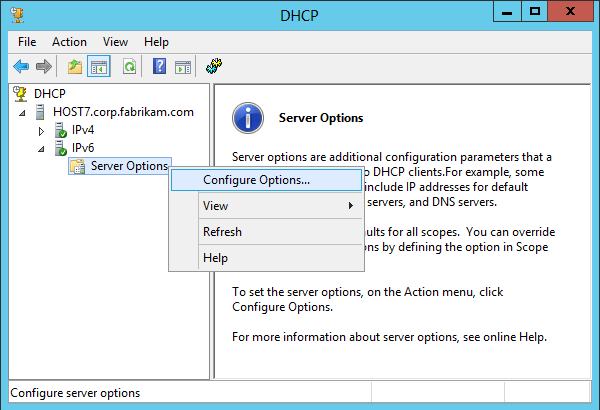
- To configure DHCPv6 options for automatically configuring stateless addresses, right-click the Server Options button under the IPv6 button and select Configure Options as shown:
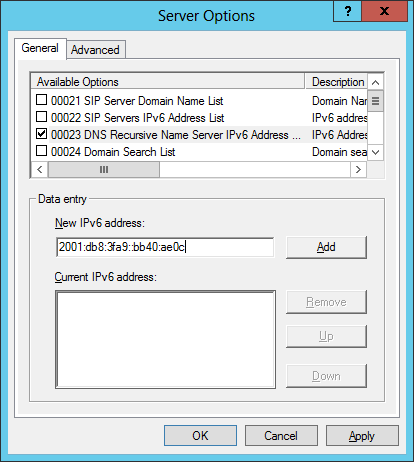
- To configure DHCPv6 options for automatic address configuration, right-click the IPv6 button and select New Scope as shown:
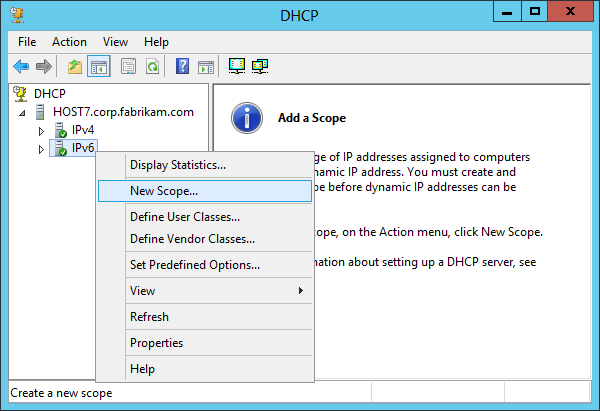
Then use the New Scope Wizard to name and describe the scope, the IPv6 subnet prefix, and other required information.
These are ways to manually assign IPv6 addresses. Hope the article is useful to you :).