Table of Contents
This guide provides a practical overview of Check the Laptop Serial (Serial) with the Command Prompt, including its main features, benefits, limitations, and important considerations.
The following article shows how to check the Serial and the laptop model name with the cmd command.
Step 1: Open the Run dialog box.
Click Start and enter Run in the Search programs and files box and select Run . Or you can press Windows + R key combination.
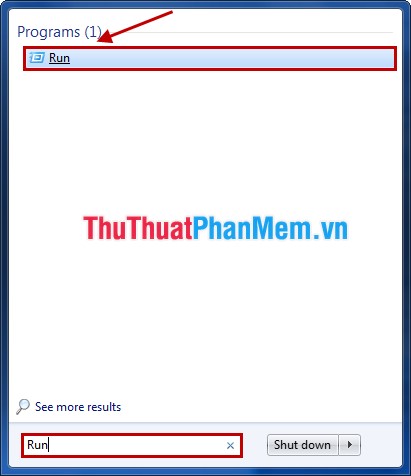
Step 2: In the Run window, enter the cmd command then click OK to open the cmd. exe window.

Step 3: In the cmd window.
- To see the Serial Laptop number you enter the command wmic bios get serialnumber and press Enter .

The Serial number will show at the bottom of the command line, the Serial number only found on Laptops with desktop computers will not display the Serial number.

- Also you can see the name of the computer by entering the command line wmic csproduct get name and press Enter . The device name will be displayed below:
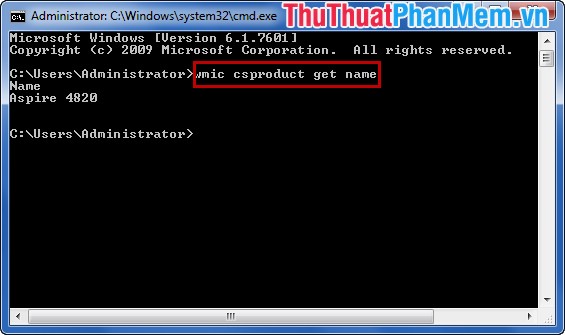
The article shows how to check the Serial and the laptop model name with the cmd command. From now on you only need to remember the cmd command to quickly check the Serial and lap top machine name. Good luck!
FAQ
What should I know about Check the Laptop Serial (Serial) with the Command Prompt?
Focus on the key features, requirements, limitations, and practical use cases explained in this guide.
How do I get the best results with Check the Laptop Serial (Serial) with the Command Prompt?
Follow the recommended steps, use current software or information, confirm compatibility, and review settings before major changes.
Are there any risks or limitations?
Potential limitations depend on compatibility, data quality, cost, privacy, support, and how the product or method is used.
Related Articles
 How to Use the Command History Function in Command Prompt9 minutes read
 Add Command Prompt to Power User Menu on Windows 103 minutes read
 How to Use Xcopy Command in Command Prompt7 minutes read
 How to Open Command Prompt on Windows 10, 8, 7, Vista and XP6 minutes read
 How to Make Command Prompt Appear at School11 minutes read
 6 Best Command Prompt Alternatives for Windows6 minutes read
Reader Comments 0
Sign in with email or Google to join the discussion.