6 Quick and Easy Ways to Take Screenshots on Windows 10 and 11
Taking screenshots on Windows 10 and 11 allows you to quickly save the displayed image. There are many different ways to do this, from using keyboard shortcuts and built-in tools to using the Edge browser..
Below, Free Download will provide detailed instructions on the 6 most common methods for taking screenshots on Windows 10 and 11 computers.
Table of Contents:
Method 1: Capturing the entire screen
Method 2: Capturing a specific area
Method 3: Quick capture with PrtScr
Method 4: Capturing with Game Bar
Method 5: Capturing with Snipping Tool
Method 6: Capturing with Microsoft Edge
1. Take a screenshot of the entire screen.
Step 1: Open the screen you want to capture (the entire screen )
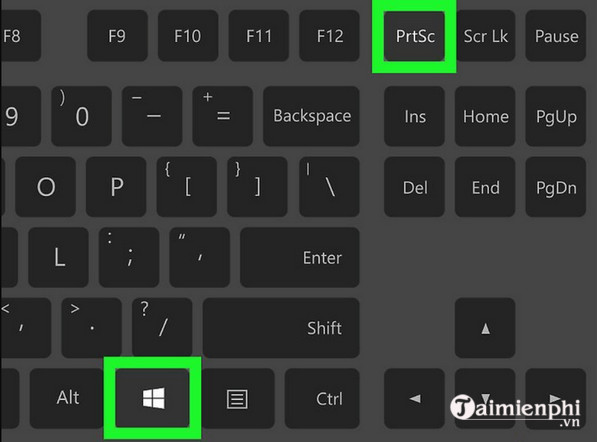
. Step 2: Press Windows + PrtSc (Print Screen) ; the screen will flicker slightly.
Step 3: The image will be automatically saved in This PC > Pictures > Screenshots.
Click on This PC to open your computer's folder, look in the right-hand column and you will find the Pictures folder.
Or you can access the folder C:UsersPicturesScreenshots (replace with your username).
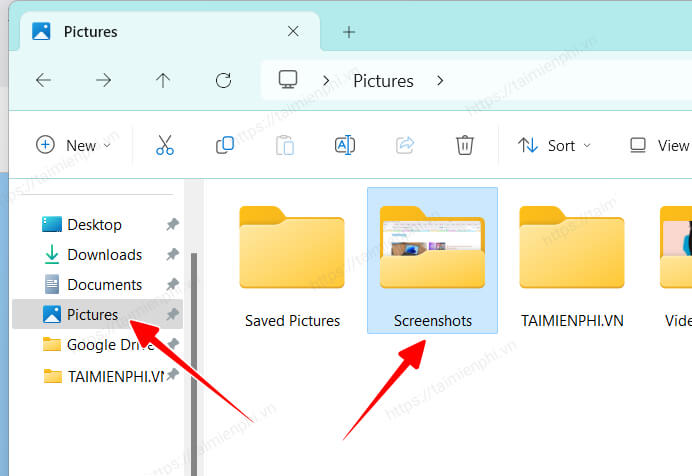
Tip: If you don't see the photos in the folder, try pressing Windows + E to open File Explorer and look again in Pictures > Screenshots .
2. Take a screenshot of a specific area.
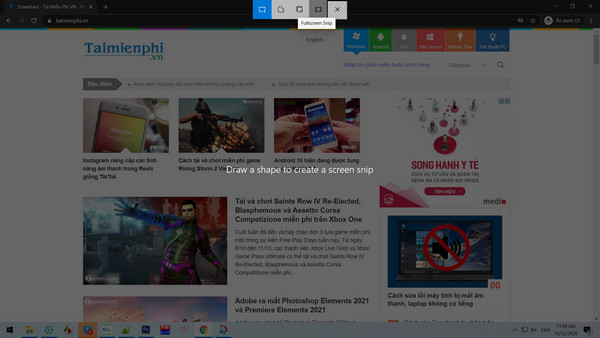
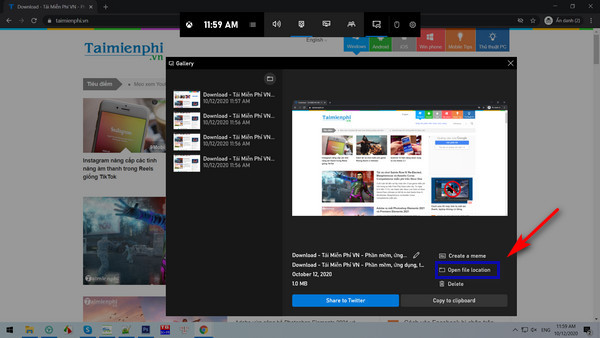
Press Windows + Shift + S ; the screen will darken and the screenshot toolbar will appear.
Select the shooting mode:
- Rectangular Snip: Captures a rectangular area.
- Freeform Snip: Captures a freeform area.
- Window Snip: Captures a specific window.
- Full-Screen Snip: Captures the entire screen.
The captured image is copied to the clipboard; you can press Ctrl + V to paste it into Paint or Word .
Tip: This method is very convenient when you only want to capture a portion of the screen without needing to edit it later.
3. Take a screenshot using the Print Screen button.
Press PrtSc to capture the entire screen.
- Open Paint , Word , or any application that supports images.
- Press Ctrl + V to paste the image, then Ctrl + S to save.
Tip: To capture only one window, press Alt + PrtSc . If using a laptop, you may need to hold down Fn as well (Fn + Alt + PrtSc) .
4. Take a photo using the Game Bar feature.
This is a feature exclusive to Windows 10 , integrated with Xbox, allowing you to take photos, record videos, and share them directly to your Xbox system.
- Press Windows + G to open the Game Bar.
- Click the camera icon or press Windows + Alt + PrtSc to take a screenshot.
- The screenshot is saved in This PC > Videos > Captures .
Tip: This method is suitable when you want to take screenshots or record your screen while playing games.
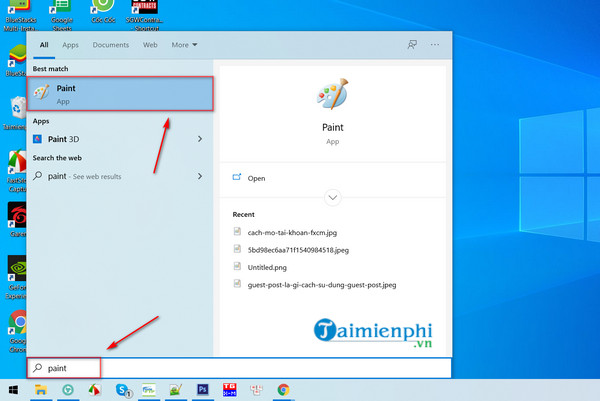
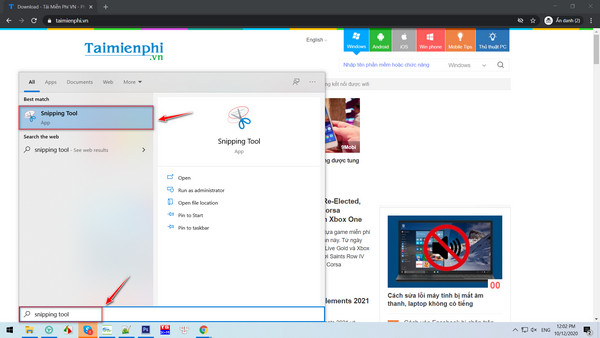
5. Take a picture using the Snipping Tool.
- Open the Start Menu , type Snipping Tool , and select the application.
- Click New , select the area you want to capture, then edit or save the image.
Tip: If you want the screenshot to be saved automatically without pasting it into Paint, use this tool instead of PrtSc.
6. Take a photo using Microsoft Edge.
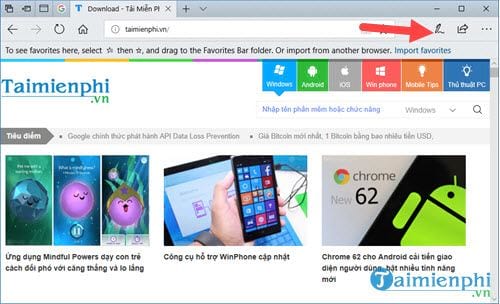
- Open the Edge browser.
- Click the pen icon on the toolbar.
- Select the drag icon and select the area you want to capture.
- The image will be temporarily saved; you need to open Paint to paste and save it.
Note: This method only applies to older versions of Edge; current browsers may not support it.
Windows 10 offers several ways to take screenshots without installing additional software. Each method has its own advantages and disadvantages; choose the one that best suits your needs.