5 ways to change DPI for images
If you're a designer or photographer, or simply want to make sure your vacation photos print out without any problems, you need to understand what DPI is and how to change the resolution when printing. . In this article, TipsMake.com will explain everything there is to know about DPI.
What is DPI?
DPI stands for 'dots-per-inch', and is a specification relating to printing and setting the printing resolution of an image.
A print is made up of millions of tiny dots of ink. The DPI setting determines the number of dots the printer will place in each square inch of the image. It's important to learn how DPI works because it controls the two most important things in printing:
1. Print quality : Simply put, high DPI means high print quality. Most good home printers can output at 300dpi, and professional printers produce much higher DPI.
2. Size of print : One pixel in a digital photo is equivalent to one dot in print. So, if printing an image that is 1800 pixels wide at 300dpi, the printed image will be 6 inches wide. Print the same image at 180dpi, it will be 10 inches wide.
How does DPI affect prints?
The following is an image to illustrate. Below are two lines consisting of 40 identical squares (same size and same color). The squares join together less tightly in the top line, which equates to low DPI; and a tighter match on the bottom line, which corresponds to a higher DPI.
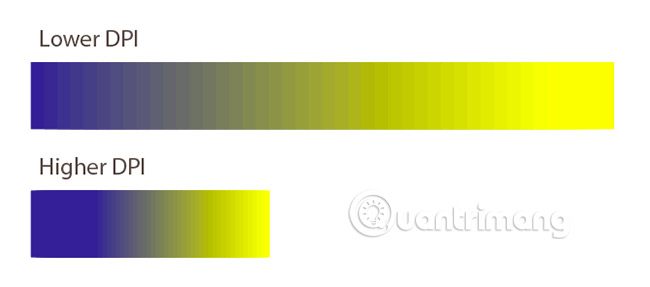
The difference is very clear. On lower DPI lines, the gradient (a gradient is a set of color gradients arranged in linear order) is much less smooth. The edges of each square are clearly visible and the line is also much longer.
On higher DPI lines, the gradient is much smoother. It's almost seamless and the line is also a lot shorter.
This demonstrates the balance between size and quality that needs to be made when setting print resolution. If you work with low-resolution images, you will have to trade off between the two factors above.
If possible, always save your work at the highest possible resolution. Because resizing an image to make it larger does not improve print quality.
What DPI level should you use?
All of this begs the question: What is the best DPI for printing?
The common standard is 300dpi. This is excellent quality for photos and every detail that the naked eye can discern is within this level.
But if the image is too small to print at 300dpi, don't worry. The intended distance for your audience to view the print also plays an important role in deciding what resolution you will need.
For images you have in hand, such as photos, flyers or magazines, 300dpi or higher is best, but 250dpi is also acceptable.
With posters, or photos that you plan to frame and hang on the wall, you can choose a lower resolution because viewers will often observe them at a distance of several dozen meters. In this case, 200dpi or even a little lower is acceptable. This DPI level also applies when you print on other materials, such as fabric.
The farther the viewing distance, the lower the resolution can be set. An advertising poster designed to be viewed from across the street can be printed at as low as 20dpi.
How to check the DPI of an image
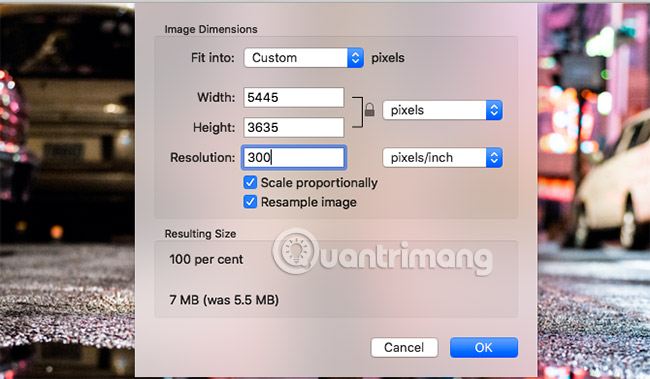
To find out the DPI of an image in Windows, right-click the file name and select Properties > Details. You'll see DPI in the Image section, labeled Horizontal Resolution and Vertical Resolution. On your Mac, open the image in Preview and choose Tools > Adjust Size. DPI is now called Resolution.
5 ways to change the DPI of an image
You can change the DPI of an image in most graphics packages. As mentioned above, you can even do it in Preview on a Mac, but the article will introduce 3 solutions that can be applied on any platform.
Remember that DPI is just a measurement of printing resolution. Changing the DPI does not change the digital image size or file size.
If working with an image that you plan to print, it's best to set the target print resolution before resizing the image. That will help ensure the image is not too small to print at the desired size.
How to change DPI in Photoshop
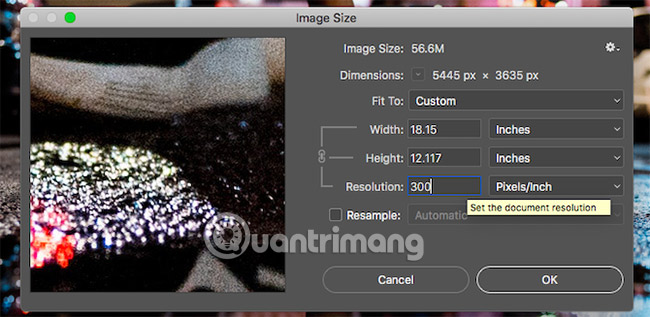
To change the DPI of an image in Photoshop, go to Image > Image Size. Uncheck Resample Image, because this setting will upscale (Upscale is the process of converting a resolution to a higher level) the image, which will cause lower image quality.
Now, next to Resolution, enter the resolution you want, set it to Pixels/inch. Note that the Width and Height metrics will also change. This shows you the size the image will be printed at.
Of course, you can specify the width and height (in inches or centimeters) if you want.
If you do this, just make sure the DPI doesn't drop so low that the overall quality is reduced.
How to change DPI in GIMP
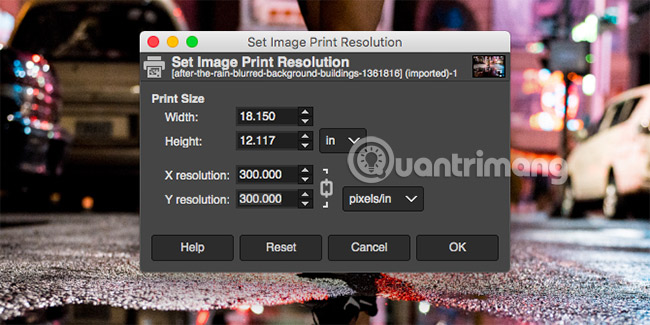
To change an image's DPI in GIMP, go to Image > Print Size. Enter the desired DPI next to X Resolution , in pixels/in. Y Resolution will also update automatically.
Just like in Photoshop, you can set the width and height as desired. Again, make sure the DPI doesn't drop too low when doing this.
How to change DPI in Photo Maximizer
Many people wonder how to increase the DPI of a photo? In this modern world, increasing the DPI of an image is really easy with Photo Maximizer.
Wondershare Photo Maximizer is a great tool to enlarge your photos 10 times without losing their quality. However, this app offers much more than that. It also comes with additional functions that will help you improve your images. Accordingly, with the crop function you can focus on only a part of the photo, eliminating what is unwanted, while with the adjustment tools you can easily adjust the quality and aspect of photo.
The program comes with many functions that help users enhance the quality of their photos, besides enlarging them. The color correction feature allows adjusting the saturation, brightness, temperature, etc. of the image. That's very useful when you're trying to repair an image and make it look better. If you want more artistic photos, the film grain feature is exactly what you need. It adds a classic filter on your photos, but you can decide how strong it is. Additionally, with the noise reduction feature, you can eliminate artifacts that appear when taking photos in low light conditions. Furthermore, you can save preset settings and use them on other images you want to enhance. That way, you'll adjust your photos faster than ever.
Step 1: Install and launch Photo Maximizer
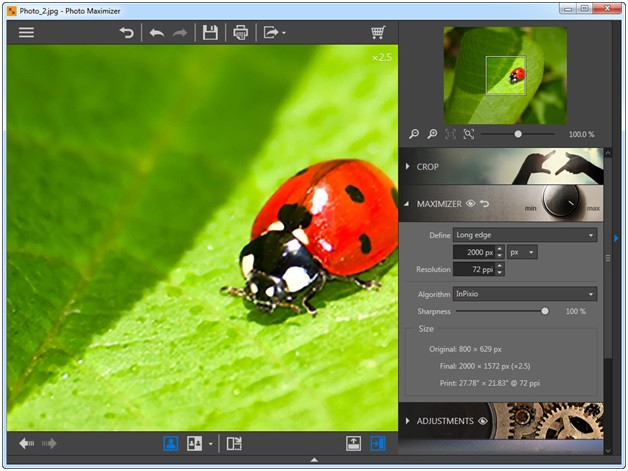
Download and install Photo Maximizer on your computer. Then launch the app and add photos to Photo Maximizer. You can add a photo by dragging and dropping it or click the Open button to add a file.

Step 2: Increase the DPI of the image
Once the photo is added, you can enter a new desired DPI value in the text box to increase the DPI without losing the quality of the photo.
Step 3: Save changes
Once the image's DPI is increased as desired, you can save and download the image to your system.

How to change DPI online for free

If you need to quickly change your DPI and don't have a graphics program to use, you can always change the DPI for your images using the Convert Town web app. This tool helps to convert DPI for free online.
All you need to do is enter the DPI you need to change the image, drag and drop the file to upload the image and wait. When the tool finishes converting, it will automatically download the updated image to the default download folder.
How to change DPI in Preview on macOS
You should use one of the above options if you are using Windows. Besides, there is also a built-in solution to help you perform this task on your Mac: Preview. This default app for viewing images also allows you to change the DPI of those images, and it's really easy.
Open the image in Preview and go to Tools > Adjust Size . Uncheck the box labeled Resample image to ensure you don't increase or decrease the number of pixels in the image. Now, with Resolution set to pixels/inch , enter your target resolution (such as 300).
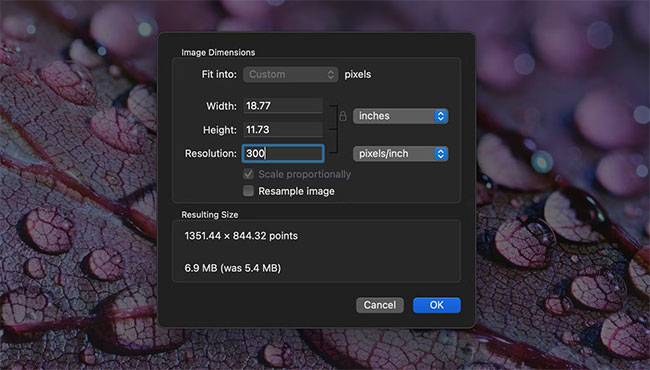
You will notice that the width and height also change, showing you the new size at which the image will be printed.
Understanding the meaning of DPI is very important when wanting to print. It's easy to ruin entire projects, or have bad prints, if you work at too low a resolution or print them larger than they can handle.
But this is only the first step in printing. There's a lot more work to do to ensure your images are perfect every time.
Good luck!