Fix the problem of not being able to install software on Windows
Wondering why you can't install any apps on Windows 10 or Windows 11? It's frustrating when a software installer won't run, throws you an error code, or seems to work fine but then fails.
Below are fixes you can try when software is not installed correctly in Windows.
1. Restart the computer
This is a common troubleshooting step. The reason the software fails to install on your computer may be due to a temporary problem. Before moving on to more in-depth fixes, you should try restarting your computer.
If you still cannot install software after restarting, continue further troubleshooting with the next steps.
2. Check the application installer settings in Windows
Windows 10 and Windows 11 allow you to install traditional desktop applications, as well as software from the Microsoft Store. Certain settings will restrict you to only installing Store apps, so you should check those first.
To do this, go to Settings > Apps > Apps & features . At the top, you'll see the Choose where to get apps section . If the drop-down menu is set to The Microsoft Store only (recommended) , you won't be able to install apps from anywhere else. This prevents you from installing traditional Windows desktop software.
Change this setting to Anywhere (or Anywhere, but let me know if there's a comparable app in the Microsoft Store if you want) and Windows will no longer block you from installing software.

If you are using an older version of Windows 10, you should also check the same settings in Settings > Update & Security > For developers . Here, under Use developer features , make sure you have Sideload apps selected. Selecting Microsoft Store apps may prevent you from installing regular software.
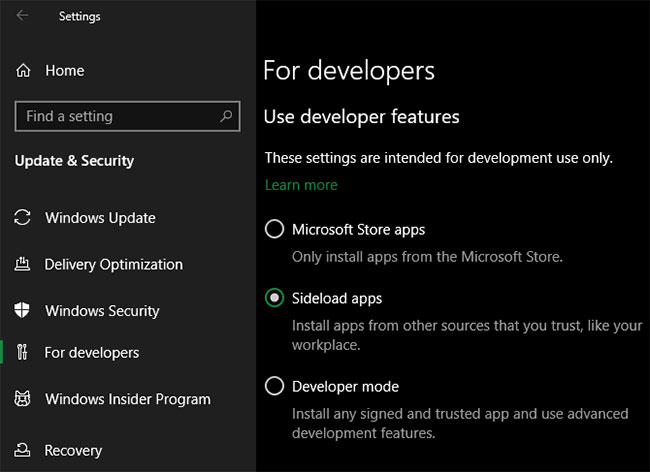
On modern versions of Windows 10 and Windows 11, you won't see these three options. Instead, you'll see a Developer Mode slider (on Windows 11, this slider is located in Settings > Privacy & security > Developer Mode ). You don't need to enable this feature to install regular apps, so you can disable it. There's no harm in leaving it on while you're troubleshooting, but you can turn it off once everything is working.
If you're trying to install an app that asks you to toggle this setting, make sure you trust it. Installing random apps from unknown sources can be dangerous.
Finally, if you're using Windows 10 S Mode or Windows 11 S Mode, you can only install apps from the Microsoft Store. Thankfully, you can easily exit S Mode. To do this, open the Microsoft Store app, search for " Switch out of S mode " and continue downloading like you would with other apps.
3. Free up disk space on your PC
If your disk space is too low, you may not be able to install new software. While this is rare for small applications, installing heavy tools, such as Microsoft Office or Adobe products, will require several gigabytes of free space.
Follow TipsMake's instructions to free up space in Windows, then try installing the software again.
4. Run the installer with admin rights
Thanks to User Account Control (UAC) in Windows, your account only uses admin rights when necessary. Since most software requires admin rights to install, you will often see a UAC prompt when trying to install a new application.
If you just installed an app for your existing account, it may not need admin permissions. But installing software that applies to all users will require administrator approval. Make sure you haven't turned off UAC, otherwise the admin permission prompt may not appear.
Sometimes, approving UAC prompts won't work properly. You may get an error that the installer cannot write to a certain directory or may refuse to run. In these cases, you should run the installer manually with admin rights.
To do this, close the installer dialog box if it is open, then right-click on the installer file and select Run as administrator . After granting admin rights, try the installer again and see if it was successful or not.

In case you do not have admin rights on your current machine, ask the computer administrator or see TipsMake's guide on how to get admin rights on your computer for further help.
5. Check the application's 64-bit compatibility
A lot of software offers both 32-bit and 64-bit versions. 64-bit software is only compatible with 64-bit versions of Windows. However, 32-bit applications will run on both 32-bit Windows and 64-bit Windows, because 64-bit Windows has backward compatibility.
Most of the time, the software will automatically choose the appropriate version to install on your system or will only install as 32-bit if that is the only option available. If you have a modern computer, it is probably 64-bit and this is not a problem. But if you're not sure, you should find out if you have 64-bit Windows or not.
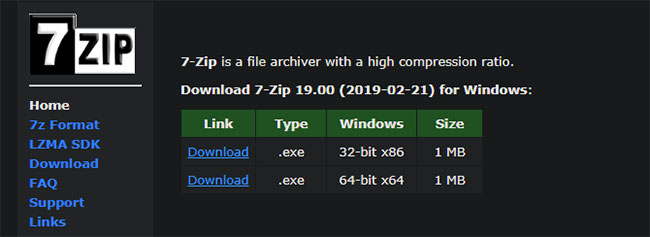
Once you know which version of Windows you have, keep an eye on software download sites and make sure to download the version that's compatible with your system. x86 refers to 32-bit, while x64 means 64-bit. Do not download 64-bit software on a 32-bit system, as it will not run.
6. Run the program troubleshooter
Windows 10 and 11 include a number of built-in troubleshooting tools that attempt to detect and fix common problems. They don't always work well, but worth a try when Windows won't install a program for some reason.
To access troubleshooters related to software installation on Windows 10, go to Settings > Update & Security > Troubleshoot and click Additional troubleshooters. Here, run the Program Compatibility Troubleshooter and see if it fixes any problems. You can also run the Windows Store Apps tool if you're having trouble installing Store apps.
On Windows 11, these utilities are located in Settings > System > Troubleshoot > Other troubleshooters .
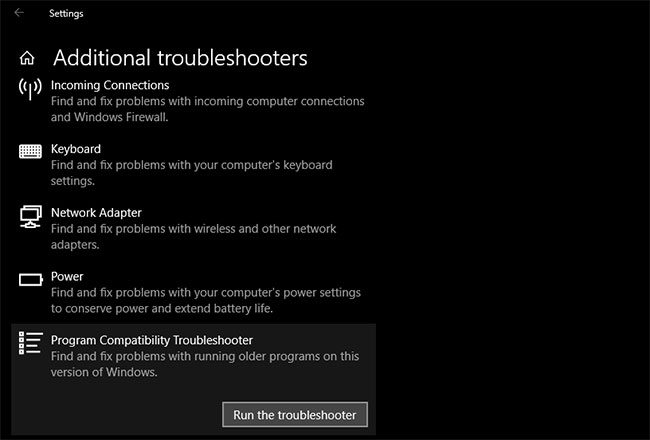
If this doesn't work, you should try the Program Install and Uninstall troubleshooter , available for download separately from Microsoft.
7. Uninstall previous software versions
In almost all cases, installing an app update (even if it's a major new version) always goes smoothly. But sometimes, installing an old version of a program can cause problems when you try to install the latest version.
If you still cannot install the software properly on Windows, go to Settings > Apps > Apps & features and uninstall the current version of the software. This won't delete any data you've saved in the app, but you may want to back up any settings or other important information first just in case.
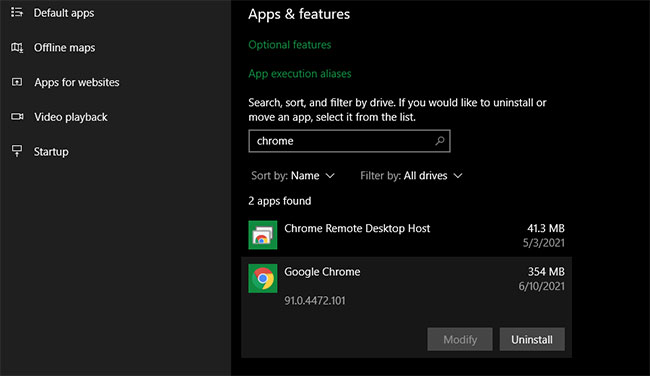
In some cases, you will need to uninstall other components to completely remove the program. For example, Apple's guide on how to completely uninstall iTunes from Windows shows you how to remove Bonjour and other related software.
You should reboot after uninstalling, then ensure that the software in question is actually gone, before reinstalling.
8. Review anti-virus settings
Sometimes, your antivirus or anti-malware program can prevent software from installing on Windows. This can be helpful or annoying, depending on the situation.
In one case, you may be trying to install a program that is actually malware. When your antivirus detects this, it will hopefully block you from installing that application. But if you have turned off notifications from your antivirus software, you may not see this warning. Try opening your security toolkit and checking recent alerts to find out if this is the case.
If you suspect that a program you want to install contains malware, you should scan it with an online virus scanner. Of course, avoid installing anything infected with a virus. If it's a tool you once trusted, it's possible the app has been hijacked or you downloaded a problematic copy from a shady website.
However, your antivirus software can also become overzealous. It can prevent legitimate programs from accessing necessary folders when they attempt to install (Malwarebytes Premium is known to do this). If that's the case, you'll need to temporarily disable your antivirus program for the installation to complete.
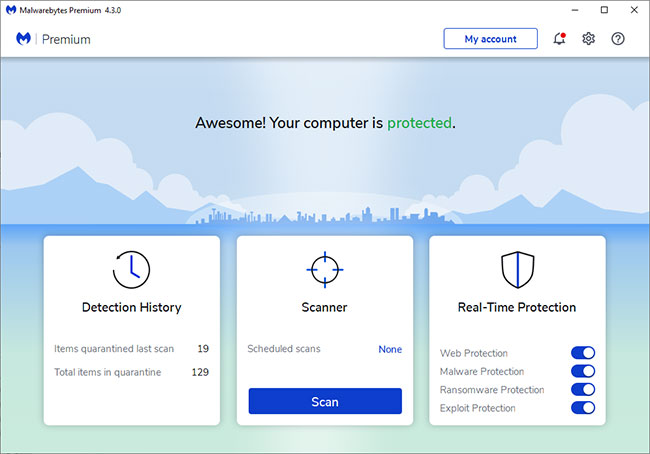
How to do this depends on your installed antivirus program - see how to turn off Microsoft Defender if you use the built-in solution. Most security apps have the option to suspend protection for a few minutes so you can install it when needed. Just make sure you trust the software before doing this!
9. Make sure that the program is compatible with your Windows version
Some programs are simply not compatible with modern versions of Windows. For example, apps created for Windows 7 were abandoned years ago, likely never updated to work on Windows 10 and 11. In this case, Windows has several compatibility tools to help you run such applications, but they still may not. works fine after that.
You should first check the application provider's website to see if the software supports your version of Windows. In most cases, you'll find this information on the download or support page. Even if it's not compatible, you can download the installer file and try to run it anyway, but knowing which platforms are officially supported is very useful.

If the application installs correctly, perform the steps below on the application's executable file after it is installed to improve compatibility for your version of Windows. You can find the executable by searching for the application in the Start menu, then right-clicking on it and selecting Open file location to go to it in the File Explorer window.
If the installer does not run, try the same procedure on the installer executable file.
Right click on the executable file and select Properties. In the window that appears, go to the Compatibility tab. Here, you can select Run this program in compatibility mode for and pick an earlier version of Windows . This is worth a try if you know the app ran correctly on the old version.
Otherwise, there are more options in Settings , which mainly deal with how the program displays. These aren't necessary in most cases, but you can try them to see if they make a difference.
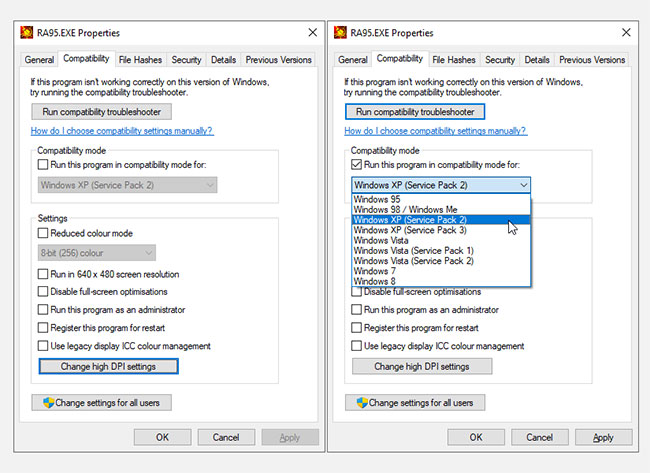
If the software still doesn't run with compatibility mode turned on, see more tips for getting older software to work in modern versions of Windows. Failing that, you'll need to pursue other methods of using the software, such as creating a virtual machine to run an older version of Windows that the software supports.
Hopefully one of these troubleshooting steps will help when you cannot install software on Windows. In almost all cases, this is due to Windows compatibility issues or a security tool interfering with the installation process.
Although the article focuses on traditional desktop software here, there may be times when software from the Microsoft Store itself cannot be installed.
You should read it
- Windows revolution and breakthrough changes through each version
- Summary of several logout methods on Windows 8 and Windows 10
- Looking back at 27 years of 'evolution' of Windows
- Instructions on how to upgrade from Windows XP to Windows 8
- 4 ways to 'revive' Windows XP on Windows 10
- What is Windows Hello? How does Windows Hello work? How to install Windows Hello
 Why is Virtual Desktop the most underrated feature on Chromebooks?
 Google Chrome will warn users about password-protected malicious archive files
 What are FAT files?
 The United States plans to produce a supercomputer called Discovery, 3-5 times more powerful than today's fastest supercomputer.
 How to open the hosts file on Windows - The hosts file stores the device's IP information
 What is URL? Structure of the URL