10 'unique' digital photography
You have heard that the better digital cameras, the higher the image quality. But the truth is that you can make beautiful pictures with a very simple, cheap machine and can also create ugly photos from the most expensive Nikon. All located in the manipulation of the shooting.
Here are 10 "home craft" tips for you to verify:
1. Warm the chroma
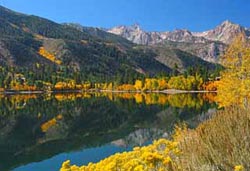
You may have seen photos sometimes feel cold. This is because the light balance setting for the device is set to "automatic" mode. So when shooting outdoors, you should adjust the "auto" to "cloudy" mode. This correction is like placing a warm filter on the lens, increasing the red and yellow color.
2. Use sunglasses
 If you really want to impress your photos, use a polarized glass filter when shooting outdoors. Reduced light intensity and unwanted reflections, the image is richer in color and bold, especially in the sky.
If your camera does not come with a filter, use a good sunglasses, place it close to the lens, and adjust its position when looking through the LCD monitor.
To create the strongest effect, stand so that the sun is above your left or right shoulder. Image quality is best when the light source shines 90 degrees into the object.
3. Show portraits in the sun
One of the secret features hidden in a digital camera is the "flash fill" mode, also known as "flash on". Using this feature appropriately, you will take an important step in capturing outdoor scenes.
In "flash on" mode, the camera exposes the foreground and then adds enough brightness to reflect the object you choose as the center. This is also the trick that wedding photographers apply for many years.
You can apply the technique of placing the subject in the position where the sun shines from the hair to the side or the back (often called the projection border) or to bring the subject to a shadow and then use flash to project it. This will make "models" more comfortable, not squinting.
Another thing to note is that the influence of the built-in flash camera is only about 3m or less, so do not stand far away from the subject when shooting outdoors.
4. Take close-up shots with Macro Mode

This flower was taken in Close up mode, the flash temple turned off.
When recognizing interesting mini worlds and want to store images, you don't need to lie down on the ground when using "close up" or "macro mode" on your digital camera.
But note, when using this mode you only get limited depth. So focus on the most important part to shoot.
5. Adjust the horizon line
Optical camera lenses often "distort" images when displaying wide landscapes on a 2-inch LCD screen. The rows of trees standing straight in your eyes seem to bend into the screen and cause the photographer to lose direction.
Thus, try to take pictures with the horizon lying real equal.
6. Large memory card
Large memory cards will help you store more photos and each of the large images will produce better quality (smoothness, color .). For example, a 3.0 megapixel camera needs at least 256 MB, 4.0 megapixels that need at least 512 MB or 6.0 megapixels that require a card of 1 GB or more.
7. Resize the image
When the memory allows, you can comfortably take photos at different sizes, but it's best to leave them at the highest resolution. For example, the image is 640 x 480 in size when printed with just one business card, and 2272 x 1702 size will produce a large and sharp image that can be printed in magazines.
8. Bracket
This 3-legged device proved to be very useful, though somewhat bulky. The market is also more compact and suitable for all situations. Shelves help you take a selfie or avoid shaking hands due to fatigue .
9. Taking slow-moving water images

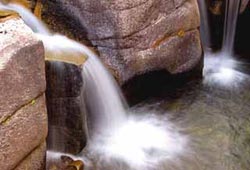
This slow flow picture was taken by placing the camera on a stand, leaving the shutter closed for more than 1 second.
These impressive images are created by finding the standard layout for a flow of water, then letting the shutter open for a second or two. You will need the bracket to fix the camera during long shooting and the self timer function to lower the shutter. If your camera has a door opening mode set to f-8, f-11 or f-16. This will help you create depth for the scene and help the shutter close slowly.
10. Set the shooting time
This function is available on most digital cameras and waits for up to 10 seconds after pressing the button. You can use "self timer" for many different situations such as setting the background to capture yourself or catch the slow-moving image.