Should photographed RAW mode or not?
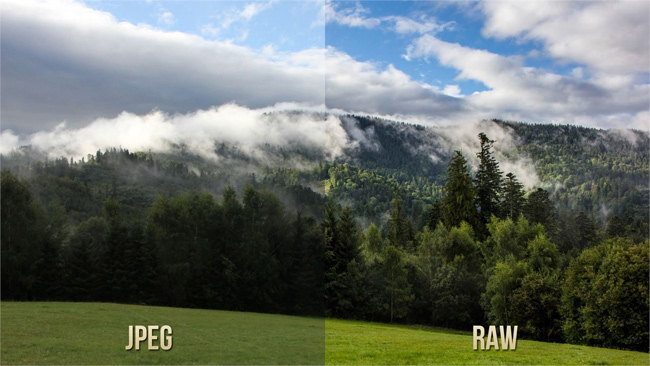
Raw understands a digital image format, saving all the information the camera's sensor receives. Unlike the JPEG format, RAW format images are not processed on the camera. Therefore, the photographer will have to conduct photo editing on the computer. In particular, RAW images retain details on bright, dark areas, making it easier to recover images. However, the ability to capture RAW images is usually only available for high-end compact cameras and DSLRs. In this article, we will provide you with the necessary information about RAW image format.
1. What is RAW image format?
RAW is a raw, raw image that has never been processed by a camera. There are many raw formats, each camera type (from each carrier) uses its specific format.
Camera manufacturer / Tail file of corresponding raw Canon / .crw .cr2 Nikon / .nef .nrw Sony / .arw .srf .sr2 Pentax / .ptx .pefOlympus / .orf Hasselblad / .3fr Leica / .raw .rwl .dng
When taking photos, a series of stages are done in the camera. This process happens very quickly: the image sensor is exposed, then each pixel on the sensor surface will be separately charged. The charges will be assigned a number (digitized), corresponding to the amount of light per pixel received. These numbers only show light levels but no color information. With the raw format, these numbers will be recorded directly on the memory card without any processing.
Raw images are not converted into color images or processed, so it is really the most "raw" and "intact" image. But in order for these raw images to be used, we must use processing tools that are raw image conversion software, such as Adobe Lightroom, Apple Aperture, iPhoto or Photoshop Camera Raw, etc.
2. When should I take RAW photos?
As mentioned, RAW images are forced to be processed on the computer. Users will be able to make their own decisions according to their preferences and needs. Manual raw processing on a computer can produce much better results. Because at the camera, the processing algorithm must be optimized in order to capture the next time while the computer has nothing to hurry.
In addition, we can also switch to RAW mode in some of the following cases:
1. When you are not sure about White Balance:
You can experience many types of weather and complex lighting conditions when taking photos. At these times, it is highly recommended to shoot with raw options.
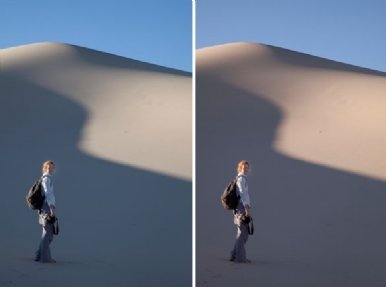
With a raw image file, you can easily change the white balance of the image later. Although the auto white balance mechanism (Auto White Balance) on most cameras is now very advanced, many cases of this mechanism are deceived. If you've ever tried to fix a wrong color JPEG image, you'll know that actually correcting white balance is not a small problem. With raw, you don't need to worry about this.

In this photo, the man is standing in the dark, the camera's Auto White Balance cannot accurately identify information about white balance. The image results are inconsistent with "cold" colors. But the raw image can simply fix the white balance by adjusting the white balance slider to warm up the image without damaging other details.
2. The highlight area is too bright or due to shooting error, the image is too bright / dark:

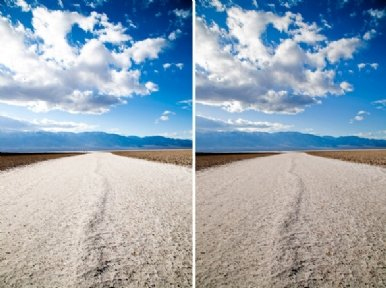
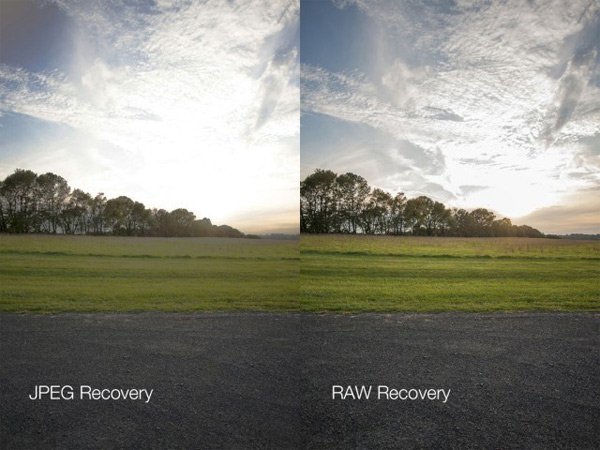
Raw should be taken if shooting in a situation where it is difficult to control the exposure of the highlight. In a raw image, you can restore the details in the overexposed highlight area and "cure" the seemingly discarded photos. In addition, photos taken accidentally / darkly too can easily be edited and restored in detail.
Raw shooting will be useful when shooting in strong sunlight conditions, shooting subjects with reflective surfaces, shooting in conditions of wide Dynamic Range (range from morning to night), when more sweaty skin creates reflections. strong can lead to overexposed images.
3. Thorough post-production:
Raw images allow for much deeper editing of JPEG files. The camera can take pictures with 12-14 bits of data per pixel, but a JPEG file can only contain 8 bits. This means that the device will remove a large amount of data from the captured image. If the editing is up to the maximum, the amount of data removed above is very significant. A "poor data" image will definitely not be able to edit as much as a raw file.

If you want to edit, you should switch to raw shooting at these times. Cases can be an environment that makes it difficult to capture such conditions as the Dynamic Range range is too wide or the color case needs a lot of correction.
4. When you need to enlarge the image:
When a captured image is compressed in JPEG format, some of the data will be removed and the image will be permanently degraded. If JPEG compression is too much, the quality degradation will be obvious. Thus, if you want to enlarge the image, JPEG is not a good choice. But if you choose raw, you won't have to worry about image quality when zooming. The raw image is not compressed in any way.
3. When not to take RAW photos:
Raw images will not be sharper, more detailed or more beautiful than JPEG images. In fact, raw may even appear less sharp and lighter than JPEG images in the image browser. In addition, raw images will be much heavier than JPEG images, taking up much more space to the camera will take more time to burn images to the card.

Once you have identified your needs, use a raw image. Many of you are afraid of wasting time editing raw files, especially when shooting events that require lots of images. The raw image can also be captured only at the highest resolution option of the device (but there are also a number of formats selected with lower resolution than sRAW and mRAW).
Thus, for photographers, raw images are the most powerful tool. It gives full control over the image. In return, raw will affect the speed of work (even when shooting and post-production), storage capacity.
Refer to the following articles:
- 10 simple photography techniques for impressive photos
- 10 tips for taking beautiful photos with digital cameras
- 5 best free photography learning websites
Hope this article is useful to you!
You should read it
- ★ The secret of creating unique photos with long exposure techniques
- ★ Take photos of the fanciful sky landscape with the following 5 tips
- ★ Taking photos and mirroring which ones will give you the most accurate picture?
- ★ The divine poses will give you a beautiful image of ecstasy
- ★ 25 beautiful pictures of Vietnam make you say 'My country is so beautiful!'