How to disable touch screen in Windows 11
The touch screen is a great piece of equipment, but it doesn't seem to be an indispensable element on Windows computers in general.
Table of Contents
The touch screen is a great piece of equipment, but it doesn't seem to be an indispensable element on Windows computers in general. According to previous surveys, there have been many cases of laptop users with touch screens confessing that they rarely touch the screen.
This is because platforms like Windows, Mac, or Chrome OS themselves are optimized for use with a mouse and keyboard, rather than touch screens like mobile operating systems. Therefore, users only need a mouse and keyboard to be able to take advantage of the operating system's potential.
This article will show you how to disable the touch screen in Windows 11, avoiding the case of mistaken operations when accidentally touching the screen.
Turn off the touch screen using Device Manager
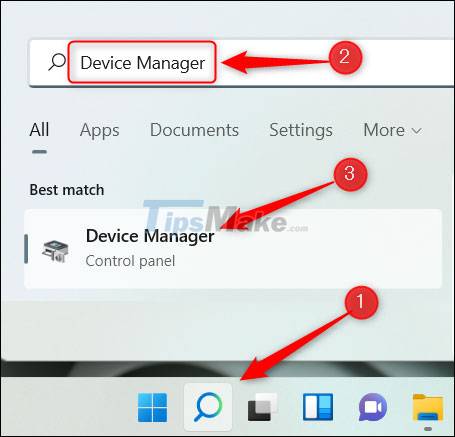
To get started, click the Windows Search icon (magnifying glass) on the taskbar, enter the keyword 'Device Manager' in the search bar, then click on the corresponding result.
On the Device Manager interface that opens, find the Human Interface Devices section and click the right arrow next to that device.

In the list that appears, find the HID-Compliant Touch Screen item. Right click on it and select 'Disable Device'.

In the dialog box that appears, click 'Yes' to confirm that you really want to disable the touch screen.

The device's touch screen is now disabled. In case you change your mind and want to re-enable the Touch Screen, simply follow the same steps and select 'Enable Device' from the menu that appears.

Turn off the touch screen using Windows Terminal
You can also run a command in Windows Terminal to disable the touch screen.
To do this, you need to first launch Windows Terminal as an administrator. Right-click the Windows icon on the taskbar (or press Windows + X) to open the Power User menu. Next, click on the 'Windows Terminal (Admin)' option.

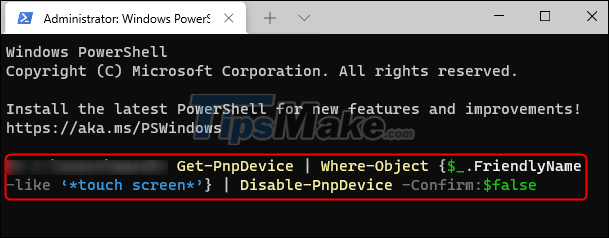
In the Windows Terminal interface that opens, run the following command:
Get-PnpDevice | Where-Object {$_.FriendlyName -like '*touch screen*'} | Disable-PnpDevice -Confirm:$false
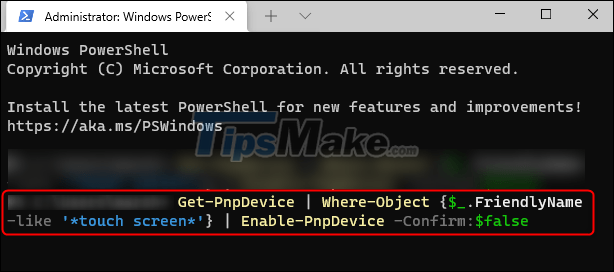
After you run the command, the touch screen will be disabled. To turn it back on, run the following command:
Get-PnpDevice | Where-Object {$_.FriendlyName -like '*touch screen*'} | Enable-PnpDevice -Confirm:$false
Hope you are succesful.
Was this article helpful?
Your feedback helps us improve.
Related Articles
 How to disable touch screen on devices running Windows 103 minutes read
 How to disable Windows 11 touchscreen3 minutes read
 Why the touch screen does not work and how to fix it11 minutes read
 Should you buy a touchscreen PC?4 minutes read
 Instructions on how to turn off the touch screen on Android phones for children5 minutes read
 Turn on / off Touch by Finger in Windows 102 minutes read
Reader Comments 0
Sign in with email or Google to join the discussion.