Troubleshooting wireless networks
Network Management - When having problems connecting wireless clients (such as desktops, laptops, smartphones or e-readers) to the office network, these step-by-step troubleshooting tips will help you a lot. useful .
1. Begin by re-checking physical connections - This simple implementation step is often overlooked. Check the wireless router's WAN port link to the broadband modem and the links from the LAN ports to the Ethernet clients. Make sure that the WAN and LAN cables are tight and the status lights are on the heads. If not:
- Try replacing the Ethernet cable to eliminate the case of broken cables.
- Check the wireless router's user manual to ensure that you are using the correct type of cable - some WAN uplink lines require crossover cables.
- If the status lights are not lit, connect another laptop-like device to the WAN port or the affected LAN port. If the status changes, it means that the device you just replaced may have an error in automatically negotiating the link. Check the configuration for ports on both ends and reconfigure it to match port speed and duplex mode.

Figure 1: Checking physical connections
2. Verify that the client's wireless adapter is installed and working properly. On a Windows computer, select the wireless connection from the Network Connections panel and verify its status as " Enabled ".
- To access Network Connections:
- In Windows XP, use Control Panel to access Network Connections .
- On Windows Vista, use the Control Panel to open the Network and Sharing Center , then click Manage Network Connections .
- On Windows 7, use Control Panel to open the Network and Sharing Center , then click Manage Wireless Networks .
- If the Wi-Fi adapter is out and does not appear in Network Connections, the problem may be related to ExpressCard slot, PC Card slot or USB port. If you physically remove and reconnect the external adapter, it doesn't help, use Device Manager to uninstall / reinstall the adapter.
- For any type of Wi-Fi adapter, if the connection is not displayed in Network Connections or is not enabled, open the adapter's Properties panel, click Configure , make sure the device is enabled, there is no conflict. resources and check driver updates if available.
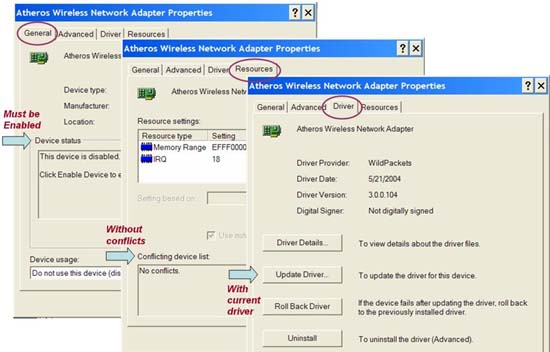
Figure 2: Verifying the client's Wi-Fi adapter settings
3. Verify the wireless router's LAN settings correctly . Use the router's administrative utility to verify the IP addresses assigned to wireless clients.
- If you don't know how to access the router's administration utility, look in its user guide. In most cases, the web browser will be able to open the default IP address assigned to the router's LAN port (for example, http://192.168.1.1)
- Observe the router's LAN settings. Make sure the router's DHCP Server is enabled and configured to assign IPs from the non-overlapping range in the same subnet to the router's LAN port address (for example, 192.168.1.50-100).
- If the router's DHCP Server is configured to filter wireless access with a MAC address, add the MAC address of your Wi-Fi adapter to the list of authorized devices (allowed device) of the router. (To determine the adapter's MAC address, open the Network Connection / Status / Details panel of the client and find " Physical Address ").
- Check the router's Log or Status page to verify that the IP address is indeed assigned to the wireless client whenever it connects.

Figure 3: Verifying the router's LAN settings
4. Verify the client TCP / IP settings . Although we describe using Windows to manage wireless connections below, troubleshooting is similar when you use other connection management programs (such as Intel. , Linksys) or devices (such as iPod, Android).
- Open Network Connections as shown in step 2 and check the status of the adapter. If Status is still in " Disabled " mode, return to step 2. Otherwise:
- On Windows XP, if Status is " Not Connected ," use " View Available Networks " to find your own network name.
- On Windows Vista, if Status is " Not Connected ," use " Connect / Disconnect " to find your own network name.
- On Windows 7, if Status is " Connections are available ", find your own network name in the Wireless Network Connection list below.
- Select your network name and click Connect . If your network name is not displayed or you cannot connect successfully, go to step 8.
- When making a connection, Status can change for a short time to " Acquiring Network Address ", then change to " Connected ". Here, use Status to determine the client's assigned IP address. If the client's IP is 0.0.0.0 or 169.254.xx, click " Repair " (XP) or " Diagnose " (Vista / 7). If the problem persists, go to step 8.
- Conversely, if the connected client's IP address is not in the LAN subnet of the router, configure the connection to obtain the IP address automatically and repeat step 4.
- On Windows XP, open the adapter's Properties , select the section labeled " Internet (TCP / IP) " and click Properties .
- On Windows Vista or 7, open the adapter's Properties , select the item called " Internet Protocol Version 4 " and click Properties .
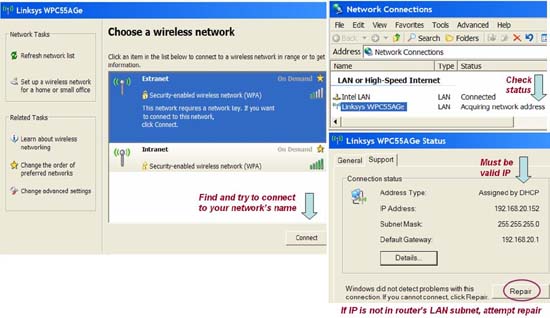 Figure 4.1.Verify the client's IP address (Windows XP)
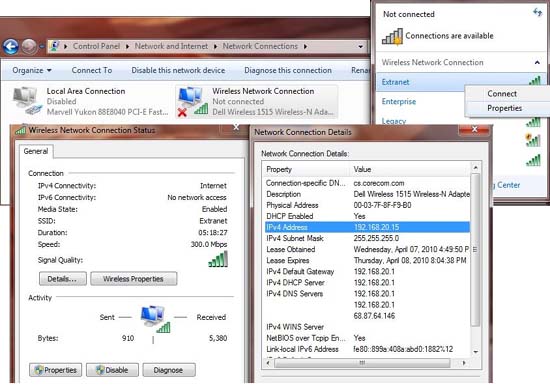
Figure 4.2.Verify the client's IP address (Windows 7)
5. When the client has a valid IP address inside the router's subnet, use "ping" to verify the network connection. Open the Command Prompt window from the client's Start menu and use it to ping the router's LAN IP address as shown in Figure 5.
- If your router's ping is constantly failing, skip to step 6.
- If your ping action is successful, continue pinging the client on another wireless or wired LAN that you want to share the file or printer with. If the ping fails, the AP isolation may be triggered or the destination may be using a firewall to block incoming traffic.
- Check the router's configuration to find an option to prevent wireless clients from communicating with each other. If you find the " AP isolation " parameter, disable it.
- Use the Control panel of Windows 7, Vista or XP computers to open Windows Firewall. If a firewall is detected, temporarily disable it.
- If Windows Firewall is not enabled, check to see if there are other security programs that may also be running a personal firewall. For example, McAfee users need to open SecurityCenter , click " Internet & Network ", and ensure that firewall protection is disabled.
- After disabling the firewall function, try ping again. If the ping action is successful then the firewall that you disabled can also block the Windows Network protocols that will be used to share files and printers. Reconfigure (and then reactivate) the firewall to allow only the traffic you want to exchange between clients on the LAN. For example, share files and printers, allow NetBIOS connections from your LAN subnet.

Figure 5: Test and allow the desired traffic
6. If your client is still unable to connect, even though you have received a valid IP address or pinged your router, this is the time you need to look for other specific issues. Routers and clients must use compatible 802.11 standards. The table of compatible standards is given below.
Client vs. Router11b
11a
11g
11a + g
11n (single)
11n (dual)
11b
√
x
√
√
√
√
11a
x
√
x
√
x
√
11g
√
x
√
√
√
√
11a + g
√
√
√
√
√
√
11n (single band)
√
x
√
√
√
√
11n (dual band)
√
√
√
√
√
√
For example, if you have an 802.11a client, it can be connected to 802.11a, 802.11a + g, or 802.11n (dual band) routers. However, an 802.11a client cannot be used with 802.11b, 802.11g, or 802.11n (single band) routers.
- To determine if your product supports any standard, look for Wi-Fi authentication logos on the box or in the user guide, or search for Wi-Fi authentication products at Wi-Fi Alliance website: http://www.wi-fi.org/search_products.php. For 802.11n products, click " View Wi-Fi certifications " to determine band support.
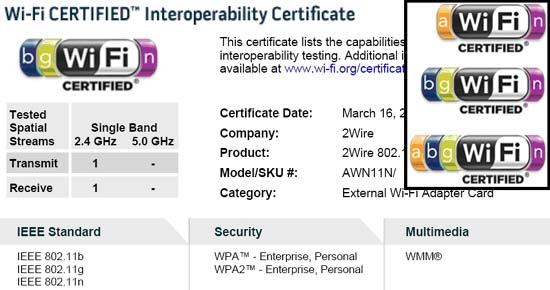
Figure 6.1.Check compatibility of adapters and Wi-Fi routers
Once you've verified that your router and client adapter are compatible, compare the router's wireless settings to the client's connection parameters.
- If the clients are 11b, you must activate " b protection " on your 11g or 11n router (sometimes called Mixed Mode)
- If non- 11n client connections fail, make sure that your router is not set to ' N-only ' mode (sometimes called Greenfield Mode).
- If the 11b, 11g, and 11n (single band) client connections fail, make sure you do not set the 11n (dual band) router in 5 GHz or 40 MHz channels.
- If client 11a connections fail, make sure you do not set your 11n (dual band) router in 2.4 GHz or 40 MHz channels mode.
- If your network has clients in both bands, make sure your 11n router is supporting dual band mode.
- If the router and client are compatible, but the router's SSID does not appear in the Available Networks list of the client, activate the " SSID broadcast ".
- Although disabling " SSID broadcast " is not recommended, WLANs can work this way if the client is configured with the router's SSID. In Windows 7, use Manage Wireless Networks to add a Network Profile . Enter the router's SSID into Network Name, set the security parameters (see step 7) and select " Connect even if this network is not broadcasting ". Be aware that some clients (especially some consumer electronics devices) do not support this option.
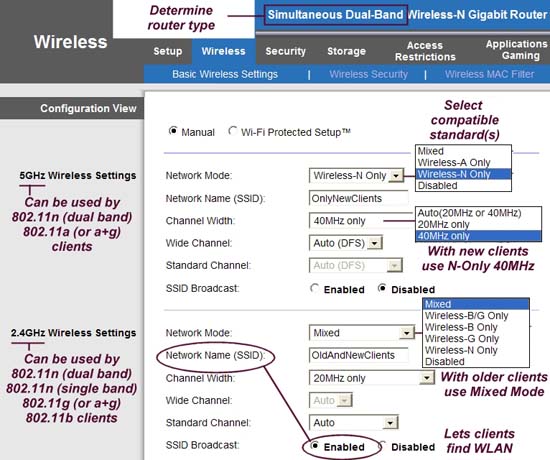
Figure 6.2: Configuring compatible wireless settings on the router
7. If the wireless client is compatible and the router can 'listen' to each other but still cannot connect or exchange traffic, look for security errors. The client must support the security mode required by the router: Open, WEP, WPA, or WPA2. Unless the WLAN is in Open mode (insecure mode), the router and client must be configured with the same keys to encrypt traffic between them. Compare the router's WLAN security settings with the client's wireless connection properties and try to match them.
- To view and configure the client's security parameters:
- On Windows 7, select the network name from Manage Wireless Networks , open Properties and select the Security tab.
- On Windows XP, select the connection from the Network Connections , open Properties , select the Wireless Networks tab, select the network name from the Preferred Networks list and click Properties .
- If your router uses WEP, the client's encryption setting is WEP and matches the router's authentication type (open or shared). Copy the first WEP key of the router to the client, translate from ASCII dsang hex format if needed.
- If your router uses WPA-Personal encryption mode, set the client authentication to WPA-Personal (also known as WPA-PSK) and match the router's encryption type (usually TKIP) . Use the router's password as the client's network key.
- If the router uses WPA2-Personal, set the authentication to WPA2-Personal (WPA2-PSK) and match the router's encryption type (usually AES). Use the router's password as the client's network key.
- If the router uses WPA or WPA2-Personal and supports Wi-Fi Protected Setup (WPS), you can automatically configure the client's security settings.
- If the router uses WPA or WPA2-Enterprise, set the client's authentication to WPA or WPA2 accordingly, match the router's encryption type and continue installing 802.1X in step 8.
- If all your clients can support WPA2 / AES, configure your router in WPA2 / AES mode; This method improves security and allows speeds of 11n greater than 54 Mbps. However, if you have old WPA / TKIP-only clients, their connections will fail unless your router is configured to accept both WPA / TKIP and WPA2 / AES.

Figure 7: Matching client and router security settings
8. Ensure RADIUS works . WPA and WPA2-Enterprise will log the client to the network and distribute the encryption keys using the 802.1X-capable RADIUS server. Otherwise, follow these steps:
- Reconfigure your router and server with a valid RADIUS port.
- Reconfigure the RADIUS server to accept requests from the router's IP.
- From your router, ping the IP of the RADIUS server to check the reach of the network.
- See the set to the router's data packet to verify that RADIUS is being sent.
- Using LAN analyzer (such as Wireshark) to capture the traffic exchanged between the router and the server, the purpose of viewing RADIUS Access-Reject packets.
- On Windows client, enter " netsh ras set tracing * enabled " to write debug content 802.1X to Wzctrace.log file.

Figure 8: Ensure RADIUS is working
9. If RADIUS works but the client's access requests are denied, switch to searching for problems with 802.1X Extensible Authentication Protocol (EAP) or logging in users. Your client must support one of the EAP types required by the RADIUS server and must provide a valid login and password / card / certificate or some type of certificate. Check the client's security settings associated with your network name, starting with the Security panel (Windows 7) or Authentication (Windows XP) introduced in step 7.
- If your server requires EAP-TLS, select " Smart Card or other Certificate " and click " Settings " to continue.
- If your server requires PEAP, select " Protected EAP " and click " Settings ".
- If your server requires EAP-TTLS, install the 802.1X Supplicant program from certain third parties, such as the Juniper OAC or Cisco SSC on the client and follow the installation instructions of the program. there.
- Ensure the EAP properties of clients and servers match, including the Trusted Root Authority server certificate, host domain (optional), and tunneled authentication methods (such as EAP-MSCHAPv2 ).
- If you are prompted to accept the server certificate at the time of connection, check the certificate carefully, reassess the issuer and identity. Never add suspicious certificates to a trusted root or your server list.
- If the EAP-TLS issue still exists, use Internet Explorer to dispute the client's certificate and ensure that the certificate is valid (such as not expiring).
- If PEAP issues persist, use the CHAP Configure button to prevent Windows automatic login and enter a valid username and password when prompted.
- If the problem is still not resolved, consult the 802.1X documents of the RADIUS server regarding EAP configuration and troubleshooting tips. On Windows 7, you can click the Advanced Settings button on the Security tab to configure options like single sign-on, computer with user authentication, and fast roaming.
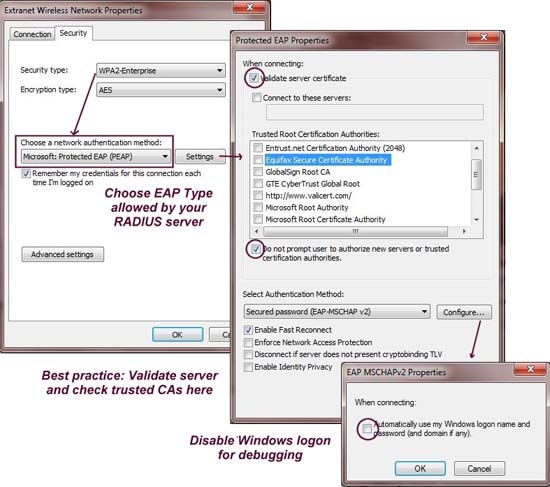
Figure 9: Verifying the client's 802.1X / EAP settings
10. If your wireless client is still unable to connect or always connect to a very low data rate, then you may be experiencing an 802.11n parameter error . To fix this phenomenon, you can do the following:
- If the 802.11n router (single band or dual band) is configured to use a 40-MHz channel, reconfigure the router to use 20 MHz channels. Many clients do not support 40 MHz channels, especially non-11n (dual band) clients.
- If the 802.11n router (single band or dual band) is configured to automatically select the available channel in the 2.4 GHz band, temporarily reconfigure the router to use channel 1, 6 or 11 to avoid interference. between channels or frequently changing channels.
- If the 802.11n (dual band) router is configured to use Dynamic Frequency Selection (DFS) in the 5 GHz band, temporarily reconfigure the router to use channels 36, 40, 44 or 48. 11n clients. , 11a + g and 11a support channels in the 5 GHz band that may be different; Lower channels are often used more.
- If 802.11n (dual band) routers are configured to use Band Steering and dual band clients are experiencing disconnection problems on a regular basis, try disabling that option.
- If the client is always connected at a lower speed than expected, check the router's configuration. The maximum speed of 802.11n depends on the antenna and the options:
- 2x2 routers using 20 MHz channels can give speeds up to 144 Mbps (MCS 15). The router does not have Short Guard Interval (SGI) only for a stop speed of 130 Mbps.
- 2x2 routers using 40 MHz channels can reach speeds of 300 Mbps (MCS 15). The non-SGI router only stops at 270 Mbps.
- 3x3 routers using 40 MHz channels can reach speeds of 450 Mbps (MCS 23).
- 1x1 clients using 40 MHz channels can reach speeds of 150 Mbps (MCS 7).
- All 11n clients are restricted at 54 Mbps when using WEP or WPA security.
- The maximum speed may change by routers and other client settings (such as increasing channel width, enabling SGI). However, if the options are not sufficient at both ends, the maximum speed may reflect the device's minimum capability (usually a client).
- Automatic speed adjustment is usually the best, however weak connections can sometimes be improved by reducing the router's maximum speed. In contrast, strong connection throughput is often improved by disabling slower speeds. It should be noted, however, that the exclusion of low speeds can disconnect remote or old clients, while the high-speed exclusion requires distance to closer guests. or have newer clients.
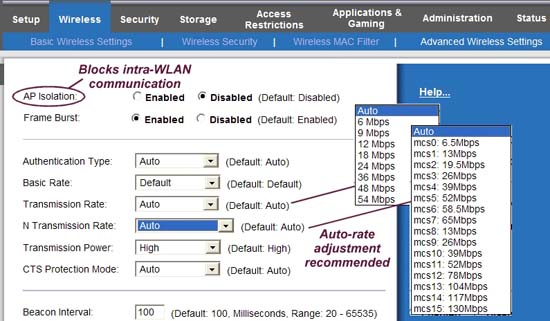
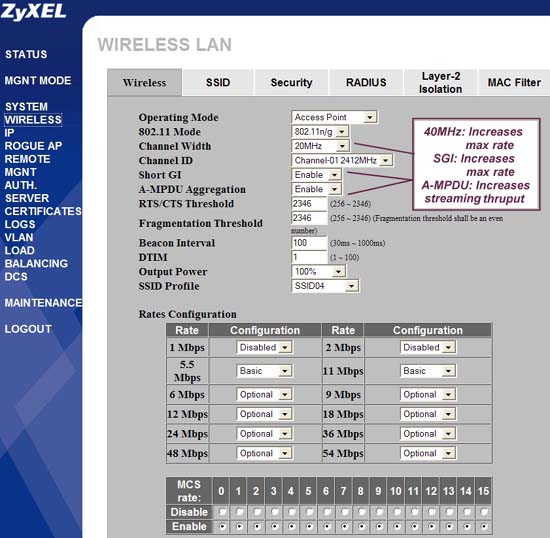
Figure 10 a, b: Select the speed and data options for the router
11. Finally, if your wireless client connects and pings successfully, but sometimes there are network connectivity problems (such as some working pings, some failures), you may be experiencing signal strength, radio noise, or disconnection caused by roaming AP.