The basics of Cisco Switch Management - Part 2
In Part 1, we went over some of the basics of Cisco Switch management. In this part 2, we will continue with the basics of Cisco Switch management.
TipsMake.com - In part 1, we went over some of the basics of Cisco Switch administration such as login, how to display switch configuration, how to display ports . In this part 2, we will continue with the basics of Cisco Switch management.
How to save the switch configuration
In part 1, we discussed how to enable / disable ports and how to change speed and duplex settings. These are necessary functions. However, when done, you need to save your configuration. Cisco switches cannot automatically save changes. If you have made some changes, the switch is faulty or the power is out, the changes will be lost. So you need to save these changes when you're done. There are 2 ways to do this:

The first way is to save with textbook: Switch # copy running-config startup-config . However, another shorter and still usable command is: Switch # wr . Both of these commands can save the configuration used on the RAM in the NVRAM file : startup-config . When this switch is turned off, the configuration in use will be lost. The startup-config archive will be read when the switch restarts and reconstructs the old configuration. However, I recommend that you save your configuration on the TFTP server in case the NVRAM can be completely lost. Once the TFTP server is working, you can save your configuration easily by: Switch # copy running-config tftp .
How to use Cisco Network Assistant
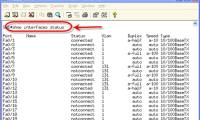
Cisco Network Assistant (CNA) is a free graphical tool available when you buy a new switch. It is used to manage Cisco network devices. This is a very useful tool that we cannot say all of its features in this article. However, I would like to introduce CNA to those who love to have a graphical interface for Cisco network devices. Normally, CNA gives you the following screen of Cisco device:

Once you click Configure> Port Setting , you will see:

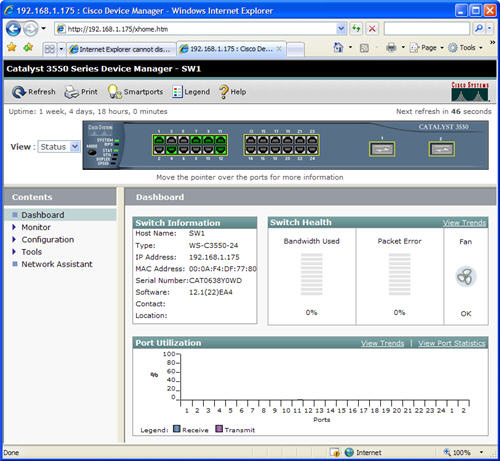
From here, you can configure the status, duplex, speed for your switch ports. In fact, you can configure most switch features using CNA. Keep in mind that for all Cisco switches, you can configure it using the web. However, web configuration is more limited than configured with CNA. You can configure it via the web via your own browser or can be done via CNA. The following is a sample screen of the Cisco 3550 using the web.
Launch switch ports faster
Switch ports can connect to many different devices, such as between switches and switches, with routers, computer ports . Each of these devices has different configurations. Sometimes, when a device is connected to the switch port, the switch will immediately check the settings to connect to this device. This takes time and will delay devices (for example, a computer) when transporting information and receiving data from the network. Most times connecting your computer to the switch, you want to be able to use the network as quickly as possible. The command to turn on all quick switch ports is: switchport mode access . This will configure the port to make your computer more accessible to the network.

Basic VLAN commands
Currently, many companies have used virtual LAN (VLAN). As an administrator, you should know:
1. How to know which device on the VLAN
2. How to change VLANs.
As you know, if a device is placed on the VLAN with an error, it cannot connect to the server. To display which device is in VLAN, use the show vlan brief command.
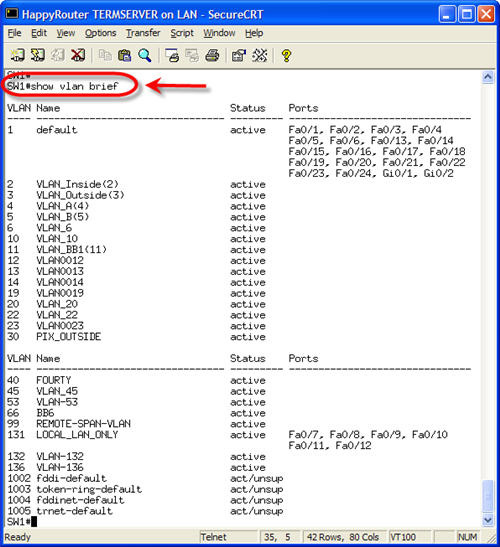
As you can see, this command displays the VLAN on the switch, which switch port has VLAN. Now, if you want to change interface port Fa0 / 21 from VLAN1 to VLAN131, you can do the following:
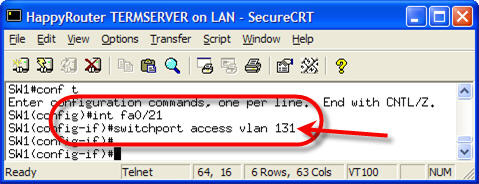
Go to interface configuration mode to change VLANs, use switchport access vlan XXX. Using the command successfully, if you want to check the VLAN member again, simply reuse the show vlan brief command.
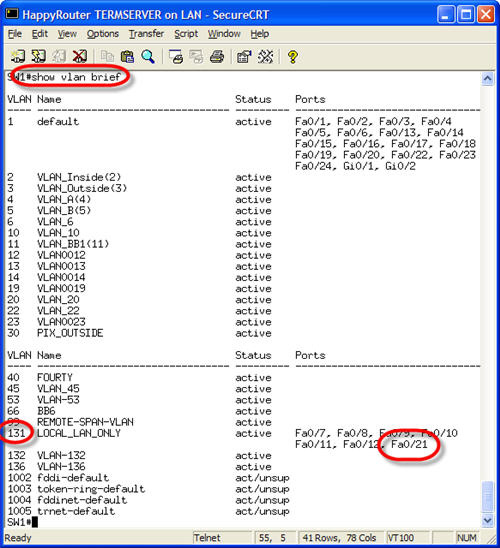
You can see that Fa0 / 21 is now a member of VLAN131.
Was this article helpful?
Your feedback helps us improve.
Related Articles
 The basics of Cisco Switch Management - Part 14 minutes read
 Differentiate indicator lights in Cisco Switch4 minutes read
 What is Cisco's new programmable switch?6 minutes read
 Warning: Detecting more than 1000 Cisco router and switch devices in Vietnam has a serious security error4 minutes read
 How to use PuTTY on Cisco routers and switches2 minutes read
 Review the Cisco RV180 VPN router3 minutes read
Reader Comments 0
Sign in with email or Google to join the discussion.