Table of Contents
This updated guide examines Cisco Switches: The Basics of Cisco Switch Management -- Part 1 and organizes the essential facts, background, and practical takeaways in clear American English.
Log in
Before you can administer the Switch, you need to know some basic information:
• What switch IP address? What is DNS?
• Can you login and password?
• Ethernet port of switch
One way to configure the switch is to configure it on the internet interface. Basic configuration is not difficult and you do not need much help. In the command-line interface CLI (command-line interface) you can perform any type of configuration. Therefore, I recommend that you use the IOS command line interface. In this article we will take the basic steps of managing switches with the Cisco IOS command-line interface.
Show switch configuration
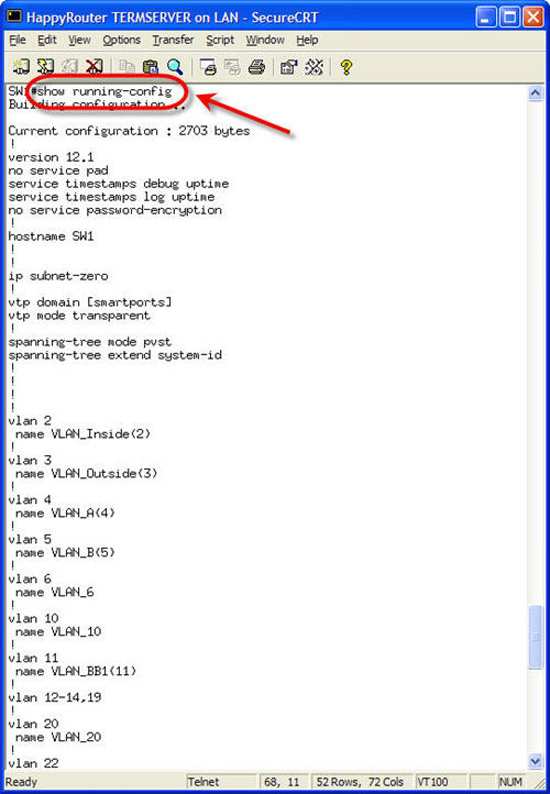
Just like on a router, the IOS command is used to display the switch configuration with all Ethernet ports. To know the configuration of the switch, just type show running-config as follows:
 Show port status
Almost every time you switch to the switch, you must troubleshoot the switch port or change the switch port configuration. The quickest way to display the status of each switch port is to show show interfaces status :

This command is displayed: if the port is connected to the device, the VLAN is IN, displayed with the speed and model of the port. This is the fastest and best way to know the status of each switch port.
Change the speed and duplex of the interface
Interface Fa0 / 21 with the speed set to auto. However, this speed needs to be set to 10Mb / sec. To change the speed of the ports, go to interface configuration mode and use the speed command :
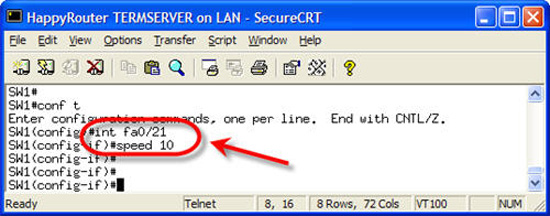
On this switch, the speed of 10/100 Ethernet ports is set to auto, 10 and 100. On the Gigabit Ethernet port you can only adjust the switch with the port speed being able or not able to detect the speed yourself. Once the speed is configured to 10Mb, you can check the interface Fa0 / 21 again like:

As you can see, the speed has been set to 10. To change the speed of both directions of the port, you perform the same step, but use the duplex command. Duplex can be set to auto , full or half .
Turn off and turn on interfaces
To enable or disable interfaces, you use the no shutdown / shutdown command in interface configuration mode. Here is an example:

Note that when the port is shut down, the communication message appears telling you that the management status has been changed to down , the line protocol is also converted to down . When the port is turned on, the line protocol will switch to up .
Now you can display the interface status to see its status.
FAQ
What is Cisco Switches: The Basics of Cisco Switch Management -- Part 1 about?
It provides a structured overview of Cisco switches, explains the main context, and highlights practical takeaways for readers.
Why does this topic matter?
Understanding the main concepts helps readers evaluate the issue, avoid common mistakes, and make better-informed decisions.
How should readers use this information?
Use the guidance as a practical starting point, confirm details that may have changed, and follow current product, safety, or security recommendations.
Related Articles
 Cisco Switches: The Basics of Cisco Switch Management -- Part 26 minutes read
 Differentiate Indicator Lights in Cisco Switch4 minutes read
 What Is Cisco's New Programmable Switch?7 minutes read
 Detecting More Than 1000 Cisco Router and Switch Devices in Vietnam Has a Serious5 minutes read
 How to Use Putty on Cisco Routers and Switches3 minutes read
 Review the Cisco Rv180 VPN Router3 minutes read
Reader Comments 0
Sign in with email or Google to join the discussion.