Manage wireless connections in Windows 7
In this article we will show you some ways to work with wireless networks, specifically about tasks like saving favorite networks, finding secure networks faster and easier. easier.
Windows 7 is Microsoft's third desktop operating system that supports wireless networking. If you've ever used Windows XP and Windows Vista to make wireless network connections before, you'll see new advantages in Windows 7's wireless network connection (you'll see the ease of setup.) and much more maintainable than the previous two versions. The difference in the support for wireless networks of Windows 7 begins as soon as Windows 7 detects a certain wireless network.
Explore wireless networks
Windows 7 has greatly improved the ability to detect wireless networks automatically in Windows XP and Windows Vista.
Note : Windows 7 uses the WLAN AutoConfig service (first introduced in Windows Vista) to manage wireless networks instead of the Wireless Zero Configuration service used by Windows XP.
While Windows 7 detects wireless networks that you can connect to but doesn't have an active network connection, it will now display an icon marked with a star in the notification area. desktop. This icon is ' Not connected - Connected are Available ' means ' No connection - Existing connections are still available '. To start the connection process, click on the icon to display the wireless networks detected (Figure 1).

Figure 1: Opening the wireless connection dialog from the notification area
As you can see in Figure 1, you can connect to a variety of different wireless networks with Windows 7. These networks include:
- Infrastructure
- Ad-hoc
- Unsecured (open)
- Secured (encrypted)
WLAN connections are listed with a signal strength icon that is infrastructure connections. An infrastructure connection uses a wireless access point (WAP) or a wireless router to connect you to other computers on the network and to the Internet.
WLAN connections being displayed with an icon are ad-hoc connections. Ad-hoc connection is a direct link between two computers or between systems with a printer, multi-function device, digital camera or other devices. These connections cannot connect you directly to the Internet.
Connections marked with a yellow Windows security shield are insecure connections (or open connections). These connections do not use encryption keys. Unsafe infrastructure networks are often used in locations with free Internet services such as lounges in hotels, libraries, conference rooms, restaurants or cafes. Ad-hoc networks are also often set up for unsafe access.
Connections without Windows' yellow security shield are secure wireless networks. You must provide the encryption key used for the network when connecting to this wireless network.
For more detailed information about network connections, you can hover your mouse over the connection (see Figure 2).
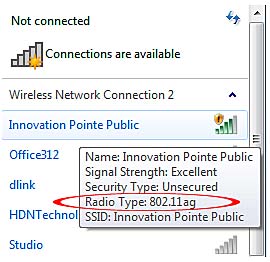
Figure 2: This connection works with 2.4GHz (802.11g) and 5GHz (802.11a) wireless adapters.
Connecting to an unsecured wireless network
If you often have to be mobile during work, you will surely encounter a lot of unsecured wireless networks. This is how to connect to unsecured networks and save these connections for future use.
To connect to an unsecured wireless network:
- Open the list of wireless networks (see Figure 1)
- Click on an unsecured connection (see Figure 1).
- To save the connection to reuse later, click the empty Connect Automatically checkbox (Figure 3a).
- Click Connect to create the connection (Figure 3b).
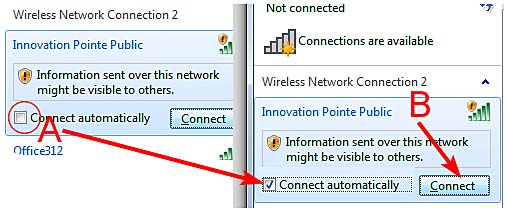
Figure 3: Save an unsecured connection to reuse (A) and connect to an unsecured network (B)
- After connecting to an unsecured network, select the Public Network network type. Select Public Network (Figure 4), and you will configure Windows Firewall to close network shares on your computer and prevent unauthorized access.

Figure 4: Selecting Public Network provides the maximum level of security for an unsecured wireless connection.
If you save the connection (step 3), Windows 7 will automatically create a connection whenever your system detects this network next time.
Connect to a secure wireless network
You can also connect to a secure wireless (encrypted) wireless network from the notification area. Here's how to do it:
- Open the list of wireless networks (see Figure 1)
- Click on a secure connection (these networks are not marked with a yellow shield icon).
- To save the connection for future use, click the Connect Automatically checkbox.
- Click Connect to start the connection process.
- Enter the network security key (WPA, WPA2 or WEP) when prompted. By default, you can see the letters when typing (Figure 5a). Click the Hide Characters checkbox to hide letters to keep it more secure (Figure 5b).
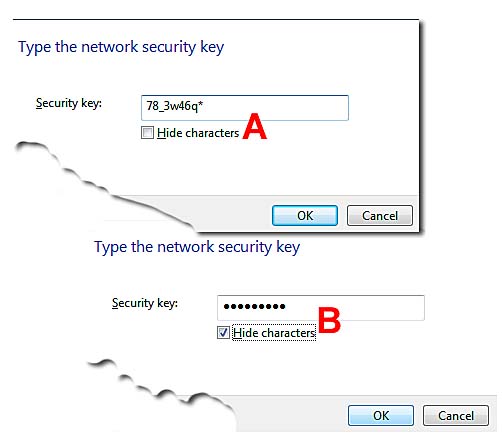
Figure 5: Enter the network security key
- After connecting to a secure network, select the Home or Work network to configure Windows Firewall suitable for the network type (see Figure 4). If you want to set up or join a homegroup, use the Home Network network type.
Automatically reconnect to wireless networks
Windows 7 will automatically connect back to a saved wireless network when your computer is within range and if the network promotes its SSID. To determine if Windows is connected to a wireless network, just observe the wireless network icon in the notification area (Figure 6).

Figure 6: Wireless networks available.
The number of lines indicated in Figure 6b indicates the signal strength of the wireless connection. When you hover your mouse over the wireless connection icon, the name of the current wireless network connection will appear (Figure 7).

Figure 7: Hover your mouse over the icon to see the name of the wireless network connection.
Connect with wireless networks with hidden SSIDs.
Windows 7 will detect wireless networks that do not promote SSIDs as "Other Network". To connect to a non-broadcast network, enter the SSID of the network as well as the encryption key when prompted.
Open a website to complete the connection
Some wireless connections require you to agree to a service agreement or access a security certificate before you can use them. Windows 7 will prompt you for the necessary event by displaying the " Additional Log On Information May Be Required " message (Figure 8). Click the notification to open your browser and complete the process.

Figure 8: Click the message to open the website needed to complete the process of connecting to a wireless network.
Manage wireless connections
As I mentioned earlier, Windows 7 will prompt you to save the wireless connection as soon as you start the connection process. To manage wireless connections, open the Network and Sharing Center (you can open it from the network connection dialog in the notification area or from Control Panel). Click the Manage Wireless Networks link in the left pane (Figure 9) to start the management.
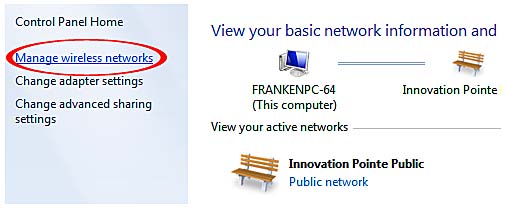
Figure 9: Open the Manage Wireless Connections dialog box from the Network and Sharing Center.
The wireless network connection management dialog box (Figure 10) is used to add, remove, or rearrange wireless network connections. You can also display the wireless adapter properties, select the attribute type or open the Network and Sharing Center.
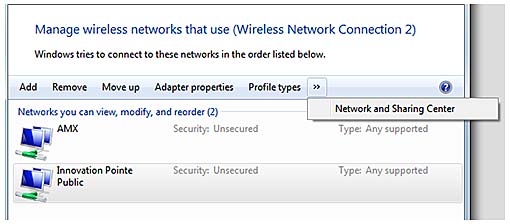
Figure 10: Wireless connection management dialog box
Wireless network connection at the top of the list is the preferred network. To move another connection to the top of the list, select it and click Move Up until the connection is above the list.
To remove a connection that you do not want to use, select the connection and click Remove.
To add a connection, click Add and provide the necessary information, such as SSID, encryption type, encryption key and .
View properties and set up a shared Internet connection
To see the properties for the wireless adapter, click the Adapter properties (Figure 11) from the wireless network management dialog box shown in Figure 10.
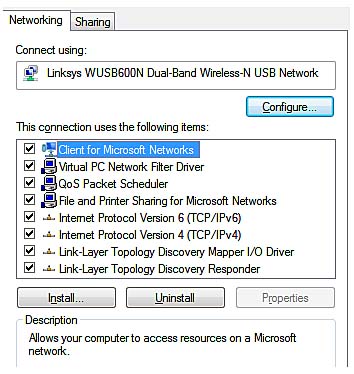
Figure 11 The Networking tab of the adapter properties page will list the components being used and allow you to install or uninstall components.
The Sharing tab is used to configure your system as an Internet Connection Sharing host (Figure 12). An ICS host will provide Internet access to computers on the network via its own Internet connection. You can use ICS with a wireless access point (or wired switch or hub) as another way to use the router.
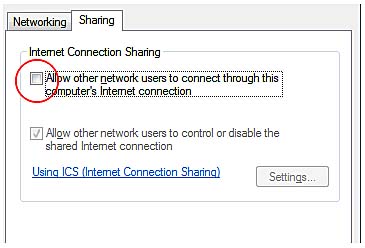
Figure 12: Networking tab of the wireless adapter properties page will list the network components being used and allow you to install or uninstall components.
Click the Allow Other Network Users to Connect . check box to enable ICS. To specify which services ICS will support, click the Settings button and select Services from the Services list (Figure 13).
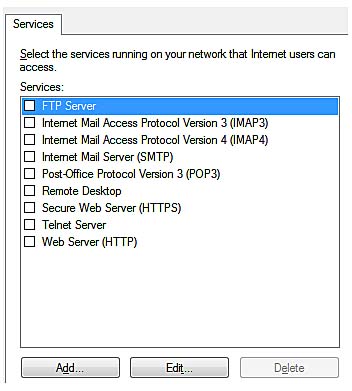
Figure 13: Use the Settings button to configure the wireless ICS connection
Note : To learn more about the use of ICS, click the Internet Connection Sharing link in Figure 12.
Disconnecting from a wireless connection
To disconnect from a wireless connection, open the wireless network icon in the notification area, right-click on the current connection and select Disconnect (Figure 14). You can also check the network status and properties from this dialog box.
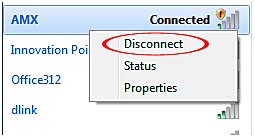
Figure 14: Prepare to disconnect from a wireless network
Conclude
Through the article we have seen that Windows 7 gives users a lot easier to manage wireless network connections. However, there is a problem that you need to keep in mind that your wireless network adapters need to have Windows Vista or Windows 7 drivers to work properly.