Table of Contents
This guide compares 3 leading Best Photo Collage Software on Computer and Usage, focusing on useful features, compatibility, ease of use, and overall value.
Here are the top 3 best photo stitching software on the computer and how to use the software to stitch photos, invite you to follow along.
Fotor
Fotor is one of the photo editing software, professional photo collage on computers today. With the two main tools of editing and stitching photos in Fotor, users will be able to insert beautiful effects for images, then combine photos together with unique frames available.
Main features of Fotor:
- Image editing: makeup remover, teeth whitening, blush removal, eyeshadow, blush, lipstick.
- Advanced multi-platform experience: can use online or software.
- Easy-to-use powerful editing tools.
- More than 100 different layout options to help you get the look you want.
- Batch processing photos at once.
- Collage photos quickly with many beautiful interfaces.
How to use Fotor
Step 1: After you download and install the software on the system, you will be provided with the Fotor interface as follows:

Step 2: To collage the first image you choose Collage.

Step 3: Appearance interface of Fotor photo, you need to set some custom in the Templates section on the right as follows:
Select a ratio: in this section you choose the frame rate you want, there are 3 main ratios: 1: 1; 4: 3; 3: 4 and you can select More and enter the ratio you want.

Select a template: in this section there are many frame templates for you to choose, you just need to click the frame template you want in the All section or you can choose the number of frames and choose the frame pattern.

Border: in this part you can adjust the border in the adjust card, change the colors in the colors card, add background patterns available in the patterns card.

Step 4: After you have customized it, select Add on the left side to add the photos to pair.

The images you add will appear in the list on the left.

Step 5: Keep pressing the image and drag to each frame position you want.

Step 6: In addition to combining photos on the side you can combine photos in the style of FreeStyle, you just need to choose FreeStyle on the right side. The image file will be changed in this style. You can move images, rotate images, and arrange images as you like.

Step 7: Save and share the file
After you have finished combining the images, select Export, where you can choose to share your photos on Facebook, Flickr, Twitter (Share to Facebook, Flickr, Twitter) or save photos to your computer ( Save to Computer ).

Appearance Save to my computer, you name in the File name, select the image format, select image quality in JPEG Quality and click Save Photo to save the file.

SnowFox Photo Collage Maker
SnowFox Photo Collage Maker is a fun and easy-to-use program for stitching photos to share with friends, family and the web. Photo Collage Maker offers different collage styles to create your own collages.
The software provides photo editing tools such as applying frames, adding text captions, rotating images, dragging smaller or larger, selecting beautiful backgrounds. You can create beautiful and impressive collages Best.
Key features of SnowFox Photo Collage Maker:
- Edit, create collages art
- Print images directly
- Save files in various formats
- View the image in full screen before saving
- Share photos on Facebook
How to use SnowFox Photo Collage Maker
Step 1: First, you access the link above to download and install SnowFox Photo Collage Maker into the system.
Step 2: Launch SnowFox Photo Collage Maker, then you select the type of photo collage you want in the tab Style: Grid (grid style); Classic (basic model); Circular (circular style); Heart (type of heart), Free (type of freedom). Choose any type, you can choose more parameters of the image type such as number of images, image space.

Step 3: In the Photo List section you choose to the folder containing the photos to be paired, the image will be displayed in the lower part.
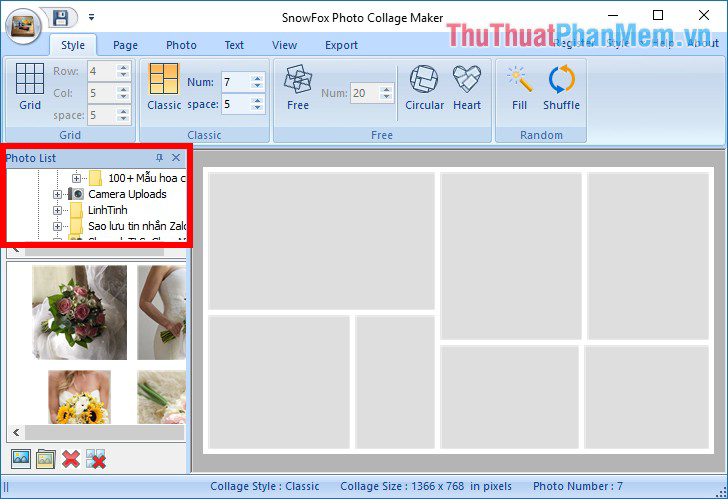
Step 4: Hold down the mouse click on the image and drag to the frame you have selected until the image has been added to all the frames.

If you choose free style, circle, heart shape, then you can add images to the collage frame, select Photo -> Add, so the photo frame will display a frame for you to insert. image.
Step 6: Add text to the collage frame you choose the Text tab -> Add Text.

The Edit Text box appears, enter the text you want and select OK to add text.

You can change the font style, color and font size in the Font section of the Text tab. You can also move the text by holding and dragging the text to the position you want.

Step 7: Save the image
You can choose the Save icon or choose Export -> Save as image.

The Save As window appears, select the folder containing the image, enter a name in the File name section, choose a format for the image in the Save as type section, and select Save to save the image.

PhotoPad Image Editor
PhotoPad Image Editor is one of the best photo collage and photo editing software available today. This software supports a lot of useful features, tools to crop, rotate, resize and flip images. Supports many image formats from jpg, gif, png, tiff, bmp and other popular formats. You can quickly combine photos with Collage, and edit collages after stitching.
Key features of Photo Pad Image Editor:
- Collage photos easily and quickly.
- Crop, rotate, flip photos and images.
- Read gif, jpg, psd, png, bmp and more.
- Edit color, saturation, brightness and contrast.
- Apply effects like sepia, gray tones, red-eye reduction and more
- Review effect before applying.
How to use PhotoPad
Step 1: You need to download and install PhotoPad into the system, then launch PhotoPad software and you will see the interface as shown below.

Step 2: To stitch photos you choose Collage to open Collage Editor.

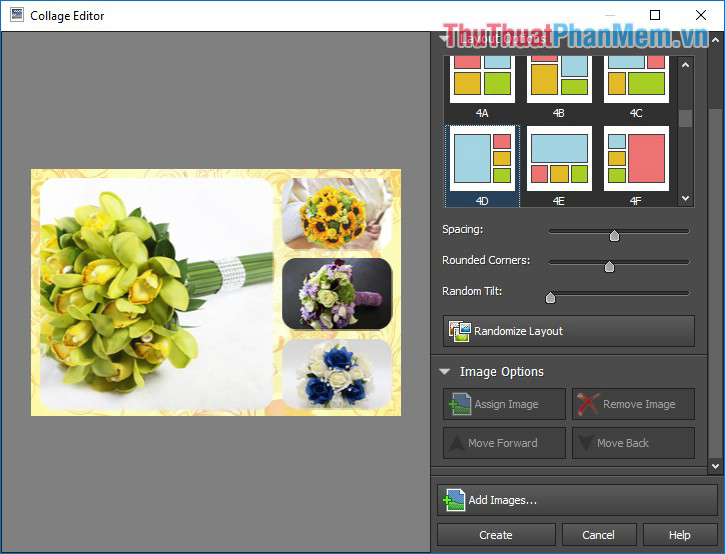
Step 3: Appears Collage Editor interface, where you will start the process of stitching your photos. The left side is the interface to display the collage image, the right is the part you set up and perform the photo collage:
Canvas Options: this section you will choose the size for the collage image in the Collage Size section, and the units in the units. There are also two directions for the image: Landscape (horizontal) and Portrait (vertical).

Background Options: in this section you make the selection of background images for collages, the software provides a lot of backgrounds for you to choose. If you want to add wallpapers on your computer, then select Custom Image and choose Open Image to choose the wallpaper you want.

Layout Options: in this section you choose the layout of the collage you want. Then you customize more:
- Spacing: increase / decrease the distance between images.
- Rounded Corners: increase / decrease the borders of each image in the collage.
- Random Tilt: rotate the image.
- Randomize Layout: random layout.

Step 4: Add photos
Click Add Images to add images to the software.

Open file window appears you choose the folder containing the image file to merge, to select multiple images, hold down Ctrl and select photos. After choosing the image you choose Open.

Step 5: The image will be automatically added to the frames in your chosen layout.
Step 6: Edit the image
To edit the image you select the image to edit and select the Image Options to customize.
- Assign Image (image assignment): replace the selected image with another image.
- Remove Image: remove the selected image from the collage.

Step 7: After you have customized to save the collage, select Create to create a collage.

Step 8: To save the collage you choose File -> Save.

The Save As window appears, select the folder you want to save the collage, name the collage image in the File name section and select Save to save the image.

Above the article has shared with you the top 3 best photo stitching software on the computer and how to use the software to stitch photos. Hope you will choose the best photo collage software to use. Good luck!
FAQ
How should I choose among Best Photo Collage Software on Computer and Usage?
Compare compatibility, essential features, ease of use, security, support, and total cost rather than choosing only by popularity.
Are free options suitable for everyday use?
Free tools can be sufficient for basic needs, but advanced features, commercial use, or priority support may require a paid plan.
What should I check before installing or using one?
Verify the official source, system requirements, recent updates, privacy practices, and support for your device and file types.
Related Articles
 Top Hottest Computer Photo Collage Software 20217 minutes read
 The Best Photo Compositing Software on Computers, Iphone, Android9 minutes read
 How to Combine Photos on Software Collageit6 minutes readTop 5 Best Photo Collage Software for Computers7 minutes read
 TOP 10 Free Online and Free Photo Collage Software on Your6 minutes read
 5 Best Best Photo Collage Software5 minutes read
Reader Comments 0
Sign in with email or Google to join the discussion.