Steps to fix Print Screen key not working
The Print Screen (PrtScr) key is one of the fastest ways to take screenshots on Windows. However, if the Print Screen key suddenly stops working, there are a few workarounds you can try.
Table of Contents
The Print Screen key may have stopped working due to a hardware problem, i.e. there could be a problem with the keyboard. If that's the case, you'll need to replace your keyboard.
However, there are also plenty of other fixable issues that cause Print Screen to stop working. Let's talk about those problems and how you can fix them.
1. Check the F-Lock . key
The F-lock key turns on or off the secondary functions of the F1 – F12 keys. Keyboards with an F-lock key may also come with an LED indicator to indicate whether F-lock is on or off. If the feature is on, press the F-lock key to turn it off. Check if your Print Screen is working properly.
2. Stop programs running in the background
Background programs can be the reason why the Print Screen key doesn't work. Task Manager and see if apps like OneDrive, Snippet Tool or Dropbox are running in the background.
These are common 'culprits', but other apps can also cause problems. If the problem started occurring after installing any new apps, try stopping them and see if that solves the problem.
If you have two or more suspected apps running in the background, stop them one by one to see which is causing the problem. To stop an application, run Task Manager by pressing Ctrl + Shift + Esc , right-clicking on the application and selecting End task .

3. Update the keyboard driver
If the system installs the incorrect, corrupted, or outdated keyboard driver, this may cause the Print Screen key to stop working. You can fix this by updating the driver.
You can update your keyboard driver from Device Manager.
Step 1: Right click on Start button and click Device Manager or press Windows key + R , type devmgmt.msc and press Enter to open Device Manager.
Step 2: Find your keyboard driver, right click and select Update driver .

On the next screen, you will be asked if you want Windows to automatically search for and install drivers or install them from your computer. If Windows can't find the driver, try downloading the driver from the manufacturer's website before choosing the second option. There are also some other ways to update Windows drivers if this doesn't work.
Once you have the updated drivers installed, restart the computer to see if the Print Screen key works.
4. Check OneDrive Settings
If you use OneDrive on your PC, check to see if OneDrive is the reason why the Print Screen key isn't working. It's a common problem among users who use Microsoft's cloud storage service to back up files.
You can do this from OneDrive's settings. Right click on the OneDrive icon from the bottom right part of the taskbar and select Settings. Next, switch to the Backup tab .
In the Screenshots section , you'll see a checkbox that says 'Automatically save screenshots I capture to OneDrive' . Make sure this box is checked.
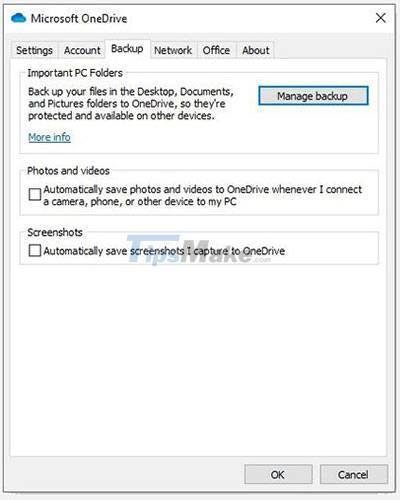
If the box is already checked, uncheck it and check it again. Now let's verify if this solves the problem.
5. Use Windows 10 Hardware Troubleshooter
Windows 10 has a built-in hardware troubleshooter. This includes a troubleshooter specific to your keyboard, which can help fix Print Screen problems.
Step 1: Press the Windows key and search for Troubleshoot Settings. This will open a new window.
Step 2: In the right pane, click Additional troubleshooters and scroll down to the Keyboard section . Select it and click Run the troubleshooter .

Follow the prompts in the troubleshooter. When done, see if this fixes the issue with the Print Screen key.
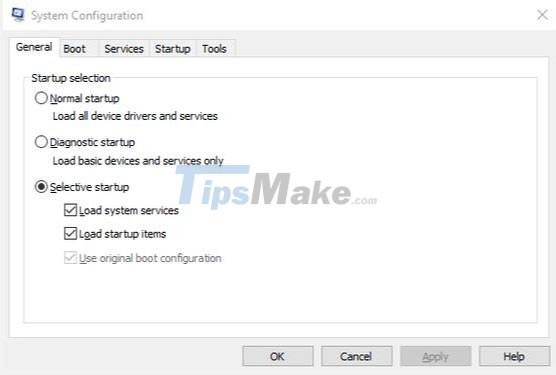
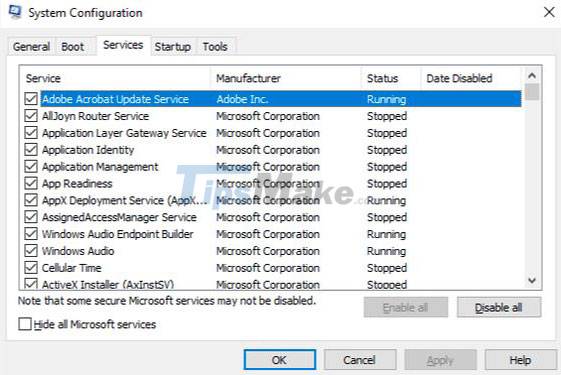
6. Boot 'clean' PC
If the first method doesn't work, you can try a clean boot of your computer. The Clean Boot process will restart Windows as usual, but only allow the necessary drivers to be loaded. This will help you narrow down the cause of the problem.
To clean boot the computer, follow the steps in the following article: How to perform Clean Boot on Windows 10/8/7.
7. Modify Registry
You can modify the Registry using the Registry Editor to fix the problem of the Print Screen key not working.
However, making a mistake while modifying the Registry can have a bad effect on your PC, so it's best to create a system restore point and back up your files before performing this fix.

Step 1: To open Registry Editor, press Windows + R and type regedit. Then, click OK or press Enter.
Step 2: Navigate to
HKEY_CURRENT_USERSoftwareMicrosoftWindowsCurrentVersionExplorer.
Step 3: Right click on the Explorer folder , and select New > DWORD and change the Value name to ScreenShotIndex . Set the Value data of the DWORD to 4 and click OK.
Step 4: Next, navigate to
HKEY_CURRENT_USERSoftwareMicrosoftWindowsCurrentVersionExplorerUser Shell Folders.
Step 5: Find the string named {B7BEDE81-DF94-4682-A7D8-57A52620B86F} and double click to open it.
Step 6: Make sure that Value data is set to %USERPROFILE%PicturesScreenshots.
If you can't find this file, create a new String Value just like you created the DWORD and use the values mentioned above in the Value name and Value data fields .
If this doesn't work, see if changing the Value data field for DWORD ScreenShotIndex from 4 to 695 helps.
Hope you are succesful.
Was this article helpful?
Your feedback helps us improve.
Related Articles
 How to print Excel, print Excel spreadsheets fast, standard8 minutes read
 Microsoft will change the way the Print Screen key works on Windows 112 minutes read
 Steps to disable Print Spooler on Windows 103 minutes read
 How to Print Screen on HP9 minutes read
 How to Use the 'Print Screen' Function on a Keyboard3 minutes read
 How to Use Print Screen5 minutes read
Reader Comments 0
Sign in with email or Google to join the discussion.