Network printer solution with Repotec Print Server.
In the face of the diversification of informatics devices, to be able to choose a satisfactory and effective computer equipment is one of the simplest products for printing. Indeed, if you used to work in a network environment and there were many computers in the network, but only one printer shared the whole network, then you would feel
In the face of the diversification of informatics devices, to be able to choose a satisfactory and effective computer equipment is one of the simplest products for printing. Indeed, if you used to work in a network environment and there were many computers in the network, but only one printer shared the entire network, then you would feel very frustrated when printing. If the computer is connected to a divided printer, there will be problems such as: damage, hang up, restart or shutdown, as if the printing capability is blocked.

As I think, because agencies often pay attention to cost-saving issues, few employers will spend money to equip a computer that is only for printing. Yes, with mobility in performance, employers are only equipped with a certain computer for employees that are capable of undertaking a lot of work. As you know, a computer using the time can not fail to be damaged more or less, so when damaged, it is inevitable to affect the whole network when this computer is directly connected to printer sharing. For the above reasons, I would like to introduce a solution in printing LAN (family or work) details as follows:
We invest in buying a Print server, this tool usually has many different types and prices: (using USB and Parallel ports). According to the online reference, I recommend that you choose Parallel port because it runs very stable and if the USB port is faulty, if you find one with both USB and Parallel ports, the more Good, You can customize the use easier! According to the content of this article, I would like to introduce a type of Repotec-type Print Server with 3 Parallel and 1 RJ45 ports as shown above, you can buy at Nguyen Hoang supermarket, at 104 Nguyen Van Cu, Nguyen Cu Trinh Ward, District 1, Ho Chi Minh City for 82USD (without VAT).
This Print Server tool helps computers in LAN to print directly with very good print speed regardless of the computer, on the other hand, the processing capability of this device is also very fair. . In addition, this device also supports many systems:
- Novell Netware 3.12; 4.x; 5.x (Bindery and NDS).
- Microsoft Windows 95/98 / Me / NT / 2000 / XP.
- Apple Ether talk
- Unix System.
- Internet (Via Internet Printer Connection Software)
Note: When buying an offer at a store that sells to a network cable and press the head like the network cable from the Network card to the Hub / Switch (short length depending on your needs) because the packaged product only has:
- 1 Print Server.
- 1 External AC Power Apdapter.
- 2 3.5-inch floppy disks set up diskettes or 1 CD (For Windows 95/98 / Me / NT / 2000 / XP).
- 1 User manual.
After fully checking the attached accessories and buying a network cable as mentioned above, we proceed to install and use step by step as follows:
I. Install the Print Server for Windows 95/98 / Me.
Step 1:
a. Power off the printer.
b. Attach the Print Server to the printer cable (Parallel), but the 3 ports of the Prin Server need to be connected to the printer and Print Server.
c. Attach a network cable to one Print Server and one Hub / Switch input, then attach the External AC Power Apdapter to the Print Server and prohibit AC Power Apdapter into the power outlet.
d. Next step 2.
Step 2: Install the protocol in Windows 95/98 / Me.
a. Please install the required protocols: IPX / SPX - TCP / IP - NETBEUI.
b. If Windows needs to add the above protocols, proceed as follows:
Select Control Panel → select Network → select Add → select Protocal → select Microsoft from Manufacture List → select a Protocal you need → Done.
Step 3: Install Driver for Print Server in Windws 95/98 / Me:
a. Insert disc 1 into the floppy drive and run the setup.exe command
b. It offers 2 utilities, one is Network Printer Monitor and another is PSAdmin.
c. Select the instructions for installation to complete, followed by step 4.
We have PSAdmin screen when activated:

Step 4: Add a new driver to the printer:
If the printer is a new printer, please install [Add printer] and complete the procedure below:
a. Select Local Printer.
b. Select the appropriate printer manufacturer.
c. Select the printer model.
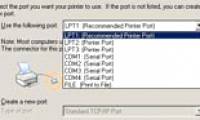
d. Select LPT1.
e. Printer name or default use.
f. In the Print test page, select 'No'
g. Next step 5.
Step 5: Configure Print Server:
a. Select the printer name you want to configure.
b. Select 'Properties'.
c. Select 'Details'.
d. Select 'Add Port'.
e. In 'Other', select 'Network Print Port'.

f. The next image appears again:

g. Select Print Server. (If there are 3 Print Servers on your network, please specify the name and port).
Finish.
II. Install the Print Server for Windows NT.
Check the product and purchase additional equipment as noted above.
Step 1: Install the protocol in Windows NT.
a. Please install the required protocols: IPX / SPX - TCP / IP - NETBEUI.
b. If Windows needs to add the above protocols, proceed as follows:
Select Control Panel → select Network → select Add → select Protocal → select Microsoft from Manufacture List → select a Protocal you need → Done.
Step 2: Install Driver for Print Server in Windws NT:
a. Insert disc 1 into the floppy drive and run the setup.exe command
b. It offers 2 utilities, one is Network Printer Monitor and another is PSAdmin.
c. Drive disk 2 to the drive.
d. Next step 3.
Step 3: Add a new driver to the printer:
If the printer is a new printer, please install [Add printer] and complete the procedure below:
a. Select Local Printer.
b. The Add printer wizar screen will appear, select My Comoputer.
c. In Available ports, select LPT1.
d. Select the appropriate printer manufacturer.
e. Select the printer model.
f. Printer name or default use.
g. In printer sharing, click Next.
hour. In the Print test page, select 'No'
i. Next step 4.
Step 4: Configure Print Server:
a. Select the printer name you want to configure.
b. Select 'Properties'.
c. Select 'port'.
d. Select 'Add Port'.
e. In 'Available Port', select 'Network Print Port'.
f. The next image appears again:

g. Select Print Server. (If there are 3 Print Servers on your network, please specify the name and port).
Finish.
III. Install the Print Server for Windows 2000 / XP.
Check the product and purchase additional equipment as noted above.
Step 1: Install the protocol in Windows 2000 / XP.
c. Please install the required protocols: IPX / SPX - TCP / IP - NETBEUI.
d. If Windows needs to add the above protocols, proceed as follows:
Select Control Panel → select Network and Dial-up Connects → select Local Area Connects → select Properties → select install → select protocal → select Add → in Internet component, select the Protocal you need → Done.
Step 2: Install Driver for Print Server in Windws 2000 / XP:
a. Insert disc 1 into the floppy drive and run the setup.exe command
b. It offers 2 utilities, one is Network Printer Monitor and another is PSAdmin.
c. Drive disk 2 to the drive.
d. Next step 3.
Step 3: Add a new driver to the printer:
If the printer is a new printer, please install [Add printer] and complete the procedure below:
a. Select Local Printer.
b. In Available ports, select LPT1.
c. Select the appropriate printer manufacturer.
d. Select the printer model.
e. Printer name or default use.
f. In printer sharing, click Next.
g. In the Print test page, select 'No'
hour. Next step 4.
Step 4: Configure Print Server:
a. Select the printer name you want to configure.
b. Select 'Properties'.
c. Select 'ports'.
d. Select 'Add Port'.
e. In 'Available Port', select 'Network Print Port'.
f. Select 'New Port'.
g. The next image appears again:
hour. Select Print Server. (If there are 3 Print Servers on your network, please specify the name and port).
Finish.
In addition, you can also refer to how to install on NetWare, Linux, internal Web printing applications on the attached CD.
The above is my presentation on how to install and use the Print server, I hope that through this presentation, you can operate your network printing effectively, regardless of a computer. .
Was this article helpful?
Your feedback helps us improve.
Related Articles
 How to Connect a USB Printer to a Network11 minutes read
 Why the printer cannot print and how to fix it8 minutes read
 Efficiently exploit printers in Windows Server 2003 (Part 3)8 minutes read
 How to Connect a USB Printer to a Network11 minutes read
 Managing printers in Windows Server 2008 - Part 25 minutes read
 Efficiently exploit printers in Windows Server 2003 (Part 1)10 minutes read
Reader Comments 0
Sign in with email or Google to join the discussion.