Secure the installation of ISPConfig 3 with Certificate Class1 SSL of StartSSL
In the following article, we will guide and introduce you to the basic operations to create and use Free Class1 SSL Certificate from SSL to secure the installation process of ISPConfig 3 and remove notifications about Self-created Certificate. The following test is based on using SSL certificate via ISPConfig web interface ....
TipsMake.com - In the following article, we will guide and introduce you to the basic operations to create and use Free Class1 SSL Certificate from SSL to secure the ISPConfig 3 installation process and remove those Notification of self-created Certificate . The following test is based on using an SSL certificate via the web interface of ISPConfig ( Apache2 and nginx ), Postfix (for TLS ), Courier and Dovecot connections (for POP3s and IMAPs ), and finally PureFTPd (with TLS / FTPES connection ). This approach can be applied on Debian or Ubuntu in a similar way, with no difference.
First, you need to make sure that the system is set up according to the following model. Here we use hostname server1.example.com , and StartSSL will allow users to create Class1 certificates for the main domain and 1 sub domain, so you need to create the corresponding certificate for example.com and server1.example .com . This also means that we must 'notify' all user accounts about using domain example.com or sub domain server1.example.com for all services ( ISPConfig console, Postfix, Courier / Dovecot, PureFTPD . ) because otherwise the system will continuously display different messages about the certificate.
In case you want to use different hostname addresses with services (eg mail.example.com for Postfix, ispconfig.example.com with ISPConfig . ), you should use Class2 certificate of StartSSL. In fact, this is not free, but it does support us to create multiple sub domains and even multiple domains. Technically, the deployment method is not different, except for the sub.class1.server.ca.pem intermediate certificate of StartSSL , you should replace it with sub.class2.server.ca.pem . We will address these differences in more detail throughout the tutorial.
All commands are done here under the highest level - root , so please use the following command in Ubuntu :
Create a Certificate Signing Request - CSR:
In fact, we need to have a Certificate Signing Request - CSR to receive the SSL certificate from StartSSL . With ISPConfig installer (minimum version 3.0.4), we will use this CSR as the basic encryption mechanism for all system services ( ISPConfig, Postfix . ).
Since ISPConfig 3.0.4 ISPConfig installer offers many options to use SSL encryption via the ISPConfig web interface, the system will create self-signed certificate ( 4096 bits ) including CSR if the user answers the questions ask after y or press Enter :
In order for the ISPConfig installer to create CSR with data matching the system, you must enter the correct option in the lower part:
Generating RSA private key, 4096 bit long modulus
......... .. ++
......... .... ++
e is 65537 (0x10001)
Bạn cần đến bạn cần nhập vào thông tin mà sẽ được hợp lệ
vào bạn yêu cầu certificate.
What are you about to enter is called a Distinguished Name or a DN.
Có đủ một trường mà nhưng bạn bỏ bỏ một trống
Để có một trường này sẽ là một giá trị mặc định,
Nếu bạn nhập vào., Trường này sẽ được trống.
-----
Country Name (2 letter code) [AU]: State or Province Name (full name) [Some-State]: Locality Name (eg, city) []: Organization Name (eg, company) [Internet Widgits Pty Ltd]: Organizational Unit Name (eg, section) []: Common Name (eg, YOUR name) []: Email Address []:
Please enter the following 'extra' attributes
cần gửi với yêu cầu xác thực
A challenge password []: An tùy chọn company tên []: ghi RSA key
If the original certificate initialization steps with data are misleading, you can update ISPConfig by typing the command:
Or if you have installed the latest version of ISPConfig , use the command:
wget http://www.ispconfig.org/downloads/ISPConfig-3-stable.tar.gz
tar xvfz ISPConfig-3 - stable.tar.gz
cd ispconfig3_install / install
php -q update.php
This process will allow users to create new ISPConfig 3 certificates by answering the following question with the yes :
If you are using ISPConfig version older than 3.0.4 , you should update with the command:
The above syntax also allows users to create an SSL connection for ISPConfig 3 by answering the question with the option yes :
As mentioned above, you should report the information exactly. After that, the system will have full SSL , CSR, and self-signed certificate keys in the directory / usr / local / ispconfig / interface / ssl /
total 16
-rwxr-x --- 1 ispconfig ispconfig 2423 Jan 16 13:29 ispserver.crt
-rwxr-x --- 1 ispconfig ispconfig 1777 Jan 16 13:29 ispserver.csr
-rwxr-x --- 1 ispconfig ispconfig 3243 Jan 16 13:29 ispserver.key
-rwxr-x --- 1 ispconfig ispconfig 3311 Jan 16 13:28 ispserver.key.secure
root @ server1: ~ #
All we need in this test is the private key (ispserver.key) and CSR (ispserver.csr) , you need to replace ispserver.crt with SSL Class1 certificate , and can ignore ispserver .key.secure . Or create the key ispserver.key and ispserver.csr as follows:
openssl req -new -newkey rsa: 4096 -days 365 -nodes -keyout ispserver.key -out ispserver.csr
Your ispserver.csr file will look like this:
MIIC7TCCAdUCAQAwgacxCzAJBgxxxxxxAkRFMRYwFAYDVQQIDA1OaWVkZXJzYWNo
xxxxxxxxxxxxxxxxxxxxxxxxxxxxxxxxxxxxxxxxxxxxxxxxxxxxxxxxxxxxxxxx
xxxxxxxxxxxxxxxxxxxxxxxxxxxxxxxxxxxxxxxxxxxxxxxxxxxxxxxxxxxxxxxx
xxxxxxxxxxxxxxxxxxxxxxxxxxxxxxxxxxxxxxxxxxxxxxxxxxxxxxxxxxxxxxxx
xxxxxxxxxxxxxxxxxxxxxxxxxxxxxxxxxxxxxxxxxxxxxxxxxxxxxxxxxxxxxxxx
xxxxxxxxxxxxxxxxxxxxxxxxxxxxxxxxxxxxxxxxxxxxxxxxxxxxxxxxxxxxxxxx
xxxxxxxxxxxxxxxxxxxxxxxxxxxxxxxxxxxxxxxxxxxxxxxxxxxxxxxxxxxxxxxx
xxxxxxxxxxxxxxxxxxxxxxxxxxxxxxxxxxxxxxxxxxxxxxxxxxxxxxxxxxxxxxxx
xxxxxxxxxxxxxxxxxxxxxxxxxxxxxxxxxxxxxxxxxxxxxxxxxxxxxxxxxxxxxxxx
xxxxxxxxxxxxxxxxxxxxxxxxxxxxxxxxxxxxxxxxxxxxxxxxxxxxxxxxxxxxxxxx
xxxxxxxxxxxxxxxxxxxxxxxxxxxxxxxxxxxxxxxxxxxxxxxxxxxxxxxxxxxxxxxx
xxxxxxxxxxxxxxxxxxxxxxxxxxxxxxxxxxxxxxxxxxxxxxxxxxxxxxxxxxxxxxxx
xxxxxxxxxxxxxxxxxxxxxxxxxxxxxxxxxxxxxxxxxxxxxxxxxxxxxxxxxxxxxxxx
xxxxxxxxxxxxxxxxxxxxxxxxxxxxxxxxxxxxxxxxxxxxxxxxxxxxxxxxxxxxxxxx
xxxxxxxxxxxxxxxxxxxxxxxxxxxxxxxxxxxxxxxxxxxxxxxxxxxxxxxxxxxxxxxx
9Z5RhXTfOz8F2wsNH5yP9eqkVlkYKpIwyUHoZtUSp + xz
----- END CERTIFICATE REQUEST -----
Get free Certificate Class1 with SSL:
The next step is to access StartSSL and create a new account. After confirming the correct domain information (at the Validations Wizard tab), request your certificate in the Certificates Wizard> SSL Server / TLS Certificate tab from the Certificate Target menu as shown below:

If private key and CSR are available, you can skip this step, click Skip >>:

On the next page, enter the contents of the CSR file, for example inside the file /usr/local/ispconfig/interface/ssl/ispserver.csr (usually begins with ----- BEGIN CERTIFICATE REQUEST ----- and end by ----- END CERTIFICATE REQUEST ----- ):

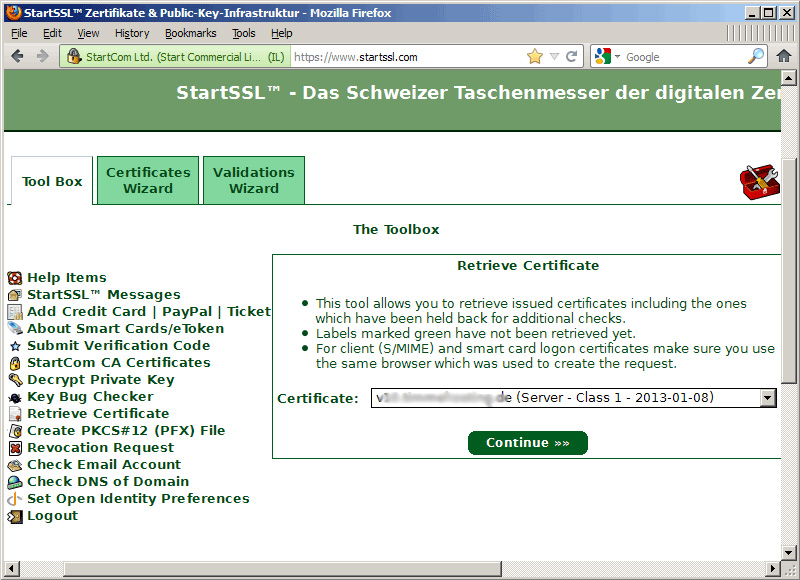
Then, following the instructions displayed, the system will ask you about the domain and sub domain that initializes the certificate, if using server1.example.com for all services, enter example.com as domain and server1 as the sub domain. . And after a few minutes, we will receive an email telling us that the certificate is complete. Open Toolbox> Retrieve Certificate and select our certificate:
Copy certificate from the web interface of StartSSL:

Back up 1 copy of the original ispserver.crt file, then enter the contents of the Class1 certificate StartSSL file into the ispserver.crt file just manipulated:
vi /usr/local/ispconfig/interface/ssl/ispserver.crt
MIIHMTCCBhmgAwIBAgIDxxxxxx0GCSqGSIb3DQEBBQUAMIGMMQswCQYDVQQGEwJJ
xxxxxxxxxxxxxxxxxxxxxxxxxxxxxxxxxxxxxxxxxxxxxxxxxxxxxxxxxxxxxxxx
xxxxxxxxxxxxxxxxxxxxxxxxxxxxxxxxxxxxxxxxxxxxxxxxxxxxxxxxxxxxxxxx
xxxxxxxxxxxxxxxxxxxxxxxxxxxxxxxxxxxxxxxxxxxxxxxxxxxxxxxxxxxxxxxx
xxxxxxxxxxxxxxxxxxxxxxxxxxxxxxxxxxxxxxxxxxxxxxxxxxxxxxxxxxxxxxxx
xxxxxxxxxxxxxxxxxxxxxxxxxxxxxxxxxxxxxxxxxxxxxxxxxxxxxxxxxxxxxxxx
xxxxxxxxxxxxxxxxxxxxxxxxxxxxxxxxxxxxxxxxxxxxxxxxxxxxxxxxxxxxxxxx
xxxxxxxxxxxxxxxxxxxxxxxxxxxxxxxxxxxxxxxxxxxxxxxxxxxxxxxxxxxxxxxx
xxxxxxxxxxxxxxxxxxxxxxxxxxxxxxxxxxxxxxxxxxxxxxxxxxxxxxxxxxxxxxxx
xxxxxxxxxxxxxxxxxxxxxxxxxxxxxxxxxxxxxxxxxxxxxxxxxxxxxxxxxxxxxxxx
xxxxxxxxxxxxxxxxxxxxxxxxxxxxxxxxxxxxxxxxxxxxxxxxxxxxxxxxxxxxxxxx
xxxxxxxxxxxxxxxxxxxxxxxxxxxxxxxxxxxxxxxxxxxxxxxxxxxxxxxxxxxxxxxx
xxxxxxxxxxxxxxxxxxxxxxxxxxxxxxxxxxxxxxxxxxxxxxxxxxxxxxxxxxxxxxxx
xxxxxxxxxxxxxxxxxxxxxxxxxxxxxxxxxxxxxxxxxxxxxxxxxxxxxxxxxxxxxxxx
xxxxxxxxxxxxxxxxxxxxxxxxxxxxxxxxxxxxxxxxxxxxxxxxxxxxxxxxxxxxxxxx
xxxxxxxxxxxxxxxxxxxxxxxxxxxxxxxxxxxxxxxxxxxxxxxxxxxxxxxxxxxxxxxx
xxxxxxxxxxxxxxxxxxxxxxxxxxxxxxxxxxxxxxxxxxxxxxxxxxxxxxxxxxxxxxxx
xxxxxxxxxxxxxxxxxxxxxxxxxxxxxxxxxxxxxxxxxxxxxxxxxxxxxxxxxxxxxxxx
xxxxxxxxxxxxxxxxxxxxxxxxxxxxxxxxxxxxxxxxxxxxxxxxxxxxxxxxxxxxxxxx
xxxxxxxxxxxxxxxxxxxxxxxxxxxxxxxxxxxxxxxxxxxxxxxxxxxxxxxxxxxxxxxx
xxxxxxxxxxxxxxxxxxxxxxxxxxxxxxxxxxxxxxxxxxxxxxxxxxxxxxxxxxxxxxxx
xxxxxxxxxxxxxxxxxxxxxxxxxxxxxxxxxxxxxxxxxxxxxxxxxxxxxxxxxxxxxxxx
xxxxxxxxxxxxxxxxxxxxxxxxxxxxxxxxxxxxxxxxxxxxxxxxxxxxxxxxxxxxxxxx
xxxxxxxxxxxxxxxxxxxxxxxxxxxxxxxxxxxxxxxxxxxxxxxxxxxxxxxxxxxxxxxx
xxxxxxxxxxxxxxxxxxxxxxxxxxxxxxxxxxxxxxxxxxxxxxxxxxxxxxxxxxxxxxxx
xxxxxxxxxxxxxxxxxxxxxxxxxxxxxxxxxxxxxxxxxxxxxxxxxxxxxxxxxxxxxxxx
xxxxxxxxxxxxxxxxxxxxxxxxxxxxxxxxxxxxxxxxxxxxxxxxxxxxxxxxxxxxxxxx
xxxxxxxxxxxxxxxxxxxxxxxxxxxxxxxxxxxxxxxxxxxxxxxxxxxxxxxxxxxxxxxx
xxxxxxxxxxxxxxxxxxxxxxxxxxxxxxxxxxxxxxxxxxxxxxxxxxxxxxxxxxxxxxxx
xxxxxxxxxxxxxxxxxxxxxxxxxxxxxxxxxxxxxxxxxxxxxxxxxxxxxxxxxxxxxxxx
xxxxxxxxxxxxxxxxxxxxxxxxxxxxxxxxxxxxxxxxxxxxxxxxxxxxxxxxxxxxxxxx
xxxxxxxxxxxxxxxxxxxxxxxxxxxxxxxxxxxxxxxxxxxxxxxxxxxxxxxxxxxxxxxx
xxxxxxxxxxxxxxxxxxxxxxxxxxxxxxxxxxxxxxxxxxxxxxxxxxxxxxxxxxxxxxxx
xxxxxxxxxxxxxxxxxxxxxxxxxxxxxxxxxxxxxxxxxxxxxxxxxxxxxxxxxxxxxxxx
xxxxxxxxxxxxxxxxxxxxxxxxxxxxxxxxxxxxxxxxxxxxxxxxxxxxxxxxxxxxxxxx
xxxxxxxxxxxxxxxxxxxxxxxxxxxxxxxxxxxxxxxxxxxxxxxxxxxxxxxxxxxxxxxx
xxxxxxxxxxxxxxxxxxxxxxxxxxxxxxxxxxxxxxxxxxxxxxxxxxxxxxxxxxxxxxxx
xxxxxxxxxxxxxxxxxxxxxxxxxxxxxxxxxxxxxxxxxxxxxxxxxxxxxxxxxxxxxxxx
c2x1wonVRVmKovt2OuM1ZqZw0Ynk
----- END CERTIFICATE -----
Next, load the Root CA part of StartSSL and Class1 Intermediate Server CA:
wget https://www.startssl.com/certs/ca.pem
wget https://www.startssl.com/certs/sub.class1.server.ca.pem
If you use Class2 certificate , download sub.class2.server.ca.pem instead of sub.class1.server.ca.pem . After that, rename both files:
mv sub.class1.server.ca.pem startssl.sub.class1.server.ca.crt
Change the second command in case you use Class2 certificate. However, there are some services that require the use of .pem files created in the following way (change the 2nd command accordingly if using Class2 certificate):
cat ispserver. {key, crt} startssl.chain.class1.server.crt> ispserver.pem
chmod 600 ispserver.pem
ISPConfig interface - Apache2:
If you use ISPConfig 3 with Apache, open the file /etc/apache2/sites-available/ispconfig.vhost with the command:
then add the SSLCertificateChainFile /usr/local/ispconfig/interface/ssl/startssl.sub.class1.server.ca.crt line to the # SSL Configuration section as follows:
# SSL Configuration
SSLEngine On
SSLCertificateFile /usr/local/ispconfig/interface/ssl/ispserver.crt
SSLCertificateKeyFile /usr/local/ispconfig/interface/ssl/ispserver.key
## phải là re-thêm sau khi ISPConfig update !!!
SSLCertificateChainFile /usr/local/ispconfig/interface/ssl/startssl.sub.class1.server.ca.crt
[.]
Please note to change the appropriate specifications if using the Class2 certificate , restart Apache:
ISPConfig interface - nginx:
On nginx, all we need to do here is apply the intermediate certificate to the ispserver.crt file :
then reload nginx:
With Postfix:
For Postfix, we need to backup /etc/postfix/smtpd.cert, /etc/postfix/smtpd.key then create a symlink to /usr/local/ispconfig/interface/ssl/ispserver.crt and / usr / local / ispconfig / interface / ssl / ispserver.key:
mv smtpd.cert smtpd.cert_bak
smtpd.key smtpd.key_bak mv
ln -s /usr/local/ispconfig/interface/ssl/ispserver.crt smtpd.cert
ln -s /usr/local/ispconfig/interface/ssl/ispserver.key smtpd.key
Next, assign smtpd_tls_CAfile to the file /etc/postfix/main.cf:
And finally restart Postfix:
With Dovecot:
To do so, open the file /etc/dovecot/dovecot.conf:
and add the line ssl_ca_file = /usr/local/ispconfig/interface/ssl/startssl.chain.class1.server.crt (note that you must redo this operation after updating ISPConfig):
ssl_cert_file = /etc/postfix/smtpd.cert
ssl_key_file = /etc/postfix/smtpd.key
## phải là re-thêm sau khi ISPConfig update !!!
ssl_ca_file = /usr/local/ispconfig/interface/ssl/startssl.chain.class1.server.crt
[.]
Restart Dovecot:
Courier:
The first thing to do here is to backup the file / etc / courier / imapd.pem and /etc/courier/pop3d.pem:
mv /etc/courier/pop3d.pem /etc/courier/pop3d.pem.bak
Then, connect to /usr/local/ispconfig/interface/ssl/ispserver.pem with the command:
ln -s /usr/local/ispconfig/interface/ssl/ispserver.pem / etc / courier / pop3d.pem
Courier restart:
/etc/init.d/courier-imap-ssl start
/etc/init.d/courier-pop-ssl stop
/etc/init.d/courier-pop-ssl start
PureFTPd:
Similarly, we must back up the file /etc/ssl/private/pure-ftpd.pem first:
mv pure-ftpd.pem pure-ftpd.pem_bak
Create a link to /usr/local/ispconfig/interface/ssl/ispserver.pem:
Restart PureFTPd :
Monit:
If you have installed and used Monit via HTTPS protocol, you can use the StartSSL certificate to remove unwanted messages. Open the file / etc / monit / monitrc:
and specify / usr / local / ispconfig / interface / ssl / ispserver.pem at the PEMFILE line. Examples are as follows:
set httpd port 2812 and
SSL ENABLE
PEMFILE /usr/local/ispconfig/interface/ssl/ispserver.pem
allow admin: secret
[.]
Restart Monit :
So, we have completed the basic steps to secure the installation of ISPConfig 3 with Certificate Class1 SSL of StartSSL . Good luck!