How to create Hackintosh USB with Clover Bootloader
Today I will guide you how to create Hackintosh USB install USB with Clover Bootloader in the most detailed and easy to understand way.
It should be noted that, in this tutorial I will not mention OpenCore Bootloader, if you want to create Hackintosh with this bootloader, you should wait for the next article.
I. What needs to be prepared?
1 / You should have a Mac (or Hackintosh, or virtual machine running macOS) at hand.
There are plenty of tutorials for making installers without using a Mac, but these installers are often unstable, error prone, and not widely supported.
2 / Download the official macOS installer (this is the link provided by Apple, downloaded through the App Store so you can rest assured)
// You choose one of the macOS versions below.
- macOS Catalina: Download it here!
- macOS Mojave: Download it here!
- macOS High Sierra: Download it here!
Note: If you are using an NVIDIA graphics card, you can only install macOS High Sierra version, because since macOS Mojave version, NVIDIA has stopped developing Web Driver for the graphics cards from this company.
3 / A USB with a capacity of 8GB or more, if you want to create a Hackintosh Catalina installer, you should use a USB with a capacity of 16GB, because the macOS Catalina installer will have a capacity of about 8.6GB.
4 / Download Clover Bootloader: Download link here (always the latest version)! or Link backup here!
5 / Download Clover Configurator software here or here (this is used to edit the config.plist file)
=> After you have prepared all of the above, let's get started!
II. How to create Hackintosh USB with Clover Bootloader
This article is quite long so I will split it into small parts, you do it step by step.
#first. Download the macOS installer
Click on the link of the installer that you need to download that I provided above, then the website will take us to the App Store. Please click Download (or Download) to download the installer.

In this tutorial, I will download the macOS Mojave installer. For other versions, you will do the same.
For those of you who are using macOS 10.14 Mojave or higher, the interface will be a little different, so you will press Get (or Receive) to download the installer.

The download process will take a bit long, it takes about 15-20 minutes, so please be patient and wait. During this time, you should go out to exercise, or make a cup of coffee to sip, instead of keeping your eyes on the screen.
Once downloaded, the installer will be saved in the Applications folder. You should rename it to Installer.app (to facilitate the command line in the following steps).

#2. Reformat the USB
Note: Before doing this, please remember to back up all important data in the USB, because this step will erase all data in your USB.
+ Step 1: You proceed to plug the USB into the computer, open the Disk Utility software by going to Launchpad => select Other => select Disk Utility.

+ Step 2: Click View => and select Show all Devices
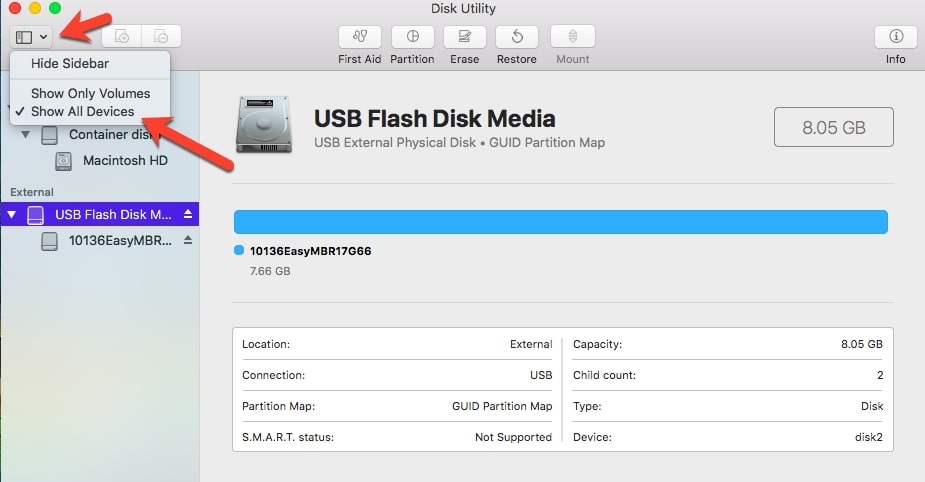
+ Step 3: Please select your correct USB device (here I am USB Flash Disk Media) => and click Erase, then set up as follows:
- Part Name: Please leave it as USB (for convenience in entering the command line in the following steps)
- Part Format: Please let it be Mac OS Extended (Journaled).
- Part Scheme: Please let it be GUID Partition Map.
=> Once setup is complete, press Erase to format the USB. This process will take about 15-20 seconds depending on the speed of your USB.

# 3. Create USB install macOS
+ Step 1: Open the Terminal command line tool by opening Launchpad => Other => Terminal.

+ Step 2: You enter the following command:
sudo /Applications/Installer.app/Contents/Resources/createinstallmedia --volume / Volumes / USB
You press the Return key on the keyboard, and then enter the password to run the command.

+ Step 3: Then the software will ask if we want to reformat the USB or not, enter y => and press the Return key to continue.
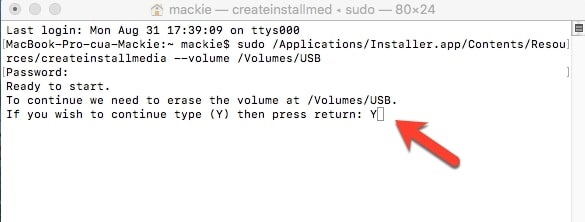
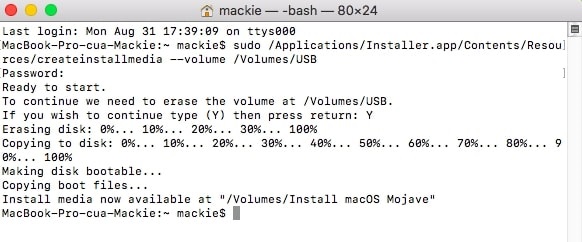
+ Step 4: The installation process will take about 20-30 minutes depending on the speed of your USB.
During this time, you should go outside, or do some exercise and limit your touch to the machine to avoid any risks. Just leave the device alone, when done, come back.

After creating the installer, we will come to a very important step, which is: Install Clover Bootloader on USB.
# 4. Install Clover Bootloader on USB
As in the previous article I said, Apple only allows running macOS on computers manufactured by them.
So we can not choose to boot from USB to boot immediately with this USB. We must have Clover as a bridge to be able to boot into the installer, because the macOS booting method is somewhat different.
+ Step 1: You will download Clover Bootloader from the link you provided above (the preparation part), then open it. Just click Next => Next until you see Install location.
Here, you will click Change install location

And choose the installation location is our USB (here I am Install macOS Mojave).

+ Step 2: After choosing the installation location, do not rush to click Install now, because we still need to tweak a little before installing Clover on your USB.
Click Customize to tweak a few things before you install.

+ Step 3: Then, you will see a list of options appear. Choose from the following options:
+ Check (Select)
- Clover for UEFI Booting Only (Install Clover in the ESP will be automatically selected)
- AudioDxe (available in the Recommend drivers section)
- DataHubDxe (available in the Recommend drivers section)
- FSInject (available in the Recommend drivers section)
- SMCHelper (available in the Recommend drivers section)
- APFSDriverLoader (available under File System Drivers)
- OSXAptioFix3Drv (available under Memory Fix Drivers)
- AppleImageCodec (found in FileVault 2 UEFI Drivers)
- AppleKeyAggreator (available in FileVault 2 UEFI Drivers)
- AppleUITheme (included in FileVault 2 UEFI Drivers)
- FirmwareVolume (available in FileVault 2 UEFI Drivers)
- Install RC Scripts on target Volume
- Black Green Moody (in Themes)

+ Unchecked (Unchecked)
- VBoxHfs (available in File system drivers section)

+ Step 4: After all is done, click Install to install Clover on USB. This will take about 1 minute, so please wait.

+ Step 5: After the installation is complete, you will see the picture below. Now click Close to close the program.

# 5. Tweak Config, Kext and Driver UEFI
After creating the USB flash drive, you will see a partition named EFI on the Desktop. This is the USB EFI partition!
Now, we will go through a very important step, which is to tweak a few things in this EFI partition so that we can boot into the macOS installer.

5.1. Tweak UEFI Driver
By default, after installing Clover on USB, Clover will not be able to immediately recognize Apple's HFS + partitions, so we will have to help it recognize, by using the HFSPlus file. efi
After the download is complete, you proceed to put it on the EFIEFICLOVERdriversUEFI partition
Note: Remember that this HFSPlus.efi file is especially important, never be forgotten. Without it, you won't be able to see the macOS installer partition when you boot.

5.2. Refine the Kext
As in the previous article I said, Kext on macOS it is like a Driver on Windows. You will need some hardware-compatible Kext for those hardware to work.
At first, there will be nothing in the directory containing kext (EFIEFICLOVERkextsOther), you will have to manually add kext to suit your hardware.
Here are some kext I have synthesized to serve the installation of Hackintosh, please add it to suit your hardware.
+ The most important Kext
// You should download the first link, because it is always updated by the author. And the second link is just a backup link uploaded by the Admin at the time of this writing, the version will get old over time.
- FakeSMC.kext: This is the most important kext, which helps to emulate the sensor system like a Mac. Without this kext, you will not be able to boot into the macOS installer. You download here (this link will always be updated to the latest version) or backup link here!
- Lilu.kext: This is also a very important kext, which helps soft patch some hardware without needing to manually fix it. You download it here or here!
- WhateverGreen.kext: This is also a very important kext, which enables the Graphics Cards from Intel (iGPU), NVIDIA and AMD. Without it, you won't be able to boot into the macOS installer! Please download it here or here!
- USBInjectAll.kext: This is kext to help fix the USB port error when booting into the installer. If this kext is missing, you will get an error with a slash circle when booting. You download this kext here or here!
+ The kext must be added depending on your current hardware:
- VoodooPS2Controller.kext: This is the kext to enable the keyboard and touchpad on the Laptop. Without it, you won't be able to use these two. Download it here!
- IntelMausiEthernet.kext: This is the kext that enables the Intel LAN cards. Use only when you use LAN cards from this manufacturer. Download here!
- RealtekRTL8111.kext: This is the kext that enables the Realtek LAN cards. Only use if you are using LAN cards from this brand, please download it here!
- AtherosE2200Ethernet.kext: This is the kext that enables the LAN cards coming from Atheros. Use only if you have a LAN card from this brand. You can download it here!
- FakePCIID: This is a kext that helps to 'fake' unsupported devices to install Hackintosh into supported devices. Download it here!
- NullCPUPowerManagement.kext: This is the kext support for power management on Intel Pentium CPUs and Intel Celeron CPUs. This kext will only be needed if you are using these two CPUs. You can download it here!
=> After all the preparations are done, put it in the EFIEFICLOVERkextsOther
Note: Do not add kext not for your device, as they can cause conflicts and will make the booting process slower, as it must load more kext.

5.2. Replace the Config file
- For Laptop computers
+ Step 1: For Laptop, most will not be able to use discrete graphics card, so you must use the onboard card (iGPU). We recommend that you use the pre-made Rehabman config. Please download it here or here!
In this repo there will be quite a lot of config files, you choose the correct config file corresponding to your iGPU (Intel HD Graphics).
Here I will choose the file config_HD5300_5500_6000.plist)

+ Step 2: Then you copy it to the EFIEFICLOVER partition

+ Step 3: Then you proceed to delete the original config file that Clover created already.
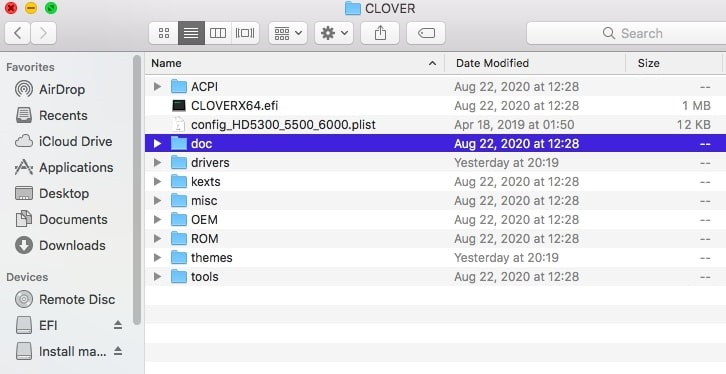
+ Step 4: And rename the config file you got in the other repo to config.plist. It is done!

- For PC (desktop)
Today, PCs can use both discrete cards (dGPU) and integrated graphics cards (iGPU). However, the problem is that the PC will not have a standard config repository like the laptop.
However, a group of Hackintosh around the world has already made us a few config files for the PC. I will divide it into two categories for you to follow.
- PC using a discrete graphics card (dGPU): You won't need to edit anything, just copy it and use it. WhateverGreen and Lilu will take care of you. You can download the config file for your device here or here!
- PC using integrated graphics card (iGPU): You will need to make a little tweak in the Graphics section so that macOS can receive our graphics card (this issue I will talk about below). You can download the config file for your device here or here!
=> Okay, then please do the same steps to change the config as with the Laptop I just instructed above!
5.3. Add SSDT-EC (only needed if you need to create macOS Catalina installer)
This is a very necessary file, not to be forgotten if you want to install macOS Catalina on your computer. If it is missing, you will either stand on the line apfs_module_start or have a slash circle error as shown below:
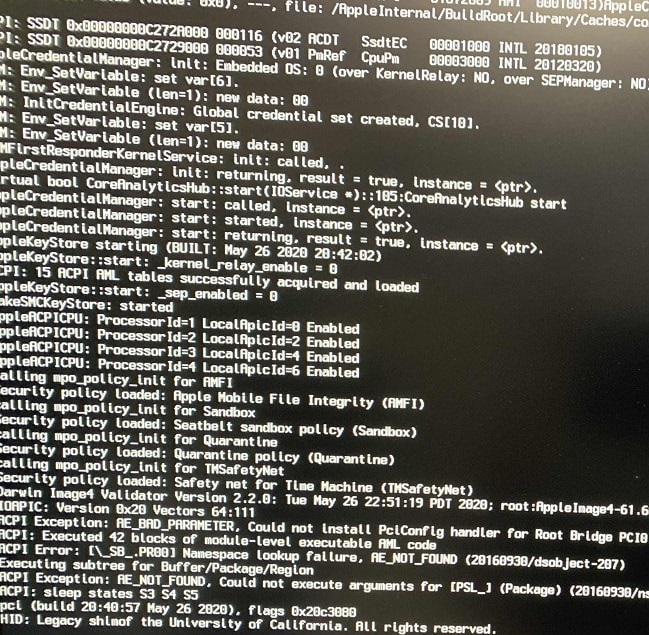
To avoid this error, you need to download the pre-made sample SSDT-EC file here or here => Then, you proceed to copy this file to the EFIEFICLOVERACPIpatched partition.
Note: This file is just a sample file, it will not be true for most machines, but at least it will help you get through this annoying error.
# 6. Tweak the config file accordingly
You proceed to open the config file with Clover Configurator by double-clicking on the config.plist file

Clover Configurator will then open that config file. This is the interface of Clover Configurator:

There will be quite a few categories here, but you only need to pay attention to the following items:
- Boot section
- Section Devices
- Section Graphics
- Section Kernel and Kext Patches
- Section SMBIOS
Besides them, you don't care about the other items, because Rehabman has made it all for us!
6.1. Boot section
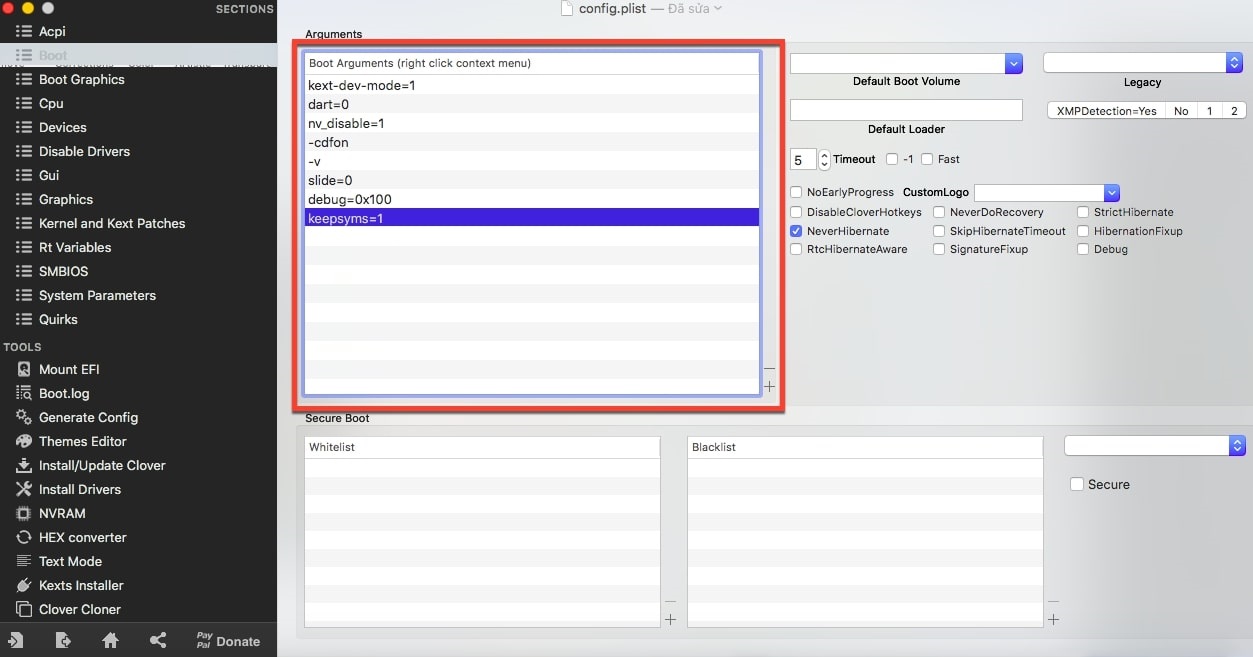
This is where you can adjust the boot parameters (Boot Arguments), as well as which partition is booted first, . pretty much anything for you to set up.
You must be very careful when working with this item, as it will greatly affect whether you have BOOT on the installer or not.

Note: Please use the (-) button and the (+) button to delete or add Boot Arguments! (-) is delete, (+) is add!

Remove some unnecessary boot parameters:
-igfxnohdmi (it may cause an error if you are using the onboard card, and output the image using the HDMI port)
And add the following boot parameters:
- -v: Please add this parameter to display the entire boot process, in some cases it can help you diagnose the error more easily).
- slide = 0: Please add this parameter to avoid driver error OSXAptioFix3Drv during boot!
- debug = 0x100: This boot parameter will prevent macOS from restarting at an error. It makes error diagnosis easier.
- keepsyms = 1: This parameter combines with debug = 0x100, which prints out some characters when macOS fails. This is a parameter we will probably also need.
- -disablegfxfirmware: This parameter will help prevent macOS from checking our Intel HD Graphics card on 6th Generation Intel Core i (Skylake) CPUs and above.
If you are using a 5th generation Intel Core i or earlier (Broadwell) CPU, this boot parameter is not required.
=> After successfully editing the Boot item, go to the next item: Section Devices!
6.2. Section Devices
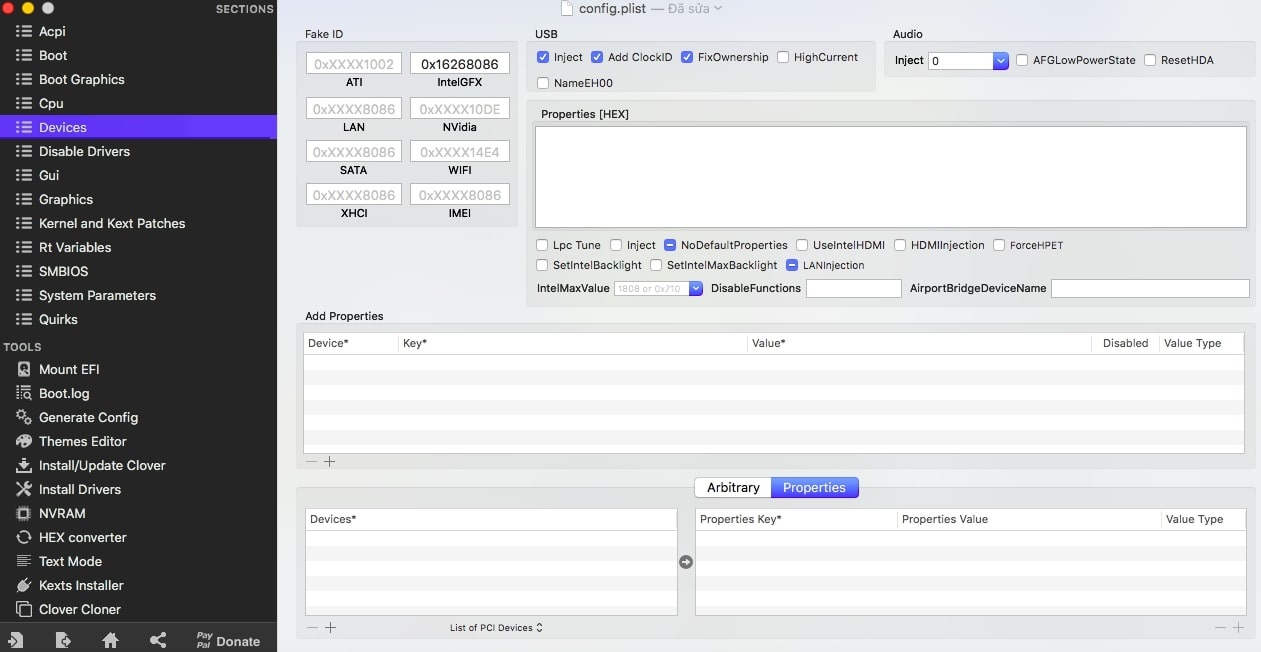
This is also an item that you should keep in mind. This is the section that will contain information about hardware devices (mainly about the GPU and sound). Here is the interface of this item, it looks a bit confusing :))

I will divide it into 3 parts for 3 different GPUs for your convenience.
# For those of you who are using Intel HD Graphics graphics card:
Note: The instructions below are for both Laptop and PC.
Please delete all the device information in the Add Properties section! (No editing is required in this section)

Next, you go down to Properties => and delete all available device information.

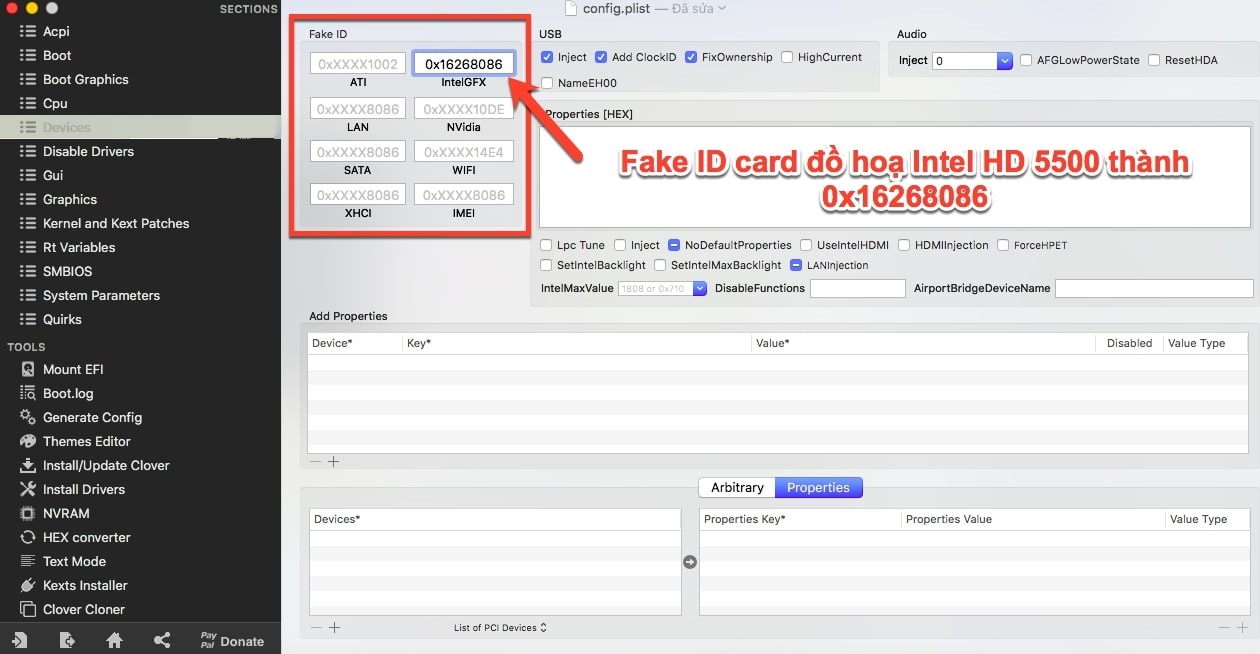
Note: For those of you who use Intel HD Graphics 5500 graphics card (like me), you need to FakeID IntelGFX to 0x16268086!
# For those of you who are using graphics cards from AMD
You won't need to edit anything, WhateverGreen and Lilu will do for you. Remember not to edit anything!
# For those of you who are using graphics cards from NVIDIA
Similar to AMD, you won't need to tweak anything. Only you need to install WebDriver and only install macOS High Sierra or lower.
=> After editing is complete, you will come to a very important item, which is the Graphics section.
6.3. Section Graphics
This is a very important item, so be very careful when handling it. It will contain information about the video card, as well as specify to Clover to receive information of the graphics card, .
And here is the interface of the Graphics section:

Note: For those of you who are using AMD or NVIDIA graphics cards, there is no need to edit anything in this section!
This part I will only guide for the graphics card Intel HD Graphics (iGPU) only.
+ Step 1: There will be quite a lot of items, for example Inject EDID, Inject ATI, ig-platform-id, . but you only need to care about Inject . (. is ATI, Intel, NVIDIA) and ig-platform -id only.
Check the Inject Intel box so that macOS can get the Intel HD Graphics graphics card information (required if you are using a graphics card from Intel)!
You also uncheck the box Inject NVIDIA and Inject ATI (because we do not use graphics cards from these two brands).
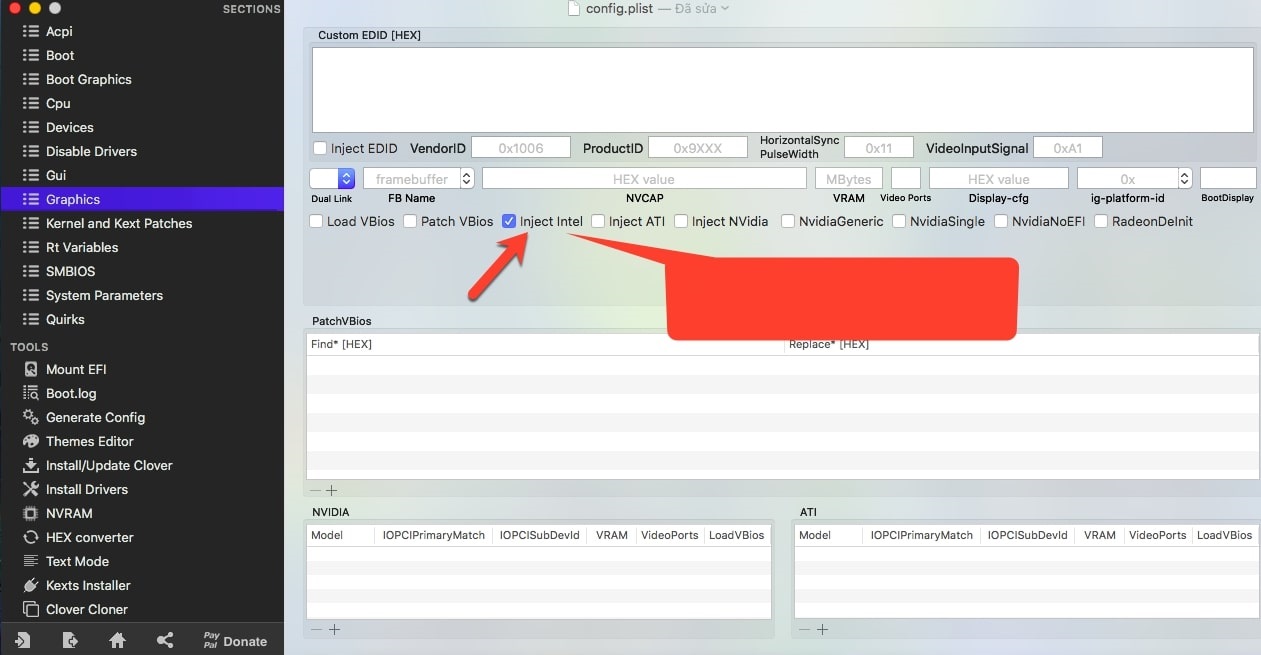
+ Step 2: Next, click the up and down button in the ig-platform-id to select the corresponding ig-platform-id for your device.
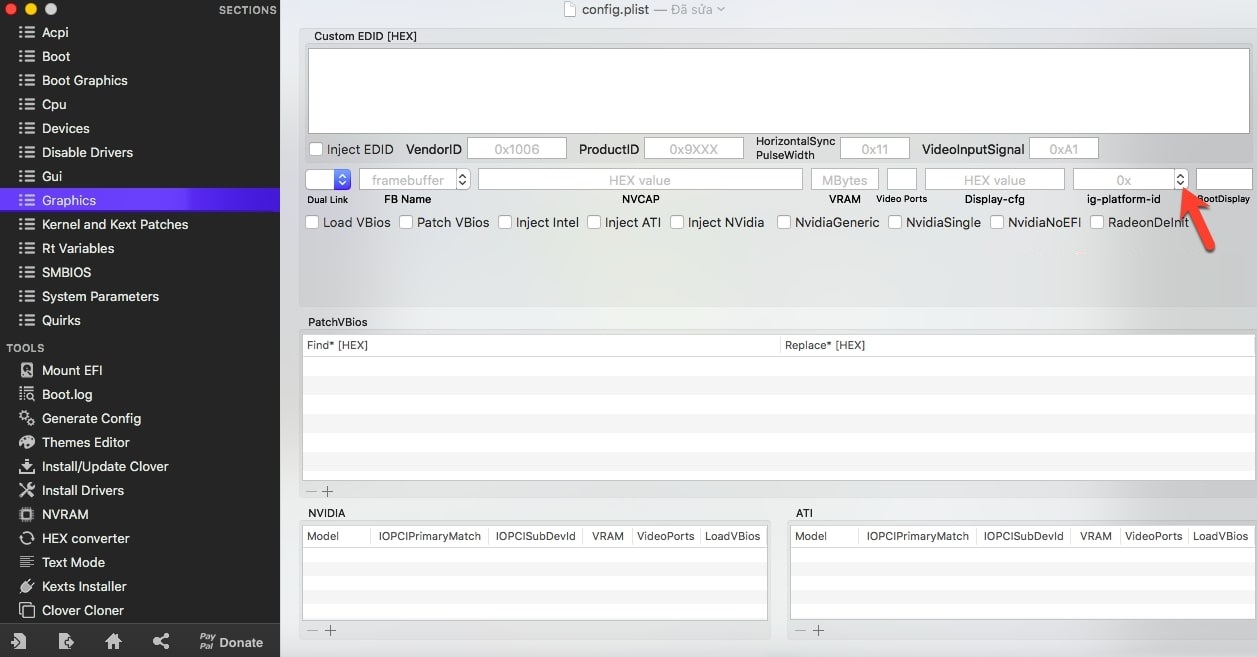
+ Step 3: When you press the button 'up and down', a menu of ig-platform-id will appear. Ig-platform-id will be divided into 2 categories, Desktop (for PC) and Mobile (for Laptop).
You need to determine what Intel HD Graphics graphics card you are using, to choose the correct ig-platform-id.
Here I am using Intel HD Graphics 5500 graphics card, so I will choose ig-platform-id 16260006 in ig-platform-id section for Broadwell CPU.
For other Intel graphics cards, you should do the same.

+ Step 4: After editing Intel Inject and ig-platform-id, now you will come to another important section, which is Kernel and Kext Patches.

6.4. Section Kernel and Kext Patches
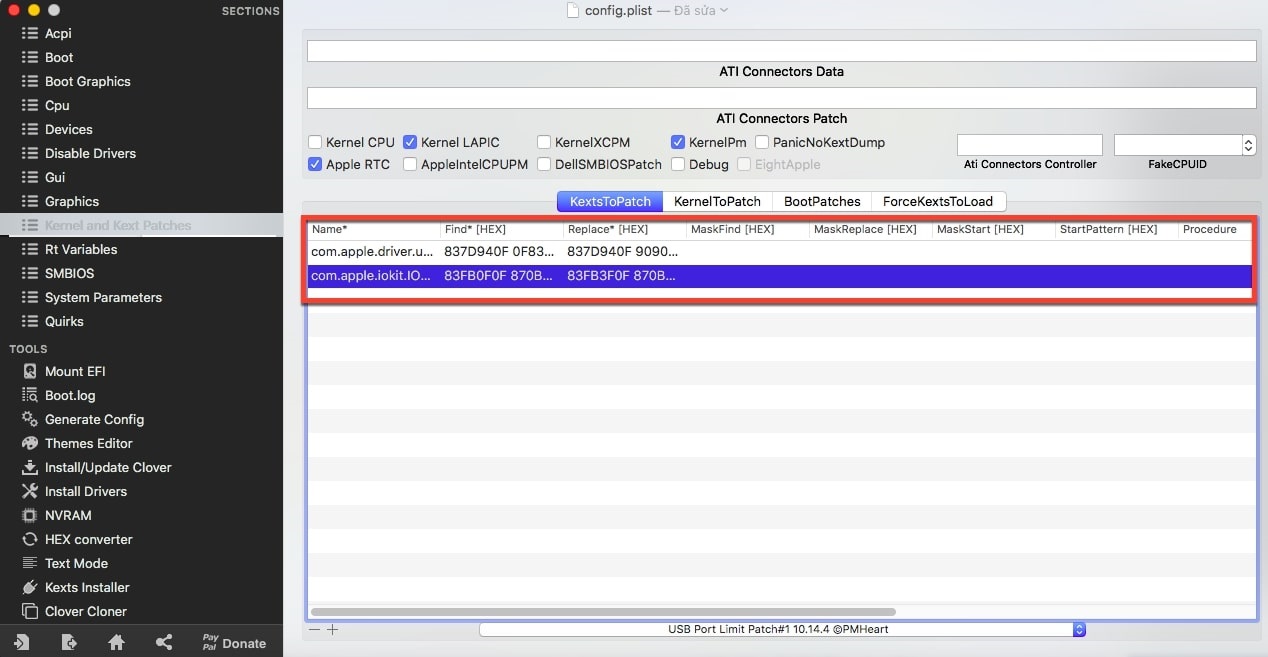
This section will help you patch some of your hardware more easily. This is the interface of the Kernel and Kext Patches entry:
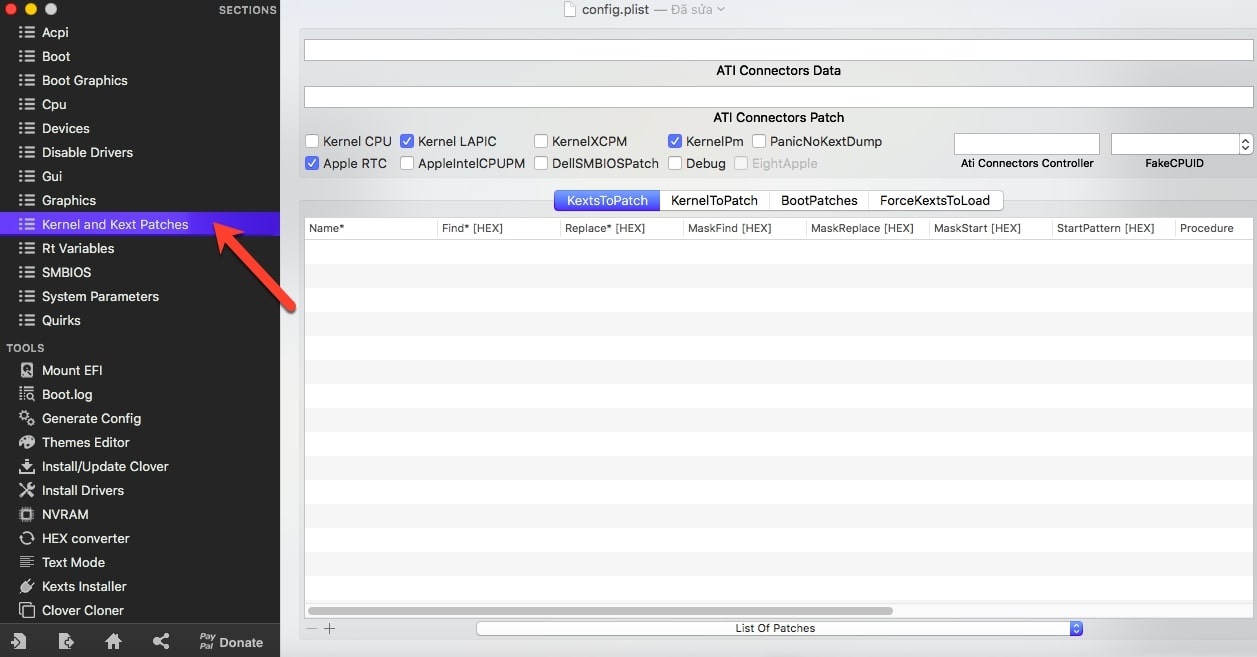
You will find the interface of this section quite cluttered. There are many items that you need to care about such as KextsToPatch, Kernel LAPIC, KernelPM,….
But you only need to care about KextsToPatch, List of Patches and FakeCPUID (for those who use Pentium / Celeron CPU) only.
You will click on the List of Patches item, and you will see a list of patches listed as shown below:
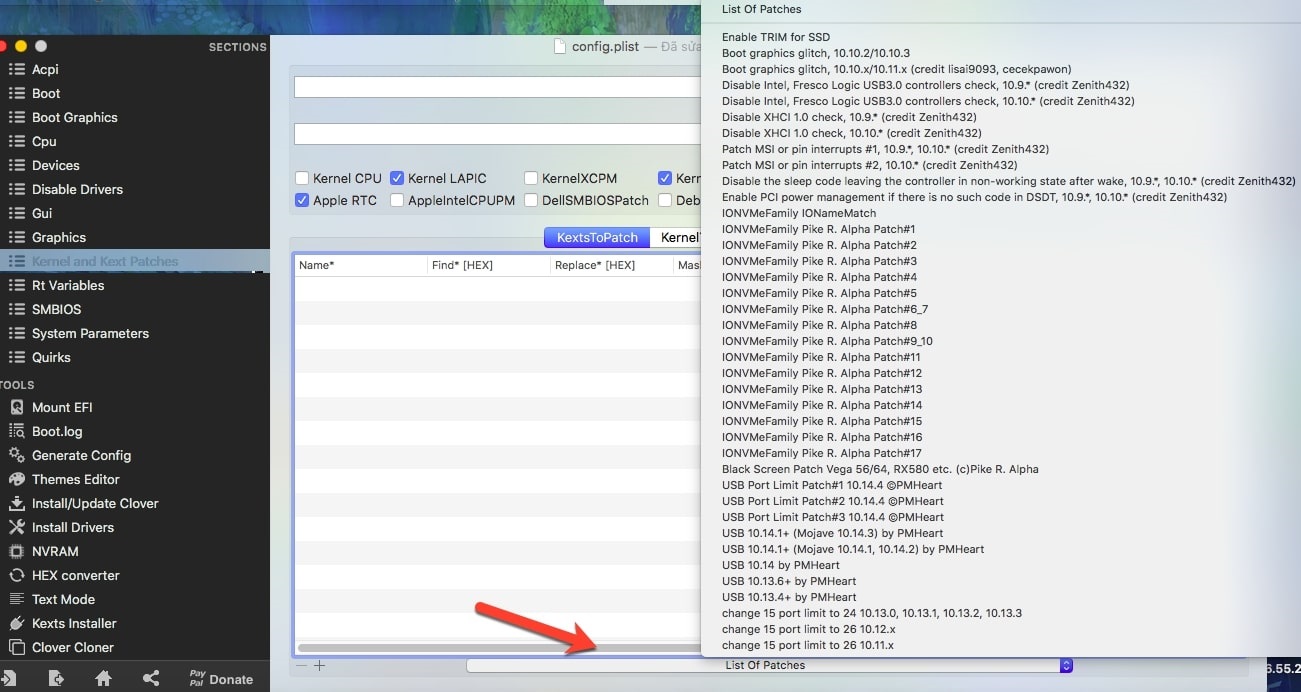
Choose the necessary patches, which are:
- USB 10.13.4+ by PMHeart (avoid booting into the installer but can't use the keyboard and mouse)
- USB Port Limit # 1 10.14.1 @PMHeart (help you avoid the error of the diagonal slash when booting into the installer, only if you have macOS from 10.14.1 or higher!)
- Black Screen Patch Vega 56/64, RX580 etc… (c) Pike R. Alpha (just if you are using AMD graphics cards such as RX580, RX570, Vega 64, . It will help you. Avoid getting black screen error when booting. Absolutely do not use if you are using Intel HD Graphics or NVIDIA graphics cards!)
Note: If you are using an Intel Pentium or Intel Celeron CPU, you need to fill in the box FakeCPUID 0x030630 to be able to boot into the installer!
Absolutely do not enter anything in this box if you are using CPUs Intel Core i or Intel Core M, Intel Xeon!

=> After you have chosen the patch, now you come to a fairly important part, which is SMBIOS.
6.5. Section SMBIOS
This is a pretty important part, but it's much simpler than the previous ones. It will help identify your Hackintosh.
If SMBIOS is not correctly set, your Hackintosh will not be able to log into iCloud, and operation will not be stable.

You will press the 'up and down' button to select SMBIOS!
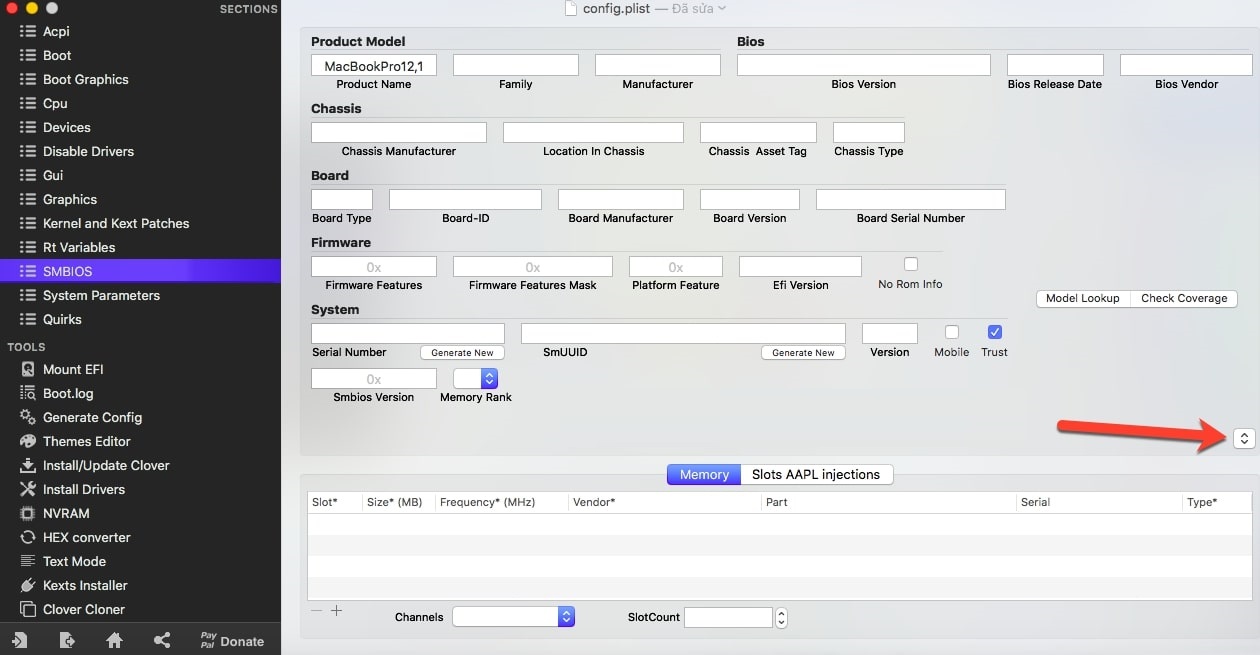
How to choose SMBIOS: Choose SMBIOS that is closest to your machine's configuration!
For example: If I have a laptop using an Intel Core i3-5005U CPU, then I would choose SMBIOS for a Real mac (a real Mac) with a nearly similar configuration, which is a MacBookPro 12.1 running on an Intel Core i5-5257U CPU.
For other machines, you should do the same!

After selecting SMBIOS, you can save the config.plist file by pressing Command + S on the keyboard. It is done.
III. Conclude
Yes, so I have just given a very detailed guide to you how to create a Hackintosh USB install so you can install macOS on Windows computers (PC and Laptop).
I firmly believe that after reading this article of more than 4000 words, you will be able to create your own Hackintosh installer so you can install it easily on your Windows computer.
In the next article, I will together with you use this USB to install macOS on our Windows computer!
Hope the article will be useful to you, wish you success!
 Should I turn off my Mac after each use?
 Instructions on how to check the configuration of a Macbook computer
 How to turn off quick app notifications on Mac
 How to test optimized application for Mac M1
 How to translate web pages on Safari on Mac
 Customize the Safari front page on Mac