Network settings for virtual machines
Register a network card
The first step in making sure a virtual machine can access the network is to register a network card for it. Ideally, your real machine should have enough network cards to install for each virtual machine, but this is not required. Virtual machines can share network cards together, and with real machines if needed.
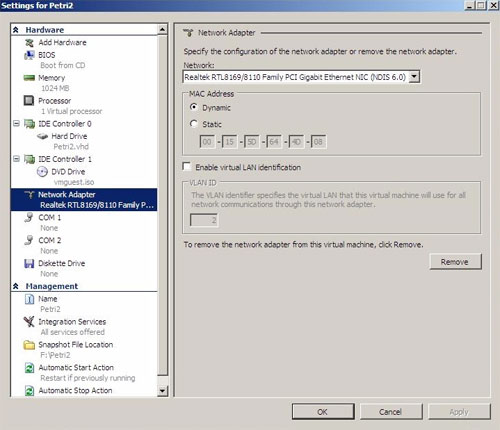
First, open Hyper-V Manager by selecting Hyper-V Manager from the Administrative Tools menu. When the application is opened, select the virtual machine you want to add the network card to, then click the Settings link in the Action pane. You will see a screen that allows you to change settings for the virtual machine.
Select the " Networkd Adapter " option, as shown in Figure A, and then register the network card for the virtual machine to use. And you can see in the picture, you also have the option to specify a MAC address and a virtual machine, click OK to close the dialog box.

Figure A: You must register a physical network adapter for the virtual server.
Install advanced services
In the previous beta version of Hyper-V, it was necessary to install advanced services. In the current beta, these services are automatically installed for virtual machines running Windows Server 2008 operating systems. You can hardly know which version of Hyper-V your operating system is using. Come on. Therefore, I recommend installing advanced services if necessary.
To do this, select Insert Integration Services Setup Disk from the Actions menu of the virtual machine. After that, start the virtual machine if it is not already running and open My Computer (on the virtual machine). Then go to D: SupportAMD64 and run Setup.exe . Windows will install advanced services or tell you that these services are installed.
Install the device driver
The last part of this process is to install drivers for the virtual machine's network card. You cannot use this driver for physical cards. You will have to use a driver specified on Integrated Services Setup Disk (this is actually an ISO file installed on your hard drive by Hyper-V).
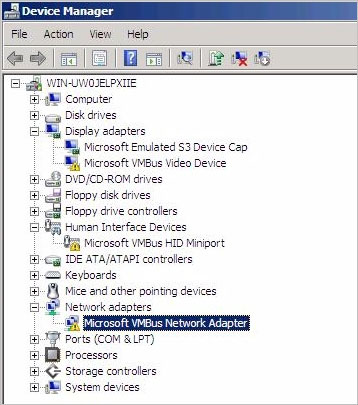
To install the network card, select Start , right-click My Computer and select Properties . When the System Properties dialog box appears, select Device manager . Look in Device Manager until you find the Microsoft VMBus Network Adapter in Network Adapters as shown below.

Right-click on the Network Adapter and select Update Driver Software . Then, Windows will display the Update Driver Software dialog box. Select the Browse My Computer for Driver Software button, followed by the Browse button. Then, navigate to D: supportamd64en-us , and select NEXT . Windows will proceed to install the driver. When the process finishes, select the Close button.
Conclude
In this article, I explained when you install a virtual machine on a system running Hyper-V, the virtual machine will not be able to access the network. Then explain how to register a network card. Also, how to use Integrated Services Setup Disk to install advanced services if needed and install the driver for the virtual network card.