Table of Contents
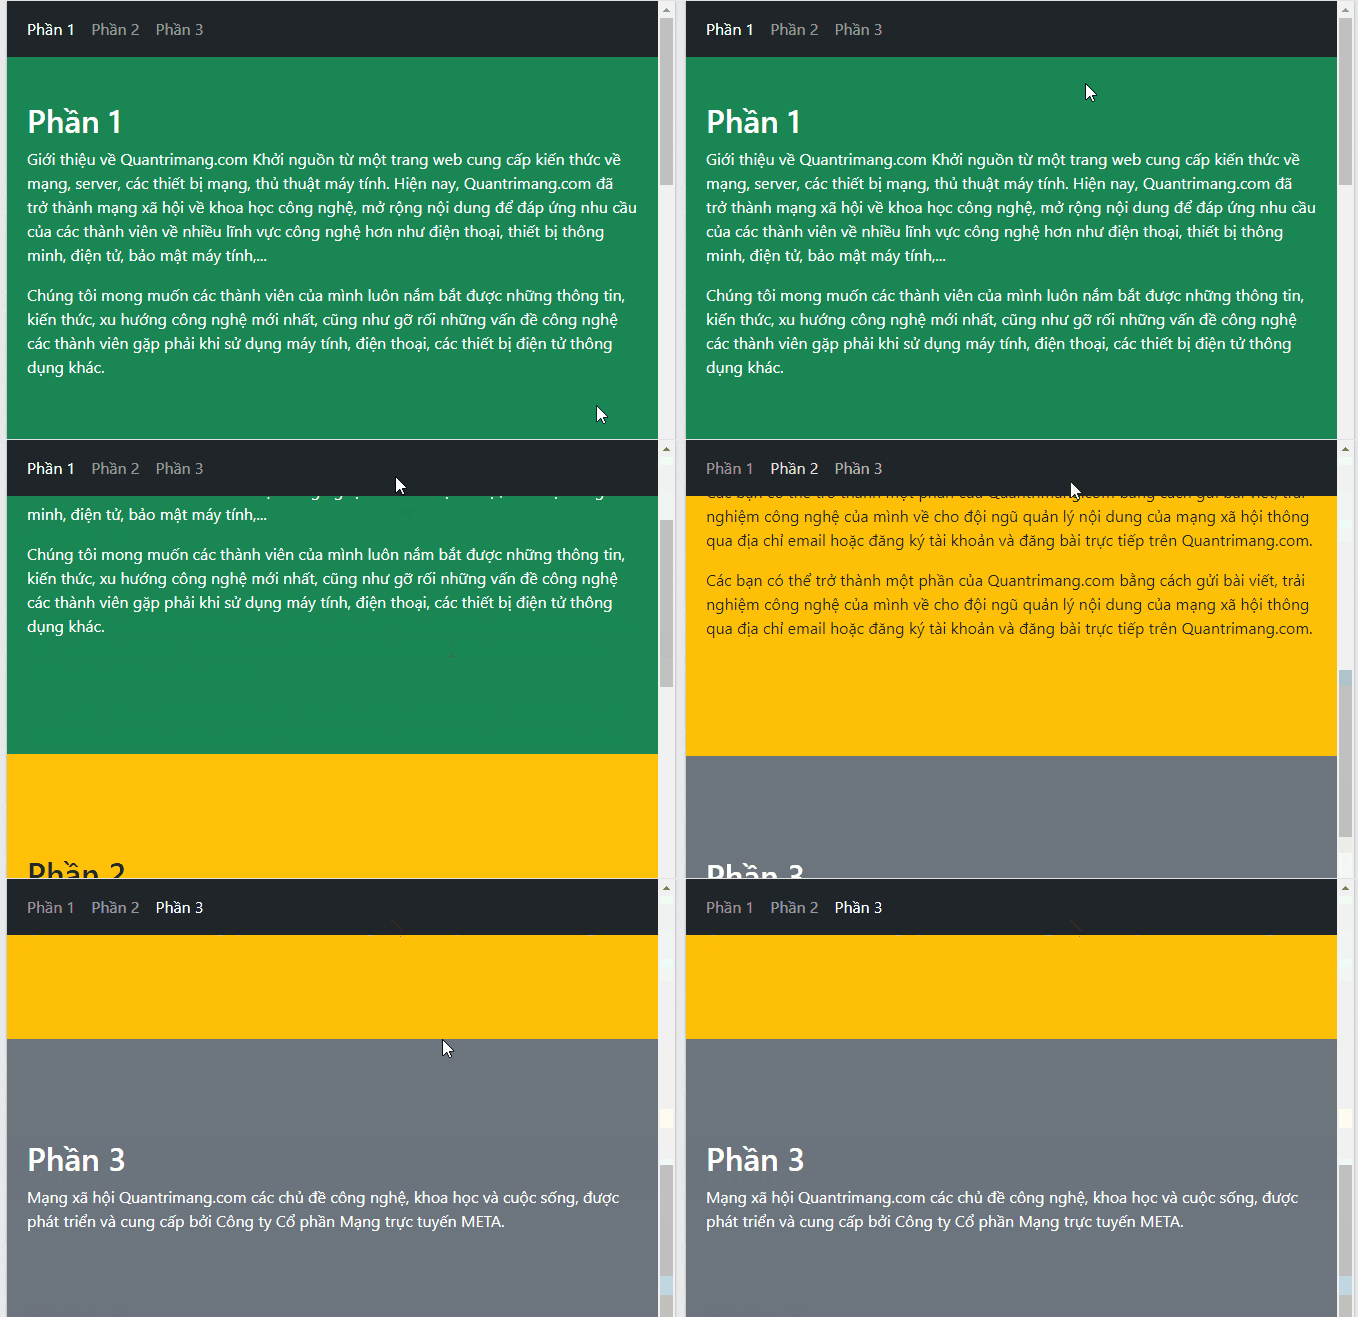
Bootstrap 5 Scrollspy automatically adds the active class to navigation links as their matching page sections enter the scrollable area. It is useful for documentation, long tutorials, product pages, and any layout where readers need to see their current position.
Scrollspy requires Bootstrap's JavaScript as well as its stylesheet. Load bootstrap.bundle.min.js, then connect a navigation element to either the page body or a separate scrollable container.
How Scrollspy works
A working setup has three parts:
- A group of anchor links, usually a Bootstrap nav or list group.
- Content sections with IDs that exactly match the links'
hrefvalues. - A scrollable element with
data-bs-spy="scroll"anddata-bs-targetpointing to the navigation.
When a target section becomes active, Bootstrap moves the active class to its associated link. A link such as href="#installation" therefore needs an element with id="installation".
Create Scrollspy in a scrollable container
The following complete example uses a compact navigation bar and a separate content area. The content area needs a fixed height and vertical overflow so that it can actually scroll. Because the container itself receives keyboard focus, it also includes tabindex="0".
<nav id="articleNav" class="navbar bg-body-tertiary px-3 mb-3">
  <a class="navbar-brand" href="#">Guide</a>
  <ul class="nav nav-pills">
    <li class="nav-item">
      <a class="nav-link" href="#overview">Overview</a>
    </li>
    <li class="nav-item">
      <a class="nav-link" href="#setup">Setup</a>
    </li>
    <li class="nav-item">
      <a class="nav-link" href="#usage">Usage</a>
    </li>
  </ul>
</nav>

<div class="scrollspy-content"
     data-bs-spy="scroll"
     data-bs-target="#articleNav"
     data-bs-smooth-scroll="true"
     tabindex="0">
  <section id="overview">
    <h2>Overview</h2>
    <p>Add enough useful content for this section to occupy space.</p>
  </section>

  <section id="setup">
    <h2>Setup</h2>
    <p>Explain the setup steps here.</p>
  </section>

  <section id="usage">
    <h2>Usage</h2>
    <p>Show readers how to use the feature.</p>
  </section>
</div>
.scrollspy-content {
position: relative;
height: 320px;
overflow-y: auto;
scroll-behavior: smooth;
}
The example uses the Bootstrap 5.3 data-bs-smooth-scroll option. The CSS scroll-behavior rule provides a similar visual effect and can be omitted if you do not want animated scrolling.
Use Scrollspy on the whole page
For page-level Scrollspy, put the data attributes on the body element and use a fixed or sticky navigation bar. The target still needs to be the navigation element's unique ID.
<body data-bs-spy="scroll"
      data-bs-target="#pageNav"
      data-bs-root-margin="0px 0px -40%">
  <nav id="pageNav" class="navbar fixed-top bg-body-tertiary">
    ...
  </nav>

  <main>
    <section id="intro">...</section>
    <section id="examples">...</section>
  </main>
</body>
Add enough top spacing to the main content so a fixed navbar does not cover the first heading. If the active state changes too early or too late, adjust data-bs-root-margin rather than relying on the older offset-based examples found in legacy Bootstrap tutorials.
Initialize Scrollspy with JavaScript
Data attributes are simplest for static pages. JavaScript initialization is useful when your interface creates or changes the scrollable area dynamically.
const scrollArea = document.querySelector('.scrollspy-content');

const scrollSpy = bootstrap.ScrollSpy.getOrCreateInstance(scrollArea, {
  target: '#articleNav',
  smoothScroll: true
});
If content sections or navigation links are added after initialization, refresh the instance so Bootstrap recalculates the available targets:
scrollSpy.refresh();Common Scrollspy problems
No link becomes active
Confirm that the Bootstrap JavaScript bundle is loaded, the value of data-bs-target matches the navigation ID, and each link points to an existing section. Hidden target elements are ignored.
The custom container does not scroll
Give the container a height or maximum height and set overflow-y: auto or overflow-y: scroll. Without a scrolling area, there is no position change for Scrollspy to monitor.
The wrong link is highlighted
Use unique IDs, avoid multiple sections occupying the same visible position, and adjust the root margin for fixed headers. Also make sure one large section has not wrapped several smaller target sections unintentionally.
Keyboard users cannot reach the content area
Add tabindex="0" when the custom scrollable container has no focusable control of its own. This lets keyboard users focus and scroll the region.
Practical implementation checklist
- Use one unique ID for the navigation.
- Match every link fragment to a real, visible section ID.
- Make a custom content area genuinely scrollable.
- Provide keyboard access to the scrollable region.
- Test active states at different viewport sizes and with the fixed header enabled.
- Call
refresh()after dynamically changing targets.
Scrollspy provides location awareness within a page; it does not open or hide content. For temporary overlays that block interaction with the page, compare Scrollspy with Bootstrap modals. If you are still choosing a toolkit, compare popular CSS frameworks or test the example in one of these free HTML editors. The current API and option reference is available in the official Bootstrap Scrollspy documentation.
Related Articles
 Lesson 42: Large Grid in Bootstrap 54 minutes read
 Lesson 38: Grid Systems from Stacked to Horizontal in Bootstrap 54 minutes read
 Lesson 30: Flexing in Bootstrap 59 minutes read
 Lesson 15: Pagination in Bootstrap 54 minutes read
 Lesson 4: Typography in Bootstrap 512 minutes read
 Lesson 29: Utilities in Bootstrap 59 minutes read
Reader Comments 0
Sign in with email or Google to join the discussion.